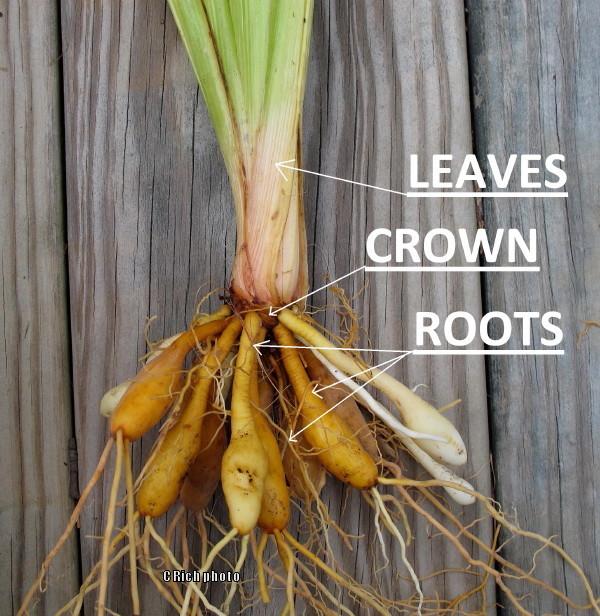
When to divide can be more difficult to determine than the physical how of dividing. A daylily multiplies by growing new individual fans, each containing roots, a crown, and leaves, which are identical to the parent fan.

These individual fans combine to form tightly growing clumps. A clump is defined and commonly referred to as having three or more fans. In the north, it can take several years for a single fan of an individual daylily to grow into a 10 - 20 fan clump, while in the south a single fan can multiply into 20, 30, or more fans in a single growing season.
Along with being affected by environmental differences that can vary from garden to garden, daylilies can also vary in their individual ability to produce new fans, further complicating the determination of when to divide. Instead of basing our decision to divide on the amount of time a daylily clump has remained in the same place, each daylily clump is better evaluated on the size, health, and performance of the clump. In large clumps, the fans compete for nutrients, and eventually the clump will show the effects with fewer scapes and fewer blooms. This is a sign that the clump needs dividing. Other reasons or times for dividing may include the decision to share fans of a favorite daylily or sell them and the decision to move a clump to a new area of the garden. One thing I always tell my garden visitors is that even if a very large clump is performing well, you may want to divide it before you need a backhoe to dig it out. A clump 2 to 2 1/2 feet around is much easier to handle than one that is 4 feet around.
Daylilies respond well to dividing when in their active growth stages. The active growth stages, when new leaves are forming, occur during early spring before bloom scapes begin to show and in the late summer/early fall after the blooming stage has been completed. Dividing in fall in the north should be scheduled to allow 6 - 8 weeks for the daylily to settle in before the ground freezes for winter.
Asking ten different daylily growers how to divide a daylily can leave you with ten different answers. What works for one person may not work for another. Over the years many different methods and tools have been used for dividing, including tools designed specifically for the task, screwdrivers for prying, or simply shovels and large knives for cutting a clump into pieces. The method shown below will allow you to separate a clump while preserving as much of the root system as possible. While daylilies are very forgiving of rough treatment, with a little bit of time and care your daylily will once again be growing happily in your garden.
The first step is to trim the leaves. This allows you to see the individual fans and reduces the amount of material you are handling. Trim the leaves down to between 8 and 12 inches from the top of the soil line. If you are dividing in the early spring and the daylily leaves are already short, you may not need to trim.

The second step is to remove the plant from the ground. A shovel or garden fork can be used. I prefer the garden fork for its ability to release the roots from the ground without cutting them. After loosening the soil around the clump, work the fork or shovel underneath the clump as deeply as you can from all sides and remove the clump from the ground. With the clump lying on its side, remove as much of your garden soil as possible from the roots.


When you have removed as much of the soil from the roots as possible, it is time to wash the clump. Using water to remove the remaining soil will release the roots, allowing them to separate. A strong spray with a garden hose to all sides, top, and bottom will remove the soil, and a quick clean up of the remaining portion of the leaves will remove any unwanted pests that may be lurking inside.


Working from the outside edge of the clump, find a section of two or three fans that have a natural separation or appear to want to separate from the clump. With your fingers, untangle as many of the roots as possible and then grasp the fans in one hand around the crown while holding the clump steady with the other hand. Twist and wiggle the fans until they separate from the clump. Continue removing sections of fans until you have separated the entire clump.


Larger divisions can be further separated down to the size or number of fans you want. In general, two or three fans still joined together will give a more pleasing appearance than a single fan.

If your clump has a larger section of fans or just refuses to separate, cut the top between two fans through the crown with a small knife. Then continue separating the roots with your fingers and wiggling the sections apart.


Once you have the clump separated into sections, it is time to replant. Dig a hole larger around and deeper than the roots. In the middle of the hole, build a mound of soil that will place the crown of your daylily 1/2 inch to 1 inch below the level of the surrounding soil. Place the daylily on top of the mound, letting the roots drape down the sides to the bottom of the hole.

If replanting in a display area or if you want a fuller plant with the appearance of a larger clump, you can plant several of your new divisions in the same hole, leaving a space between them.

Steady the daylily on top of the soil mound and slowly backfill the hole, being careful not to pull the daylily deeper into the soil as you fill. Gently and lightly press the soil with your hand over the area where the roots are, just a bit to firm it and then water the plant to settle the soil deeper down between the roots.


Newly divided daylilies may not bloom at their registered height until they reestablish their root systems. Once reestablished, your daylily will return to its full blooming potential.
| Thread Title | Last Reply | Replies |
|---|---|---|
| Untitled by canadanna | Jul 5, 2016 9:26 AM | 6 |
| Excellent! by Newyorkrita | Jan 20, 2015 5:58 PM | 8 |
| Untitled by rmpeters | Nov 12, 2013 7:31 PM | 4 |