
Although orchids are relatively pest-free plants, an invasion of some bug or disease will inevitably be something you will have to deal with. Insect and disease problems can be greatly reduced by good plant sanitation. Fortunately, there aren't many pests to contend with and they are not that difficult to identify.
Prevention...Prevention...Prevention---It is the best answer!
Here are some steps to take to prevent pest problems from getting out of hand.
Make a practice of regularly inspecting the tips of new growth and the undersides of the leaves. This is where most bugs hang out.
Provide the best growing conditions possible. When orchids are under stress they are more susceptible to disease and insect infestations.
When re-potting always use new or cleaned and sterilized pots.
Buy plants that are clean and healthy. Beware of the "bargain" or left over plants; many have serious problems. Unless they are in excellent condition, stay away from them.
Don't allow weeds to infest your pots of orchids; they can harbor insects.
Keep the floor or ground in your growing area free of weeds, or dead leaves and flowers.
Always isolate new orchids from your other plants for four to six weeks. During this time, inspect them for any signs or insects.
To prevent spread of disease sterilize your cutting tools. These are the two methods that I use. For chemical sterilization, I dilute household bleach to one part bleach to nine parts water and soak your tools in them for a few minutes before you use them. Most chemicals that are used to sterilize tools, like bleach, are highly corrosive, so after you have used these tools be sure to thoroughly rinse them with clean water or their metal will quickly rust.
Heat is another very fast and clean way to sterilize tools. You can use a compact propane torch for this, but I have found the most convenient way is to use a small butane hand torch, like the ones sold to make the crust on crème brulee. With these torches you merely flame the tool on the cutting edges until they get red. Let the tool cool and it is ready to use.
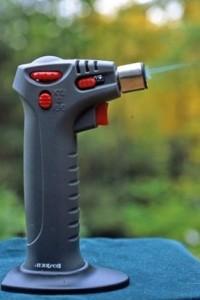
I used to have to fight my wife for this gadget so I got another one for myself!
If you have tried the preventative and curative measures outlined and your orchid does not seem to be recovering, it is sometimes best to discard it. Once a plant becomes too weakened by infection or a bad infestation of insects, it is not likely to recover and in the process of your hoping for this to happen, it can serve as a carrier of its problem to your other healthy orchids.
The most important aspect of pest control is vigilance. Even though most insects do reproduce faster than rabbits, infestations do not occur overnight, but insect populations can get out of hand quickly if you don't make a point of closely inspecting your orchids regularly. Keep on the lookout, because if you can detect the pests when they are in small numbers it is much easier to eradicate them. Many of the pests described, like mites and thrips, are very tiny and are difficult to see with the naked eye. Buy yourself a 10x hand lens at a camera or stamp shop. It will make the task much easier.
When pests are first sighted they need to be promptly and properly identified so the most effective control can be applied.
In many cases, especially if there are many pests present, you will have to apply control measures repeatedly, every 7 to 10 days for at least three times. This is because these creatures have laid eggs that are resistant to the control measure and so hatch out later. By repeating the control several times you will kill these next generations of pests after they emerge from their eggs.
Aphids are probably the most ubiquitous insect pests of them all. They come in all colors—including green, red, pink, black, and yellow---and are usually found on the new, succulent growth including the flower buds. They feed with syringe-like mouthparts and are particularly damaging to buds by causing them to be deformed when they open. Aphids are also very effective carriers of disease, especially viruses and are frequently found in clusters on the flower buds. If you see clear sticky droplets anywhere on your plant look out for aphids. This is material, euphemistically called "honey dew", is actually aphid excrement.
APHIDS

SCALE
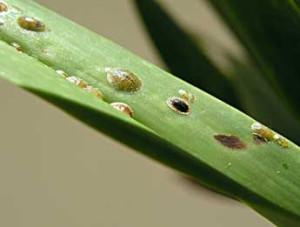
Scale is another real pest.
It comes in various forms, but most have a shell, which serves as a type of armor for the soft insect body that is protected by it. This shell must be penetrated by a chemical or by rubbing it off before you can kill the insect. They are frequently found on the undersides of the leaves near the middle vein of the leaf or on the edges of the leaf and are also commonly hangout on the flower stems. This is a very difficult insect to totally eradicate, but with persistence can effectively be controlled.
MEALYBUGS
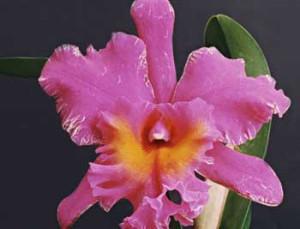
Mealy bugs seek out hiding places in crevices of leaves, buds and flowers.
See that white mass on the top right petal and column. Those are the dreaded mealbugs.
The name of this creature, mealy bug, pretty much describes what this insect looks like—mealy or cottony masses. They frequently hide out in the crevices of leaves, stems and bud sheaths. One type is also found on the roots. This is a bothersome pest with a waxy body that makes controls less effective. As a result multiple insecticide treatments are usually necessary to get rid of it.
THRIPS
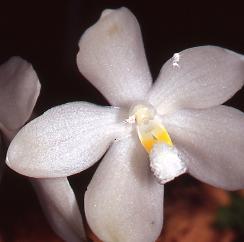
Thrips can be very destructive, especially to flower buds, maturing flowers, and young leaves. They are minuscule creatures that look something like long gnats and are very difficult to see with the naked eye so are best searched for with a magnifying glass. Their damage is easier to detect. It shows up as light streaks on the flowers or stippling on the leaves. The flower buds are also usually deformed.
Notice the stippling mostly on the edges of the the flower petals, sepals and lip.

These are what thrips look like. These are tiny buggers that and you usually need a 10x magnifier to see them well.
SPIDER MITES
Spider mites are not literally insects, but are spiders, and are often found when growing conditions are hot and dry. They can be green or red, but in any color are very difficult to see because they are so small. In extreme infestations you will see fine webbing on the leaves. Before the infestation gets this bad the foliage will take on a stippling effect, which is a result of their feeding.

This is an extremely bad case of a spider mite infestation. Hopefully you will spot the problem before it gets to this stage.

Stippling of the orchid foliage, especially on the bottom of the leaves is another indicator of a spider mite infestation.

This is the common two-spotted mite. You can only see well the actual creature with a 10x magnifier.
The next article will deal with other pest and diseases. Don't be discouraged. We are just showing you the worse-case scenarios. Keep your operation clean and you will see few of these problems.