

 With the planning and soil preparation taken care of, you're ready to decide whether to plant in raised beds or trenches, and whether to use wide or single rows.
The simplest raised beds are nothing more than well-worked garden soil raked into a mound. They're easy to make, even in the smallest garden, and they enhance vegetable growth.
Raised beds work because they make an ideal growing environment. Here's how:
The soil in a raised bed has room on the sides to give with little or no resistance as the roots grow, even if it's hard-packed or wet. Roots develop easily, which makes them healthy, well-formed and better tasting.
You can plant much earlier in the spring on raised beds because the soil warms up and dries out in the bed before it does in the rest of the garden. If you make some raised beds in the fall, you can plant on them very early the next spring. This way, you may be harvesting baby beets and carrots almost before your neighbors have planted a single seed.
If your garden stays waterlogged for a long time after each rain, raised beds solve that problem. On level beds, standing water cuts off the oxygen supply to the roots, and the weight of the water packs the soil so tightly it stifles root growth. On raised beds, water runs off and into the walkways in between. The soil in the bed dries out quicker, and the water seeps gradually back into the soil from the sides.
The added height makes the soil deep and loose, so you can grow longer carrots and parsnips than is possible on a level bed. In making raised beds, you place some of the valuable topsoil from the walkways onto them. This increases the total amount of topsoil on the seedbed.
Wide-row growing makes sense on raised beds to make the most efficient use of all that growing space. If you're going to do the work making them, you might as well make it worthwhile by getting as much food from them as you can.
Raised beds are convenient and attractive. Your crops are 10 to 12 inches closer to your hands, saving you some bending and kneeling. It's easier to keep children and pets from walking on the garden soil and packing it down or stepping on plants, because they can easily tell the walkways from the seedbeds.
Last, but not least, raised beds give your whole garden a neat, well-tended look that is very pleasing to the eye.
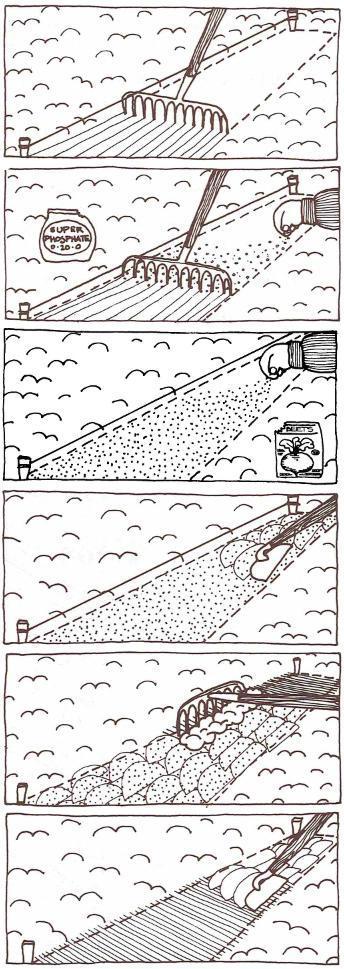
Raised beds are as easy as one-two-three! Once you have the soil well-tilled or spaded to a depth of six to eight inches, you can probably make a raised bed in less time than it takes to read this page. Here's how:
Determine the width and length of the bed and the walkways, using stakes for guidelines. The dimensions will depend on whether you plant in wide or narrow rows.
Use a hoe to pull the loosely tilled soil from the walkways up onto the bed until it's four to eight inches higher than the walkway.
Rake the top of the bed smooth, leveling the surface as you go. You're all set to plant.
You fertilize, plant, thin and harvest in the same ways on raised beds as on level ground. You can add fertilizer to the whole plot before you make the beds -- the fertilized soil will end up on the beds anyway. You can also mulch between the beds to prevent weeds and keep the soil moist.
There's no need to brace the sides of beds six to 10 inches high unless you have the materials handy. For taller beds, railroad ties or planks give a neater appearance.
Raised beds work in almost every kind of soil, in just about any part of the country and with all of your garden vegetables. They dry out faster than normal beds, however, so raised beds aren't recommended for very dry areas or sandy soils.
You don't have to turn your whole garden into raised beds, but try growing a few root crops on some this year and you'll be convinced -- raised beds make sense!
 Wide-Row Planting
Once you've prepared the soil, follow these easy steps for wide-row planting:
Mark the row by stretching a string close to the ground between two stakes spaced the length you want. You only need one string for a straight line -- the width of your rake will determine the width of the row. Garden rakes are usually 14 to 16 inches wide.
Hold one edge of an iron garden rake next to the string and drag the rake down the length of the row. This marks off the area where you'll broadcast the seeds.
Rake just the seedbed a few times to remove lumps and stones and get it really smooth and level before you plant. There's no need to rake your whole garden. Don't walk on the seedbed once it's prepared or you'll pack it down again. A smooth, clod-free, loose seedbed is one of the most important elements for gardening success.
Add extra bonemeal, rock phosphate or superphosphate now, raking it into the top inch of soil.
Sprinkle the seeds onto the planting area, trying to broadcast them thinly and evenly. Root crop seeds are small, and you'll have to develop your own system to keep from sowing them too thickly. Beet seeds are larger than the others, and they're easier to control. But once you get the hang of it, the rest are no trouble, either.
You'll be thinning the row when the seedlings first come up, so don't worry if a few extra seeds slip out of your fingers as you go. In fact, more seeds will ensure not having any skips or bare spots within the row.
Lightly sprinkle radish seeds in with your main crop. Use about five percent as much radish seed as the other vegetable.
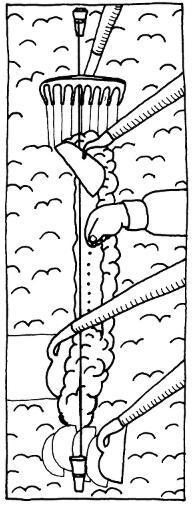
Firm all the seeds into the soil with the back of a hoe. This anchors the seeds and gives them good contact with the soil, helping them germinate.
Cover the seeds with 1/4 to 1/2 inch of soil pulled from the side of the row with a rake, leveling the top of the seedbed as you go. The rule for all seeds is to cover them with fine, moist soil to a depth four times their diameter. These small seeds don't need much soil over them. Only cover them more (with an extra 1/4 inch of soil) in midsummer plantings, when the weather is hot and dry.
Gently firm the soil again with the back of a hoe.
Single-Row PlantingStake out a single row just as you would a wide row, stretching a string along the ground between two stakes to mark off the length of the row.
Rake the seedbed smooth right over the string, then mark your planting line by making a furrow beside the string. Do this with the corner of a hoe or the end of a rake handle, or by laying the hoe or rake handle beside the string and pressing it lightly into the soil.
Sprinkle the seeds thinly along the planting line, then sow radish seeds in the same line (again about five percent). Firm the seeds into the soil, cover with 1/4 to 1/2 inch of soil, and firm again.
Whether you plant in wide rows, single rows or multiple rows, you should keep the soil around the seeds moist for the first week after you plant. Root crops won't germinate well in a dry seedbed. If the soil is dry, give the rows a light sprinkling of water right after planting. Because the soil is drier in the late summer, try this trick when planting for fall: Soak the seeds for an hour or so before planting to give them a head start on germination. Place them on a saucer or plate, barely cover them with room-temperature water, wait awhile, then plant. Once you've soaked the seeds you must plant them, because you've started the germination process. The wet seeds are a little harder to plant, but the results are worth it.
Keep an eye on the soil the first few days. If it rains, check it for a hard crusting when it dries. If the seedlings have to struggle through a crust, they'll suffer. Make it easy for them by carefully scratching the top 1/4 inch of soil in the row with an iron rake, a weeding tool or a piece of wire (a coat hanger works well).
 Tips on Sowing Root Crop Seeds
The easiest way to sow root crop seeds is to sprinkle them by hand, keeping your hand two to three feet above the row. This scatters the seeds more evenly than if your hand is down very close to the row. (If it's a very windy day, of course, move a little closer!) Mix some fine soil or sand with the seeds to help even out the distribution.
You can also broadcast the seeds, mixed with dry sand, from a salt shaker if the holes are big enough, or right from the packet by tearing a tiny hole in one corner for them to slip through.
 Victory Seed Company has all the seeds you want for your best garden in 2024.
For 25 years, the family-owned Victory Seed Company has provided the highest quality vegetable, herb and flower seeds to families across the country. We are passionate about providing you the best seeds available that give excellent germination, robust plants, and the harvest you want. With a catalog of over a thousand varieties, we have everything, and our prices are the kinds that we'd want to pay. We have hundreds of yesterday's heirloom vegetables, as well as today's award winning hybrid selections. Get to know us by visiting our website and browsing through our online vegetable seed catalog.
| 1. Planting Root Crops ← you're on this article right now |
| 2. Trench Planting Root Crops |
| 3. Combining Root Crops |
| 4. Soil Preparation for Root Crops |
| 1. Planting Root Crops ← you're on this article right now |
| 2. Trench Planting Root Crops |
| 3. Combining Root Crops |
| 4. Soil Preparation for Root Crops |