Post a reply

Avatar for jones1104
May 31, 2015 8:40 PM CST
Thread OP
Name: Ben
Fremont Ohio
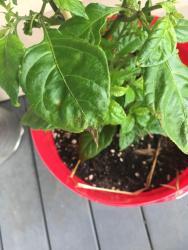
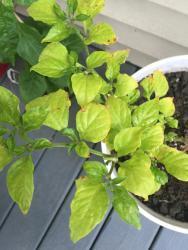
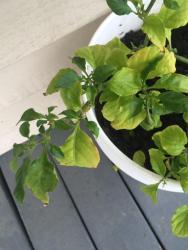
I've got ghost, Trinidad scorpion and carolina reaper plants that all seem to be suffering the same problems. The ghosts are dropping yellow leaves, but the new growth is fairly dark green. The Trinidad scorpions leaves are turning brown and drying out starting at the tips. And my carolina reapers are doing the same thing as my scorpions.
I'm container gardening all of these plants, and they are individually planted in 5 gallon buckets. My soil is a mixture of potting soil, cow manure and sand all mixed together in fairly equal amounts. The manure is store bought so it was 100% ready to be used. I did spray the ghosts with 1:1 water and rubbing alcohol because I think they have spider mites.
I will update posts with photos in a day or so, but it's wet, cold and miserable here in Ohio today. Any help would be appreciated
Image
May 31, 2015 9:49 PM CST
Name: Sandy B.
Ford River Twp, Michigan UP (Zone 4b)
(Zone 4b-maybe 5a)
Charter ATP Member Bee Lover Butterflies Birds I was one of the first 300 contributors to the plant database! Million Pollinator Garden Challenge
Seed Starter Vegetable Grower Greenhouse Region: United States of America Region: Michigan Enjoys or suffers cold winters
@jones1104 -- Ben, welcome to All Things Plants.

Do your buckets have good drainage? Was the cow manure in your mixture "aged" ?

I never have very good luck growing veggies in containers, but of course many people do... I hope someone else will have some good suggestions for you!

You might also be interested in this thread about super-hot peppers: The thread "Extra Hot peppers" in Vegetables and Fruit forum
“Think occasionally of the suffering of which you spare yourself the sight." ~ Albert Schweitzer
C/F temp conversion
Image
May 31, 2015 9:58 PM CST
Name: Elaine
Sarasota, Fl
The one constant in life is change
Amaryllis Tropicals Multi-Region Gardener Orchids Master Gardener: Florida Irises
Herbs Region: Florida Vegetable Grower Daylilies Birds Cat Lover
A mild soapy water solution, 1/2tsp. dish soap to a quart of water, would be just as effective and less harmful for your spider mites, Ben. Soap is the preferred treatment for most sucking insect problems on edible plants. You do need to treat every few days for a week or two, to get all the generations though, since the soap rinses off if it rains. Be sure to get all the leaf surfaces with the spray.

The dropping of yellowed leaves is certainly a sign of spider mites, and if the new growth looks good, you may have a handle on that, but use the milder remedy in future. Rubbing alcohol is used as a spot treatment on a Q-tip for mealybugs, but I would never spray it on a plant, even diluted.

A picture or pictures will be really helpful to diagnose the brown leaf problem, but off the top of my head, it might be nitrogen burn from the manure you used in your potting mix. Sometimes it releases too fast, or in fact all at once, and can give young plants too much to handle. That's the usual thing that causes brown leaf tips. It's a risk using manure in containers because you really don't know how much/how fast your plants are going to get the goodies. Better to use a controlled release pelleted fertilizer, or a soluble fert, at regular intervals in containers to prevent any chance of burning leaves, or later on, starving your plants because all the soluble nutrients were used up early by the plant.
Elaine

"Success is stumbling from failure to failure with no loss of enthusiasm." –Winston Churchill
Avatar for jones1104
Jun 1, 2015 8:19 AM CST
Thread OP
Name: Ben
Fremont Ohio
Thumb of 2015-06-01/jones1104/d61fd1
Thumb of 2015-06-01/jones1104/9164c4
Thumb of 2015-06-01/jones1104/29df3b

The photo with the dark green leaves is the reaper plant. The other two are the ghost chills. The scorpion looks like the ghosts, so I didn't include a picture of it.
As far as drainage goes, I drilled a dozen 1" holes in the bottoms of each of the buckets, lined the bottom with landscape fabric and filled each with about 2 inches of sand before adding my planting medium mentioned before. I had little, light brown ants that I got rid of by replacing the dirt in the affected ghost peppers. I was sure to keep the ant infested plants far from the other plants until I had eradicated the pest problem before I put them next to any other plants
Image
Jun 1, 2015 10:11 AM CST
Name: Elaine
Sarasota, Fl
The one constant in life is change
Amaryllis Tropicals Multi-Region Gardener Orchids Master Gardener: Florida Irises
Herbs Region: Florida Vegetable Grower Daylilies Birds Cat Lover
Your drainage sounds like a good beginning, but does water flood out the bottom of the buckets? The landscape fabric might be getting clogged up, and slowing things down. Watch for that. I buy bridal veil netting at the fabric store for use in the bottom of my pots. It's cheap, lasts well and the holes are big enough not to get clogged.

After seeing your pictures, I'm going to stick with my guess from above - I think you have an inconsistent nutrient problem with those plants. It may be that you got more manure in one pot than another, it was unevenly mixed, that the plants didn't reach the manure until they put down some deeper roots, or that the manure released inconsistently. Your soil mix also may be lacking other components needed by the plant.

I'd advise you to use some good quality controlled-release balanced fertilizer (N P K numbers about the same plus micronutrients) that is rated for use on edibles. Apply it sparingly at first, as these are young-ish plants and let's see what that does. I use Osmocote, and have had great results with it. For a quick green-up you could give them some soluble fert first.

Btw, ants don't harm your plants if they are just in the soil. If they are on the plant, they might be 'farming' something like aphids - they eat the honeydew excreted by the aphids. But in general, ants don't harm plants. I don't see any sign of aphids, and the yellowish leaves aren't really mottled like they would be for spider mites so . . . again look at nutrient deficiency.

My three tried and true pest and disease controls that I use on my edibles are the soapy water spray I mentioned in my first post, a baking soda and water spray for fungal prevention (a biggie here in FL) and Bt which is a caterpillar remedy. (I haven't had any caterpillar problems on peppers though). Anything else you're tempted to try, please read all the literature on it first, because a lot of things are not rated for use on plants with edible crops - for good reason!
Elaine

"Success is stumbling from failure to failure with no loss of enthusiasm." –Winston Churchill
Avatar for jones1104
Jun 1, 2015 10:13 PM CST
Thread OP
Name: Ben
Fremont Ohio
If it is nitrogen burn, how do I treat it? Should I leach the soil with heavy watering for a few days? Should I replace the dirt in the buckets? I read on pepperjoe.com to use manure in my buckets. I bought seeds from him so I figured he knew what he was talking about. The manure I used was labeled as 100% ready to use.
I'm also curious about the growth of new, small leaves at the bottom of the plant. These are commonly called "suckers", aren't they? Should I leave them alone, or trim the back? I want my pepper plants to be more tree than bush. Doesn't having leaves so close to the dirt invite disease from the splashing dirt?
I had nearly 30 bids on one plant 2 weeks ago, but 20 of them fell off before they opened. Is it common to drop so many buds before the blossom, or is this a sign of something else?
I appreciate the help and advice 😀👍
Last edited by jones1104 Jun 1, 2015 11:04 PM Icon for preview
Image
Jun 2, 2015 12:01 PM CST
Name: Elaine
Sarasota, Fl
The one constant in life is change
Amaryllis Tropicals Multi-Region Gardener Orchids Master Gardener: Florida Irises
Herbs Region: Florida Vegetable Grower Daylilies Birds Cat Lover
Ben, I'd watch to see if the fertilizer burn continues or if it is already done. If it continues, yes a good flush with clear water would be a good idea before you add more fertilizer. I wouldn't try to change out the soil completely at this stage. It will do the root systems of your plants too much damage.

On the little suckers at the bottom, I think I'd leave them for now only because you've lost a bunch of leaves already and the plant needs leaves making food for recovery right now. Later you can take them off for the purpose of keeping your plants a nice shape. I never remove mine, though. I'm growing mine in Earth Boxes, so they have lots of room to bush out and sprawl.

Yes, it's common for pepper plants to drop some buds at first, especially if the plants are stressed. With mine, it usually takes quite a while for them to ramp up to setting lots of fruit. Often the plant sets one big pepper, and matures that one, then when I pick it the plant says "phew" and starts producing multiple new fruits.
Elaine

"Success is stumbling from failure to failure with no loss of enthusiasm." –Winston Churchill
Image
Jun 3, 2015 5:10 PM CST
Name: Rick Corey
Everett WA 98204 (Zone 8a)
Sunset Zone 5. Koppen Csb. Eco 2f
Frugal Gardener Garden Procrastinator I helped beta test the first seed swap Plant and/or Seed Trader Seed Starter Region: Pacific Northwest
Photo Contest Winner: 2014 Avid Green Pages Reviewer Garden Ideas: Master Level Garden Sages I was one of the first 300 contributors to the plant database! I helped plan and beta test the plant database.
>> My soil is a mixture of potting soil, cow manure and sand all mixed together in fairly equal amounts.

>> and filled each with about 2 inches of sand before adding my planting medium mentioned before.

Sometimes a sudden change in he texture of the planting medium breaks the wicking or "capillary connectedness" of the soil column. If so, a lot of water might be accumulating right at the boundary between your potting mix and the plain sand. If too much accumulates instead of draining, anaerobic soil and root rot follow quickly.

The question was a very good one: "does water come flooding out the bottom?" If a very dry pot gains a lot of weight after a heavy watering, you might not have good ENOUGH drainage. None of your three ingredient are necessarily coarse, like 1/10 inch grains or 1/8 inch grains.

Manure, even composted, is very fine and water-retaining. Most non-pro commercial potting mixes have a lot of fine peat, which is killer fine and killer water-retaining, and I don't mean "killer" in a GOOD way!

If that had been 1/3 very light and open, airy potting mix" plus 1/3 medium grit or crushed stone around 1/8", or very coarse Perlite great!

My belief is that tall 5 gallon buckets need even airier mix than smaller containers.
Image
Jun 3, 2015 5:23 PM CST
Name: Rick Corey
Everett WA 98204 (Zone 8a)
Sunset Zone 5. Koppen Csb. Eco 2f
Frugal Gardener Garden Procrastinator I helped beta test the first seed swap Plant and/or Seed Trader Seed Starter Region: Pacific Northwest
Photo Contest Winner: 2014 Avid Green Pages Reviewer Garden Ideas: Master Level Garden Sages I was one of the first 300 contributors to the plant database! I helped plan and beta test the plant database.
But what do I know about peppers in pots?

@cycadjungle

Tom, looking at the posts and photos, what would you try first?
Avatar for jones1104
Jun 3, 2015 10:07 PM CST
Thread OP
Name: Ben
Fremont Ohio
The sand I bought was labeled "pool filter" sand and was the most coarse I could find without driving all over creation comparing grain size. How can I fix the drainage issue without repotting my plants? There are 1" holes on the bottom for drainage; could I stir it through those?
Elaine, about the fertilizer. Mix it with water, or apply directly to the soil around the base of the plant and water thoroughly?
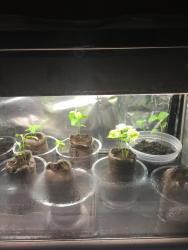
I've got seedlings that I think are ready to harden off. They have 2 and 3 sets of true leaves. My concern is that I'm going to kill them. They've been in a climate controlled environment wih 24 hours of light since they've sprouted and I don't want to ruin them. Any suggestions, other than the run of the mill answers on the web?
Thumb of 2015-06-04/jones1104/994add
Image
Jun 4, 2015 7:57 AM CST
Name: Elaine
Sarasota, Fl
The one constant in life is change
Amaryllis Tropicals Multi-Region Gardener Orchids Master Gardener: Florida Irises
Herbs Region: Florida Vegetable Grower Daylilies Birds Cat Lover
Depends which fert you use, Ben. If you go with a soluble fert, something like Fish Emulsion (phew!!) or as a last resort, Miracle Gro it should be just for a recovery dose. Use it about half strength and only once, then apply the pelleted time-release product and scratch it in to the top inch or so of the soil. That way you aren't having to fertilize with soluble stuff every week or two for the whole summer (but you can if you prefer).

The pelleted fert is sure to not cause any further burn problems though, as it takes a few weeks to ramp up to it's usual release rate, then increases release in warmer weather too, which is a nice feature. Just be sure you get something that says it's suitable for vegetables, and "lasts for 3 (or 4) months" on the label.

Yes, hardening off is a touchy process. You need to first separate the seedlings in the Jiffy pellets that have more than one plant. Get everybody into a 3in. pot of their own. They do fine if you are quick and careful. Then gradually acclimate them by moving the pots outside to a bright shady spot on warm days, and bringing them in at night for maybe a week. Temps below about 50 at night will be a shock that will set them back. Then - gradually again - put them somewhere they will get morning sun for an hour or two, and start leaving them out over night when the lows are warm enough. Beware of windy days that can dry out seedlings pretty fast.

When you pot up these babies to their final container, use a uniform mix or straight commercial potting soil. As Rick said, a transition from one type of medium to another can cause pooling. If you want to use more 5gal. buckets, you can lighten up the potting medium by adding Perlite and mixing it in well. The drainage holes can be smaller - mine are 1/4in. but there are lots, probably 20 in each.

As far as fixing drainage on the existing pots, if you can tip them sideways and maybe poke a skewer or something in there to aerate and mix the bottom layers a bit, that might help. Observe what happens when you do this - if water starts draining as soon as you poke some holes, you've found your problem!
Elaine

"Success is stumbling from failure to failure with no loss of enthusiasm." –Winston Churchill
Avatar for jones1104
Jun 4, 2015 11:28 AM CST
Thread OP
Name: Ben
Fremont Ohio
Well, I've found the problem just as you described, Elaine. I turned each of them on their side and poked them, and voilà! Water starting draining. Now what?
I've read that bone and blood meal are good fertilizers too, but should I wait until they are bigger to use it?
Image
Jun 4, 2015 12:07 PM CST
Name: Rick Corey
Everett WA 98204 (Zone 8a)
Sunset Zone 5. Koppen Csb. Eco 2f
Frugal Gardener Garden Procrastinator I helped beta test the first seed swap Plant and/or Seed Trader Seed Starter Region: Pacific Northwest
Photo Contest Winner: 2014 Avid Green Pages Reviewer Garden Ideas: Master Level Garden Sages I was one of the first 300 contributors to the plant database! I helped plan and beta test the plant database.
I know what you mean about finding sand that is coarse enough. Even if you find "extra coarse sand", that means that 10-20% of the bag is as coarse as you want, and the rest just clogs up the soil mix even worse.

Part of the problem is that "sand" only goes up to at most 2 mm grains. That's smaller than 1/10th inch. When grains are larger than 2 mm, it is "grit", not "sand".

We want fine or medium grit, not coarse sand.
Perlite is easier to find than screened grit unless you can find chicken grit ("#2" or "cherrystone" crushed granite). Something like double-screened crushed rock would be good, if it isn't too expensive or loaded down with dust, sand and fines.

Personally, I have a bark fetish. Pine bark, fir bark, balsam bark. Shredded and screened - I do my own screening with hardware cloth.

It's hard to find clean, dry bark mulch, especially at Home depot where "bark mulch" means logyard trash and dirt stored damp so it ferments. My Lowes has a clean, dry bagged product called fine bark nuggets, very cheap. But I have to screen it and then re-grind the chunks with an electric lawn mower.

It's easy to get any size bark shreds and chips that you want. I like them larger than the coarsest Perlite.


One trick that I've used on shallow pots is to set the pot (or tray) on top of an absorbent pad like a towel, Tee short, denim, or cotton flannel.

The pad has to TOUCH the soil mix or sand THROUGH the holes in the bottom of the pot.

If the sand layer doesn't break the wicking, that towel will pull the perched water out of the bottom of the pot. Then the rest of the excessive water will be pulled down to the bottom, and into the towel.

If you drape one end of the towel or pad over the edge of the shelf and then let it hang down 12", the excess water won't saturate the towel and stop flowing. Instead it will drip and evaporate until the only water left in the pot is capillary water (not perched water). In a water-retentive mix, that's plenty of water.

If the mix had been almost fast-draining enough, adding a wick might have made you water it more often.
Image
Jun 4, 2015 3:14 PM CST
Name: Elaine
Sarasota, Fl
The one constant in life is change
Amaryllis Tropicals Multi-Region Gardener Orchids Master Gardener: Florida Irises
Herbs Region: Florida Vegetable Grower Daylilies Birds Cat Lover
Yup, as Rick suggests, sitting them on an old towel folded up to make a thick pad will "wick" the excess moisture out of the bottom of the bucket. Or if you have rags, or old T-shirts, anything cotton works best.

After that, I'd set them up on something that will hold the bottom of the bucket off the ground a little so that air can get under there to the drain holes. You'll also be able to check in future that when you water, the water going in is also (mostly) draining out. Stones, brick pieces, chunks of wood, anything will do.

I'd wait on any more nutrient additions until we see how the plants recover. Once you've let the buckets dry out a bit - maybe don't water for a day or two - sparingly water in some 1/2 strength soluble fert and let's see if the pale leaves green up and the plants generally perk up within a few days. If they don't, the root rot caused by soggy soil may have you "flogging a dead horse" and it might be better to start over.

Rick's explanations are much more scientific but here's my simplistic version of soil science 101 - organic material is absolutely necessary to any growing medium. This is because the cellulose fibers that make up all current and former plant matter swell up like tiny sponges when they get wet and - this is the key !! - they shrink when they dry out, leaving air spaces in the soil. This allows the plant's roots to grow without rotting.

Compost is the gold standard of soil amendments because it is mostly decomposed plant material - tiny shreds of cellulose fibers that can work their way down into almost any soil and then do their expanding/contracting work to help incorporate air, as well as hold nutrients and water at a rate useable to the plant.

So, having straight sand down in the bottom of your buckets might sound like a great idea on the face of it, but without the little sponges between the little pieces of rock, there's no air getting in there.
Elaine

"Success is stumbling from failure to failure with no loss of enthusiasm." –Winston Churchill
Avatar for jones1104
Jun 5, 2015 9:38 PM CST
Thread OP
Name: Ben
Fremont Ohio
I added "wicks" to my buckets and they pulled all of the extra, standing water out of the buckets. Such a simple idea may have saved my
plants, thank you Rick.
My scorpion pepper put 2 blossoms out and one has been pollinated. If I let the pepper grow to maturity, will it hurt or help the plant? I'm afraid it's using all of its energy to make a pod for the seeds. Am I close to right, or way off?
Image
Jun 6, 2015 1:14 AM CST
Name: Wes
Ohio (Zone 6a)
Interesting reading. I'm doing bell peppers in pots and buckets this year and I don't expect a full yield but so far so good with a simple mix of topsoil and cheapo potting soil. So far, so good.

My gut reaction to potted plants suffering is do dig a hole and plant them in the ground. Not always an option nor a foolproof solution. It's been an effective habit for me. I've overwintered hot peppers in pots but I've never specifically grown one in a pot.
Image
Jun 6, 2015 4:18 PM CST
Name: Sandy B.
Ford River Twp, Michigan UP (Zone 4b)
(Zone 4b-maybe 5a)
Charter ATP Member Bee Lover Butterflies Birds I was one of the first 300 contributors to the plant database! Million Pollinator Garden Challenge
Seed Starter Vegetable Grower Greenhouse Region: United States of America Region: Michigan Enjoys or suffers cold winters
jones1104 said:I added "wicks" to my buckets and they pulled all of the extra, standing water out of the buckets. Such a simple idea may have saved my
plants, thank you Rick.
My scorpion pepper put 2 blossoms out and one has been pollinated. If I let the pepper grow to maturity, will it hurt or help the plant? I'm afraid it's using all of its energy to make a pod for the seeds. Am I close to right, or way off?


Ben, I think helping the drainage was the absolute best thing you could have done for those plants -- I suspect they will do much better now!

I'm not quite sure what you're asking with the 2nd part of your post, though... as far as will it hurt the plant to let the pepper grow, and making a pod for the seeds; I think I'm misunderstanding you somehow, because the whole point of growing peppers is pretty much to GET peppers (which are, of course, the seed pod) Smiling

You will, however, get more production by picking the peppers "green" (i.e., unripe, whatever color that may be), than by letting the early ones ripen -- because, as one of my botany profs liked to say (many, many years ago), once the seeds form, the plant has fulfilled its destiny.

On the other hand, with those super-hot varieties, one or two peppers may be all you need! Blinking
“Think occasionally of the suffering of which you spare yourself the sight." ~ Albert Schweitzer
C/F temp conversion
Avatar for jones1104
Jun 7, 2015 6:56 PM CST
Thread OP
Name: Ben
Fremont Ohio
So I have new plants, fresh from a nursery. Before I go and ruin these, I would like to know how to plant these in buckets. ANY insight to help and/or simplify this process is appreciated.
An update to the solved drainage problem:
The reaper plants are dropping limp, soft leaves. There is new green growth on the bottoms, but the bigger more mature too leaves are sagging.
The scorpion dropped both buds and only has 3 big leaves left. It has a lot of smaller leaves that are still green though.
The ghost plants both have new growth while one has buds.
You answered my question about the pods too, Elaine. Once the pod stops growing, I will be sure to harvest them.
Last edited by jones1104 Jun 7, 2015 7:01 PM Icon for preview
Image
Jun 7, 2015 8:15 PM CST
Name: Elaine
Sarasota, Fl
The one constant in life is change
Amaryllis Tropicals Multi-Region Gardener Orchids Master Gardener: Florida Irises
Herbs Region: Florida Vegetable Grower Daylilies Birds Cat Lover
I'd advise you to start by using only potting soil, mixed with some extra Perlite (an expanded rock product, available in bags at the garden center). This will help keep the mix open enough to allow drainage and air to the roots.

If you haven't already drilled drain holes in your buckets, maybe drill smaller holes, and more of them. Say 1/4in. holes instead of the great big ones you had. Then don't use the landscape fabric in the bottom of the buckets. I've had success with a single layer of newspaper - it 'filters' the water out and eventually rots away but by then the soil has compacted enough in the bottom part of the bucket to stay in there. But I also like to use the bridal veil netting I described above. You can even re-use your coffee filters if you use the paper ones.

Also, set the buckets up on something so you can see that they are draining properly. Soak the layers of soil as you fill the buckets, then let them drain until they stop dripping before you plant your new plants.
Elaine

"Success is stumbling from failure to failure with no loss of enthusiasm." –Winston Churchill
Image
Jun 8, 2015 6:17 PM CST
Name: Rick Corey
Everett WA 98204 (Zone 8a)
Sunset Zone 5. Koppen Csb. Eco 2f
Frugal Gardener Garden Procrastinator I helped beta test the first seed swap Plant and/or Seed Trader Seed Starter Region: Pacific Northwest
Photo Contest Winner: 2014 Avid Green Pages Reviewer Garden Ideas: Master Level Garden Sages I was one of the first 300 contributors to the plant database! I helped plan and beta test the plant database.
Some people have used an old "anti-static dryer sheet" to keep soil from dribbling out of drain holes. I would rather use smaller holes! Or maybe run some loose, open wicking material into the holes, partly blocking the soil, partly wicking water out or in, and partly leaving some space open for air diffusion.

Also, if the only holes are UNDER the pot, air may have a hard time getting in those holes. Hence some holes should probably stick out the side, to let air in and C)2 out.

Elaine said:
>> I'd advise you to start by using only potting soil, mixed with some extra Perlite (an expanded rock product, available in bags at the garden center). This will help keep the mix open enough to allow drainage and air to the roots.

Yes! Garden soil in most yards has a lot of clay: death to potted plants. Starting with an open, soilless mix is a great idea if it's affordable.

If not, adding "chunky stuff" to an affordable soilless mix opens it up to let air in. Coarse Perlite happens to be the most popular "chunky thing" that gardeners use. Screened crushed stone (grit) is just as good, and "sharper", but heavier.

Personally, I think Perlite always makes a container look like someone is growing pot.

I like screened pine bark for "chunky stuff". It's cheaper than Perlite and holds just a little water. It's easier to re-wet than peat. If you have a couple of kinds of hardware cloth, you can screen bark to get any size particles you want, from dust and fibers to shreds, to chips, to chunks.

And the starting material is very cheap (fine bark nuggets or medium mulch if it is clean and DRY).

http://garden.org/ideas/view/R...
Only the members of the Members group may reply to this thread.
  • Started by: jones1104
  • Replies: 35, views: 13,908
Member Login:

( No account? Join now! )

Today's site banner is by Zoia and is called "Snow White, Deep Green"

This site is protected by reCAPTCHA and the Google Privacy Policy and Terms of Service apply.