Post a reply

Image
Jan 22, 2013 4:23 PM CST
Name: Greg
Buena Park, California (Zone 10b)
Bulbs Region: California Dog Lover Lilies
I dug up a gigantic bulb of American spirit 2 days ago and found that a few scales that had somehow broken off the mother bulb underground somehow had bulblets growing on them. One of them looks like it's going to send up some leaves.
Image
Jan 23, 2013 2:00 AM CST
Name: Calin
Weston-super-mare UK (Zone 7b)
Bulbs Lilies Plant and/or Seed Trader
Thanks Lorn for the info,
I find it hard to just get them out, place them in a bag etc.
Much easier to just cover them with a light medium and what if I place the whole thing in a bag?
Sounds like an easier solution.
Or just leave as is, and see what happens to the bulbils I already have...
Tough!
Image
Jan 23, 2013 7:20 AM CST
Name: Lorn (Roosterlorn)
S.E Wisconsin (Zone 5b)
Bee Lover Lilies Pollen collector Seed Starter Region: Wisconsin
Calin, Look----you have to be both brave and confident when it comes making decisions with lilies. Those little bublets will most often forgive you if you're not quite right in whatever you do. Those tiny little bublets, small as they are, have a unbelievable amount of stamina packed in them and will tolerate more abuse than most can imagine. I do crude exploratories very often with seeds, seed sprouts, seedlings and scales for any one of a hundred reasons--even if it's only to check progress or take a picture just for fun.. So disturbing them a little isn't going to hurt them one bit. Just be careful not to dislodge the bulblet away from the mother scale. When you dig them out you'll most likely find one or two long roots and a bunch of small, tiny roots at the base of the bublet. And if you break some off in the process, don't fret--it won't hurt a thing. We all try not to, of course, but if it happens, it's not a big deal.

Now, we all like to practice perfection, sterile conditions and all that--and we do at our initial starting point with scaling. But your case is two months into a procedure; so, let's step out of line for a moment and and do a little backyard botany. Just take a large kitchen fork and dig the ones with bublets out. Whatever media falls off that's great, if some clings, that's ok too. Cut away as much black, soft area of old scale if you see any. We'll forget about being sterile for this one particular instance. Place those with bulblets in a seperate bag and media with tweezers (a couple handfulls in a quart bag, little more if you use gallon size) Lay them in horizontally. Then spoon in enough media to cover this side. Then, using two pieces of thin chipboard cut from a cereal box, gently slide one piece under the bag, place the other piece on top of the bag and with both hands gently flip the bag and continue adding mix until all are well covered. The chipboard stays with the bag now wherever it goes and you'll see how usefull it will become down the road.

The rest of your scales don't appear to hold much promise--but you never know and there's only one way to find out---dig 'em up! If you find some bublets, great! Start a second bag. If some scales don't have bublets but are still solid, start another bag.

Now, the media mix I use is about 70% milled moss and 30% sand that I have lightly dampened--I emphasize lightly. Some people use vermiculite, some use perlite; it's a matter of personal choice and what works for them. I just find that moss gives me such nice, even distribution of dampness that I stick with it and if there is a little to much moisture it will show up quicker as condensation inside the bag.

Then, lay your sealed, bagged scales in a very dark, warm place--about 70'F, give or take a couple degrees and check daily for two days for condensation. If there is, open the bag for a couple hours, reseal and check the next day. Keep them dark; you don't want any green to start. Placing a light weight matt over them is a good idea. Then, in your case, I'd let them nurse off the old scale for another 3 or 4 weeks before chilling a few weeks. The old scale should resemble an old dried up walnut meat when it's all said and done--should, I say, but not always. Sometimes, it will be just 'gone', sometimes the old scale will be still solid, but most time it's just dried up, depleted.

Try to plan your program/schedule with these so they are ready to transplant in late May, early June at the latest. You see, another reason you don't want cover and grow these bublets now is that they inheiret the same season cycle--the last one the old mother bulb experienced and need to be kept on course with that. If they grow now they would (want to) go dormant in summer, but they can't--it's too hot and there's too much moisture (rain). They will rot instead!!

Now, in regards to placing your whole pots and all in a big plastic bag at this point, moisture contol would be the main concern; you might be just building a big incubator for molds judging by the appearance of some of you scales. If you do decide to go this way, cover the whole scale--you just might get a few more bublets. Whatever you decide, we always learn something from each experience, for better or worse. That's how I got brave and confidant on my decision making with lily growing.
Last edited by Roosterlorn Jan 23, 2013 7:34 PM Icon for preview
Image
Jan 23, 2013 9:32 AM CST
Name: Rick R.
Minneapolis,MN, USA z4b,Dfb/a
Garden Photography The WITWIT Badge Seed Starter Wild Plant Hunter Region: Minnesota Hybridizer
Garden Sages I was one of the first 300 contributors to the plant database! Plant Identifier Million Pollinator Garden Challenge
I agree

I have to say, I am even more "brave" than Lorn, due to my laziness. Though my mediums may start with a pasteurized potting mix (but not for scaling), the additions of sand, grit, perlite, peat, vermiculite, etc. are not treated. I would definitely say, however, that if there is a time for a "sterile" type medium, scaling is it. I am far more particular with scales then I am with seeds!

Usually, I prefer not using tweezers, but whatever works best for you. I think it is much easier to gauge the pressure being used to pick up things, so you don't accidentally pinch to hard and damage the lily. Always be gentle; that's the key.
---
I don't do nearly as much scaling as many participants here, so I don't have the quantity of experience as some do. But for myself, I've never had bulblets start in mid-scale, as the the small white bulblet in this pic of yours, Calin:
http://garden.org/pics/2013-01...
I'd be interested to here other people's experiences in this regard. Of course, the typical origin of scale bulblet production is the basal cut end of the scale.

I am brainstorming a few possibilities reasons for Calin's results:
---- The vigor of hybrids may very well increase the overall "randomness" of scale bulblet initiation.
---- A damaged surface is a probable impetus.
---- More favorable environmental conditions 
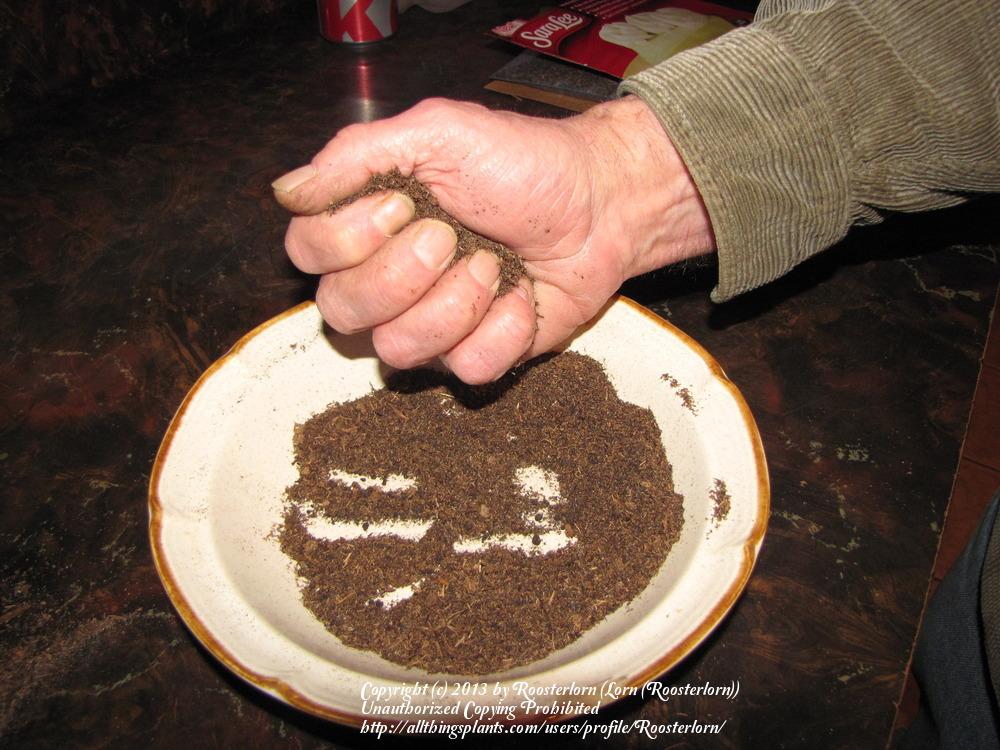
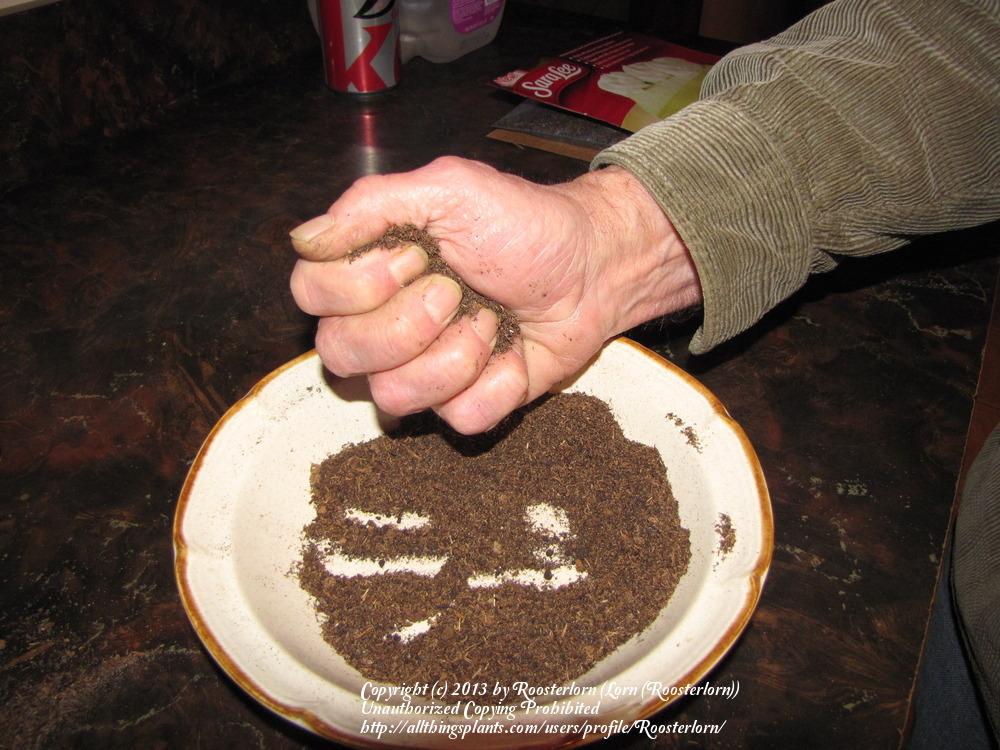
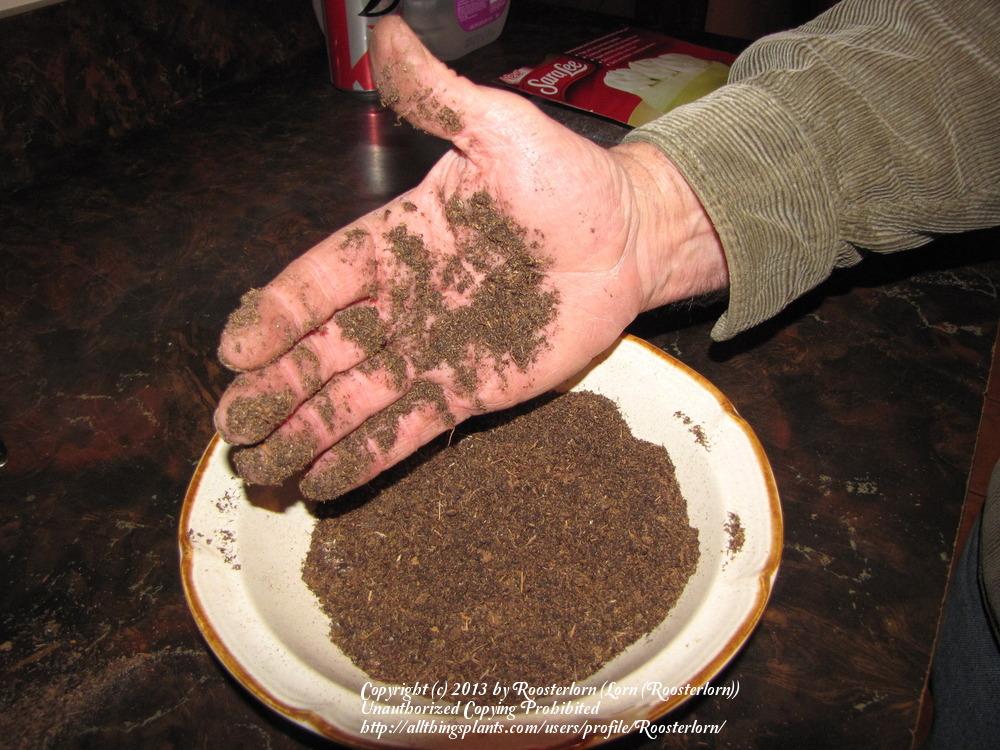
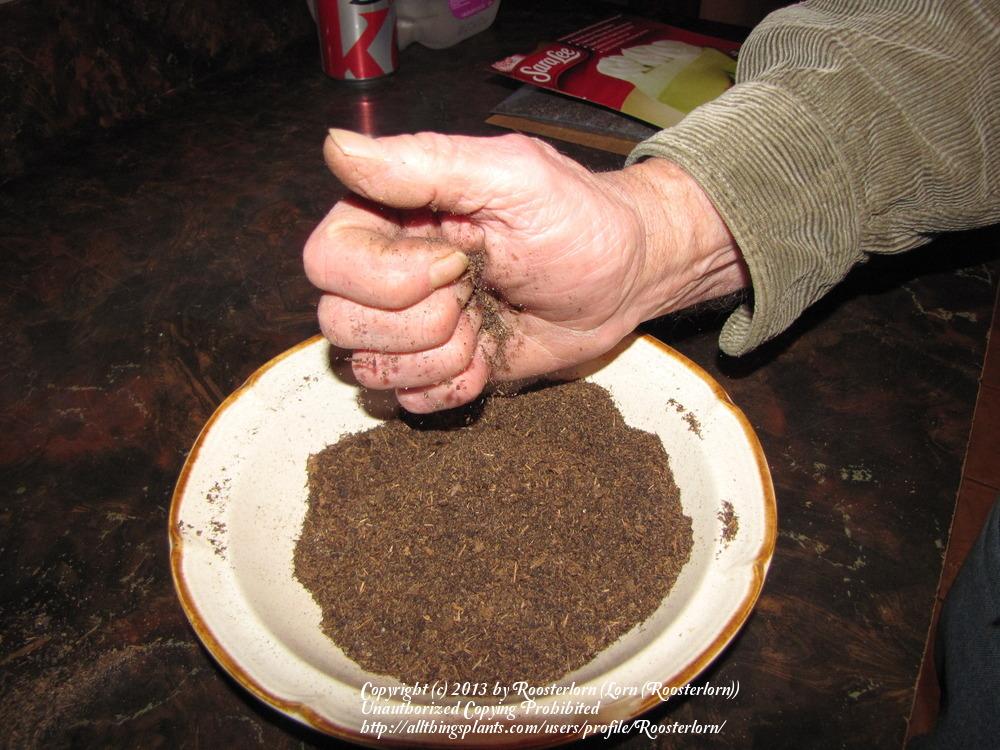
above the soil surface rather than below. Take Lorn's suggestion of a barely moist medium for scaling seriously. Although obviously not completely fatal, it looks to me like the mix you used Calin, hold too much moisture for scaling purposes. When you go digging, we all would love to here of your findings. What is happen below the soil surface, when a scale has the option to grow in either condition?

Adventures with scaling .... what a great name for this thread!
When the debate is lost, slander becomes the tool of the losers. - Socrates
Image
Jan 23, 2013 11:02 AM CST
Name: Lorn (Roosterlorn)
S.E Wisconsin (Zone 5b)
Bee Lover Lilies Pollen collector Seed Starter Region: Wisconsin
Rick, I think the scratch is the most likely cause. I've seen it before a few times. Even a tear along the edge might occasionally produce a bulblet. Bulblets formed this way have a lower percentage of survival if there are larger more demanding bulblets at the basil because the scale shrivels first at the top and then down the sides and toward the center as it is being consumed by the 'hogs' (as I call them). The 'runts' often parish in the process and go 'sight unseen' as if they never happened--unless of course, curiousity drives us to explore somewhere around mid term. Making intentional small cuts on the side of the scale will produce bulblets too, but I'd much rather have just a couple big, healthy bulblets than run the risk and handicap of many little ones.

I think the vigor inheirent to the hybrid may very well have something to do with it. Look at LAs for example. My gosh--anywhere a lose scale lands it grows. I just spotted one the other day growing a bulblet at the surface in the garden--in this climate and season? I covered it up out of sympathy, but I shouldn't have. I should have stepped on it but you and I both know that wouldn't have done any good.

How well fed the mother bulb was last year also has a lot to do with quantity and size of bulblets in all instances. And there are differences between cultivars of the same division as well. Some will only produce one or two bublets while others produce several. There are also differences in rate of development during a typical ten week incubation. Some are just plain slower than others. Every new batch is a new experience.

Calin, your scaling program is very interesting to me because I've never done it that way--nor have I ever seen it being done that way. By the way, you never did tell us what cultivar those scales are, did you? Just curious.
Image
Jan 24, 2013 1:30 AM CST
Name: Calin
Weston-super-mare UK (Zone 7b)
Bulbs Lilies Plant and/or Seed Trader
Ok... so what I did with the resources at hand was:
I went home, it was already getting dark, took the two margarine containers in the kitchen, on the table, on a large supermarket catalogue page .
Used a fork, lifted the scales, checked them, made a mixture using very little of the mix with lots of perlite and sand (it's all I have right now, and nothing was available at that time).
I filled half of the containers with this very loose mixture, placed the scales as horizontally as i could - I had to place one upright as bulbils grew on each side, and I would like both to stand a chance.
Then I covered them generously, sprinkled water on top (not too much I hope) and placed them in a plastic bag each and tied it, and placed them in a cupboard (dark).
Very few bulbs IN the mix (I mean under the surface).
And now I WAIT.

OH... these were Orientpets Lavon, Satisfaction and Garden Pleasure

And... another OH... please don't tell me I did something wrong again... I won't stress the scales/bulbils and MYSELF!

I'll promise to follow instructions next time. If you send me scales...LOL
Image
Jan 24, 2013 9:28 AM CST
Name: Lorn (Roosterlorn)
S.E Wisconsin (Zone 5b)
Bee Lover Lilies Pollen collector Seed Starter Region: Wisconsin
Well, at least you've got them covered and sealed. Now the next thing you want to do is check for excess moisture later today. If you see tiny little water droplets condensing inside(underside of top surface) open the bag and let it escape for a few hours, then reseal. In the meantime, pick up some freezer bags and slide you containers in them and seal tightly. Then check for excess moisture again in about a day or so. The reason you want to use sealed freezer bags is because they show excess moisture faster and once you obtain the proper moisture and sealed tight, they hold it better. I want to expant this post a lot more but I have out of town errands this morning so I'll post a lot more later. I want anyone one reading this to fully understand that what Calin and I are doing here represents a considerable departure from the norm. In my vision, there is no such thing as right or wrong or embarrasement. If anyone sees it differently, them embarrass me. In the end, I want to make Calin the best cloner around. Stay tuned.
Last edited by Roosterlorn Jan 24, 2013 9:21 PM Icon for preview
Image
Jan 24, 2013 9:17 PM CST
Name: Lorn (Roosterlorn)
S.E Wisconsin (Zone 5b)
Bee Lover Lilies Pollen collector Seed Starter Region: Wisconsin
Calin, it's been a long day for me here today; I finally get a chance to sit down and jot down my thoughts. First, what you did wasn't really wrong. What you were doing in a sense was mimicking nature. And we all know free scales in a natural setting generate clones. But nature conducts its business on the outside where scales are subjected to all kinds of environmental variables and resulting success/survival rate is low. We do our business (mostly) on the inside and we control the environment and our success/ survival rate is much higher. And, of course, we all like to follow the generally accepted uniform procedures of cloning, taking shortcuts only occasionally here and there because we know from past experience we can in certain Instances, but not without being mindfull of the risks in doing so.

I had thought of your procedure during my travels throughout the day and became more and more intrigued by it, mainly because I had never done it that way. I thought that many interesting things can be learned from it. I thought it would a wonderful idea if you or I or both of us conduct the same procedure as an experiment this Spring so we can observe and determine exactly what does happen both above and below ground when cloning is done that way. We could run these scales and clones all the way till Fall and pot then up as usual for an outdoor cold cycle next winter. For better or worse, whatever the results, I think Rick and others would be very interested in seeing it.

Now a couple other thoughts. You mentioned you sprinkled water on you mix after you finished covering, is that correct. Ok, here's how I do it. First, always premoisten your mix, whether it's perlite and sand, moss and sand, vermiculite and sand or any combination of them. Mix thoroughly and let it stand a few minutes. Then grab a handfull and squeeze tight and release. If you can see moistere in the palm of your hand, you have way, way to much water, add some more dry mix. If you can't see any moisture in the palm of your hand but particals that cling to your hand feel a little moist when you rub them together with your fingers--you still have too much--add just a little more mix. They key here is very, very little moisture is needed and is a very important point. I use distilled water. Always error on too little moisture rather thar than too much. I'll tell you why later when we talk about choices of media.

Now--another thought. You mentioned you had one scale that had generated a clone on both sides so you placed it vertically so both clones would have a chance to grow. Just a pointer here--I've always found that clones don't really care if they're upside down, sideways or above or below the scale. They all develop the same. In fact, I'll occasionally flip my bags to make sure there is continued even distribution of moisture. They don't seem to mind this at all; in fact, I think they kind of like this turning over for some unknown reason. This is another way I use those two pieces of cardboard. By sliding one piece under the bag and placing the other on the top, I can slide one palm under the bag and then palming the top piece with the other hand, I can then hold it like a patty cake between between the palm of both hands and then gently flip it over.

Well, enough for tonight. Check you Tree Mail tab in the top right corner from time to time. I'm going to be sending some tips, pointers and pictures in the next day or two. Tree mail tab will red when a message comes thru.

Edit: Calin I just noticed and I am very, very sorry. I just edited/corrected my last post. My first stop this morning was with a man named Brian and I guess somewhere in my mind I was 20 miles up the road ahead of myself. I am so sorry!
Last edited by Roosterlorn Jan 24, 2013 9:30 PM Icon for preview
Image
Jan 24, 2013 10:50 PM CST
Name: Rick R.
Minneapolis,MN, USA z4b,Dfb/a
Garden Photography The WITWIT Badge Seed Starter Wild Plant Hunter Region: Minnesota Hybridizer
Garden Sages I was one of the first 300 contributors to the plant database! Plant Identifier Million Pollinator Garden Challenge
Roosterlorn said:I think Rick and others would be very interested in seeing it.


--- I'm always interested in a good experiment. Big Grin
When the debate is lost, slander becomes the tool of the losers. - Socrates
Image
Jan 25, 2013 12:52 AM CST
Name: Calin
Weston-super-mare UK (Zone 7b)
Bulbs Lilies Plant and/or Seed Trader
Roosterlorn said: I want to make Calin the best cloner around.


I'm pretty happy with "the best cloner in Romania" :)

I don't get the last part in the edit. I can't tell what you edited...
But I do appreciate the long explanatory messages.
I have just started this thing about lilies so... got lots to learn.
Image
Jan 25, 2013 6:53 AM CST
Name: Lorn (Roosterlorn)
S.E Wisconsin (Zone 5b)
Bee Lover Lilies Pollen collector Seed Starter Region: Wisconsin
Oh Calin, I had inadvertantly called you 'Brian', the name of a guy I went to, to pick up some pots from yesterday. You didn't notice? Gosh, I felt bad--I had a hard time going to sleep over it. I picked up over a hundred nice gallon size pots 6 and 1/2 inches diameter by 6 inches deep--nice and deep for lilies. At a very cheap, almost give away cost.

As far as shipping scales back and forth, etc, I don't think individuals are allowed to ship live plant material back and forth. We can, however, send seed and pollen. I remember we sort of had a round table discussion with Anthony a while back in the past. We would probably have to work thru a licensed dealer with permits, etc.
Image
Jan 25, 2013 5:54 PM CST
Name: Anthony Weeding
Rosetta,Tasmania,Australia (Zone 7b)
idont havemuch-but ihave everything
Charter ATP Member I was one of the first 300 contributors to the plant database! Region: Australia Lilies Seed Starter Bulbs
Plant and/or Seed Trader Hellebores Birds Seller of Garden Stuff Garden Art Cat Lover
Lorn-send!!- but dont put a return address!!...Send me nothing-Australia is very strict Thumbs down -Anthony,.,.,.,.I send Oystein pollen, with no problems!! Thumbs up but he cant send me anything but ...Ahem!!!!....species seed Blinking
lily freaks are not geeks!
Image
Jan 28, 2013 3:18 AM CST
Name: Calin
Weston-super-mare UK (Zone 7b)
Bulbs Lilies Plant and/or Seed Trader
Hmmm, never noticed the Brian thing. :)

Pots for lilies... I always plant them out in the garden. You'd say with the drought we had last year I;d start planting all in pots to control water. Wrong... I only go to my garden about 2-3 times a week and Saturdays... and well, in pots, in the heat... they would DRY up.

About sending stuff, yes I mainly trade seeds but occasional roots, corms, bulbils may happen :)

I only had an incident when some lily bulbils I mailed to Canada got confiscated... I think I left some dirt on them (didn't clean properly) but most attempts are successful.
And receiving is not really a problem. if envelopes/packages come from outside the EU they all go to a post office with a customs officer but the small ones go ignored. Sometimes they may ask "What's inside?" but it's OK. I always give an ellusive (spelling?) answer like "I don't know, I think my mom received something from a friend" ...but I realized even an answer like "Some seeds, plants" doesn't lift eyebrows.
Image
Jan 28, 2013 3:31 AM CST
Name: Anthony Weeding
Rosetta,Tasmania,Australia (Zone 7b)
idont havemuch-but ihave everything
Charter ATP Member I was one of the first 300 contributors to the plant database! Region: Australia Lilies Seed Starter Bulbs
Plant and/or Seed Trader Hellebores Birds Seller of Garden Stuff Garden Art Cat Lover
Calin , you asked me a while back 'who is Rodrigos'?...Type in 'Rod Barwick'-Tasmania, into google..to get a sensible answer..To get a truthful answer, I will tell you...One of the worlds greatest daffodil breeders,Not a bad lilium breeder either..a hermit, recluse, lives in the past, in the hills of Abbotsfield ..Tasmania..A great teacher of plants.. and somewhat of a society legend,.,.
lily freaks are not geeks!
Image
Jan 28, 2013 7:51 AM CST
Name: Calin
Weston-super-mare UK (Zone 7b)
Bulbs Lilies Plant and/or Seed Trader
Thanks. Got it. There's some daffodils I've never seen around here Smiling
Image
Jan 28, 2013 8:53 AM CST
Name: Lorn (Roosterlorn)
S.E Wisconsin (Zone 5b)
Bee Lover Lilies Pollen collector Seed Starter Region: Wisconsin
Calin, most people start and grow their seedlings and scales in the some pot for at least 2 full growing seasons, expressed as (n + 1), where (n) is the year the seed was planted. During the Fall of (n + 1), people have a choice to make; either transplant into the garden seedling bed or transplant (pricking out) into single pots and continue growing them out in pots to (n + 2) or (n +3) or whenever they get their first bloom at which time 'culling' can begin For instance, the seeds I planted in March of 2012 will be at ( n+ 1) this Fall and I will transplant them out into the seedling bed in Oct. of 2013. They should bloom by 2014 or 2015 or ( n + 2 or n + 3). This same procedure would also apply to scaled bublets.

Whether one transplants to pots or transplants to garden is a matter of personal choice or whatever their situation predicates. Some people just don't have a lot of garden space and have to use pots, while others might use pots because they find it easier for them to control, including record keeping and they can quickly, easily sell or destroy a potted plant if it's not a 'keeper' They are advantages and disadvantages to both ways and as you work your way along, you'll improvise and find ways that work best for you.

You've already found one disadvantage of using pots in your case.
Image
Jan 28, 2013 10:04 AM CST
Name: Lorn (Roosterlorn)
S.E Wisconsin (Zone 5b)
Bee Lover Lilies Pollen collector Seed Starter Region: Wisconsin
Here's how I check to make sure my media moisture content is 'just right'. In the example shown it is 'just right'. In the end (the last picture), if you have to use your other hand to clean off the first hand, you've got too much. And as you can see in the last photo, my hand is clean so I would accept that as being 'just right' or good enough, anyway.

Start by grabbing a handfull and squeeze hard ( pictures 1 and 2) Thumb of 2013-01-28/Roosterlorn/948c36
Thumb of 2013-01-28/Roosterlorn/60a1c0


Then release and drop back into the bowl. It should fall freely leaving very little in the palm of your hand--see how nice and smooth and evenly it fell back into the bowl. Thumb of 2013-01-28/Roosterlorn/55ca11

In next 2 pictures, close you hand and work your fingers and thumb together just a little bit and then release again. And, like magic--your hand is clean.
Thumb of 2013-01-28/Roosterlorn/715e5f
Thumb of 2013-01-28/Roosterlorn/cce3c5

I use this same method for checking media moisture and mix texture for seeding as well. I sure would like hear if anyone else does this a little differently--just for variation.
Image
Jan 28, 2013 11:59 AM CST
Name: Rick R.
Minneapolis,MN, USA z4b,Dfb/a
Garden Photography The WITWIT Badge Seed Starter Wild Plant Hunter Region: Minnesota Hybridizer
Garden Sages I was one of the first 300 contributors to the plant database! Plant Identifier Million Pollinator Garden Challenge
Of course this is if you are using peat.

Squeezing perlite or vermiculite hard would destroy the structure of the media, and wouldn't help anything.

More later.
When the debate is lost, slander becomes the tool of the losers. - Socrates
Image
Jan 28, 2013 8:40 PM CST
Name: Lorn (Roosterlorn)
S.E Wisconsin (Zone 5b)
Bee Lover Lilies Pollen collector Seed Starter Region: Wisconsin
Rick--that's milled Canadian sphagnum peat moss and play sand (about 70/30 mix) that I used in the demonstration.

OK--Go ahead---
Image
Jan 29, 2013 1:41 AM CST
Name: Rick R.
Minneapolis,MN, USA z4b,Dfb/a
Garden Photography The WITWIT Badge Seed Starter Wild Plant Hunter Region: Minnesota Hybridizer
Garden Sages I was one of the first 300 contributors to the plant database! Plant Identifier Million Pollinator Garden Challenge
Okay, Lorn. You asked for it... Big Grin

The flipping thing.
Honestly, I've done it before, too, and for the same reason: better distribution of moisture.
But I am a reluctant flipper, and I have found that by better insulating my baggies, the "need" disappears. I wrap them in a bath towel. The more even temperature does the trick for me.

But still, I can't imagine that a plant doesn't mind being flipped. After all, the plants we deal with are heavily geotropic. That is, they orient themselves according to gravity. I am sure you have read, too, the advice to never change the orientation of scales, once incubating. A bit overzealous, in my opinion, but I think it does have merit. Another interesting experiment to brew: flip one bag every third day (or whatever repetitive interval), and a control bag that is not flipped.

When I have use peat to propagate hybrid lily scales, I have always used the peat one would use to mix with soil. Of course, it's always been fine with vigorous hybrids, but I think milled sphagnum peat is a much better idea.

I tend to use distilled water, too. But I'm not overly fussy.

So often, it's hard to get the right moisture content. With finicky or badly damaged scales, especially, I've devised what I thinks is pretty fool proof. 3/4 rinsed perlite and 1/4 raw sphagnum. http://garden.org/thread/view_... It teeters on the brink of just moist enough, which is more important with not so vigorous subjects.
The perlite is rinsed to remove most of the fluoride contaminant. The raw sphagum is moistened and tested in the same ways as Lorn suggests. The BIG advantage here is this: if, in time the medium becomes to dry, the color change of the dry raw sphagnum is very easy to detect. It lightens very significantly. The large amount of perlite is present because too much raw sphagnum is too moist for the finicky.
When the debate is lost, slander becomes the tool of the losers. - Socrates

Only the members of the Members group may reply to this thread.
  • Started by: Ispahan
  • Replies: 282, views: 23,532
Member Login:

( No account? Join now! )

Today's site banner is by Leftwood and is called "Gentiana septemfida"

This site is protected by reCAPTCHA and the Google Privacy Policy and Terms of Service apply.