Post a reply

Image
Mar 25, 2010 1:58 PM CST
Name: Linda
SE Houston, Tx. (Hobby) (Zone 9a)
"Godspeed, & Good Harvest!"
Region: Texas Vegetable Grower Seed Starter Garden Ideas: Master Level Canning and food preservation Gardens in Buckets
Tip Photographer Charter ATP Member I was one of the first 300 contributors to the plant database! Ferns
Claud,
I'm sorry, but I'm still a bit confused about that overflow tube. I see it coming out one side. Does it go all the way thru the other side or is it just angled up from the bottom of the tub on that other side?

Also, you didn't cut the entire tube in half vertically, right? Only about 12" from one end.

Yeah, tell me about saturation! I'm held up right now cause the potting mix in my eBuckets was saturated at the bottom and the only way to empty the bucket entirely was to tip it and drain as much water as I could from the reservoir and dump the rest. Mud! I spread it out on a tarp Tuesday to let it dry out.

I have this thing about completely breaking down, cleaning, and rebuilding my EBs and eBuckets before I plant the next seedling (unless the seedling croaked relatively quickly and my potting mix was still fresh). Even if I just turn the potting mix over a coupla times, I feel this refreshes it for the next seedling going in.

Most folks tell me to just dig another hole and sink a seedling in, but I've encountered enough matted root systems below to know that vessel and the potting mix could be entirely plugged up...

P.S. At least 2 of my eBuckets had some funky smelling potting mix. I'm sure due to the fact that the overflow straws got plugged up, the mix went anaerobic 'cause of no air circulation. Will drying it out in the fresh air, and adding some fresh MG potting mix do the trick, you think?

And, please, if you have any pics of that pipe, they'd sure help!

Thanks!

Linda
Image
Mar 25, 2010 3:46 PM CST
Name: Claud
Water Valley, Ms (Zone 7b)
Charter ATP Member
Linda, The drain pipe is level and goes all the way through the box and has 16 inches of the bottom half removed from the middle. The pipes stick through the sides about 3 inches so if I wanted to I could join the boxes together with an 1 1/2 inch coupling and just add water to one and fill them all. I was concerned about air circulation too, that's why I used 1 1/2 inch pipe and cut the bottom half off in the middle (instead of just boring holes in the bottom of the pipe). When I removed the plants last fall, there were no signs of rotted potting mix in the pots or elsewhere, but the mix was saturated with hair like tomato roots holding it all together. I chopped it up with a hoe and plan to reuse it. Two cubic foot bags of potting mix cost about $12, and I'm cheap. By letting the reservoir get down to 1 1/2 gallons of water before you refill, it moves the saturation zone up and down about 3 inches in the pots. I think that's why it didn't rot. Rather than using the band of fertilizer as recommended by EarthBoxes, I prefer to use 12-4-8 liquid plant food (MG). I mix 1/4 teaspoon per gallon of water and it seems to work fine for tomatoes. I've only done this for a year, so please don't consider me an expert on any of this. I'm only relating my experience thus far. I agree with you about breaking up the soil, especially if mix at the bottom is rotting. I'd throw the rotted part away and add fresh mix. I switched to Scotts potting soil because all the Miracle-Gro in this area has the moisture control in it. Also, the first time you fill the reservoir, it probably wouldn't hurt to add 1/4 cup of hydrogen peroxide per gallon of water to disinfect. Hope this clears it up for you. Claud

Thumb of 2010-03-25/saltmarsh/99081a
Image
Mar 25, 2010 4:29 PM CST
Name: Claud
Water Valley, Ms (Zone 7b)
Charter ATP Member
Linda, I placed one of the pots in the container in the middle of the end and marked the inside of the container at the top of the pot. Did the same thing at the other end. Used the marks to position my holesaw to cut the holes so the top of the drain pipe would be at the same height as the top of the pots. I used adhesive caulk to fasten the drain pipe to the box. I placed 6 - 6 inch pots into position. I cut the hardware cloth one inch oversize so I could bend a half inch down all around. Then I cut the screen wire 2 inches oversize so the edge could stick up and catch the potting soil. I positioned the screen wire over the pots and used sissors to cut holes where the pots were. Next I used the screen wire for a pattern to mark the other screens and the hardware cloth using a Sharpie. Used tin snips to cut the hardware cloth so the tabs could be bent down into the pots. After I installed the hardware cloth in the box, I marked the location for the fill tube, and cut out for it. Finally, I used nylon ties to fasten the pots to the hardware cloth. On plastic pots you can drill or melt holes for the ties. On clay pots fasten 2 nylon ties together to form a circle below the rim and run your ties from the nylon circle to the hardware cloth. These things are heavy. Last year we had 80 MPH winds when the tomatoes were 6 feet tall and it didn't have any effect on the tomatoes or boxes. An oak tree about 50 feet away was uprooted. Unless you have 2 strong people, put the boxes where your want them then fill them with mix and water. Remember, tomatoes aren't everything. Claud

Thumb of 2010-03-25/saltmarsh/1ef1f5
Image
Mar 25, 2010 4:53 PM CST
Name: Linda
SE Houston, Tx. (Hobby) (Zone 9a)
"Godspeed, & Good Harvest!"
Region: Texas Vegetable Grower Seed Starter Garden Ideas: Master Level Canning and food preservation Gardens in Buckets
Tip Photographer Charter ATP Member I was one of the first 300 contributors to the plant database! Ferns
Claud,
I am a visual person. Confused

Thumb of 2010-03-25/Gymgirl/65a95e
Image
Mar 25, 2010 9:04 PM CST
Name: Claud
Water Valley, Ms (Zone 7b)
Charter ATP Member
Linda, turn the pipe over so the cutout is on the bottom and curve the ends of the cutout and you've got it.
Image
Mar 26, 2010 10:10 AM CST
Name: Linda
SE Houston, Tx. (Hobby) (Zone 9a)
"Godspeed, & Good Harvest!"
Region: Texas Vegetable Grower Seed Starter Garden Ideas: Master Level Canning and food preservation Gardens in Buckets
Tip Photographer Charter ATP Member I was one of the first 300 contributors to the plant database! Ferns
Claud,
It's only right side up so YOU could see it, silly! Lovey dubby

"By George, I think she's got it!!!"

Hugs!
Image
Mar 26, 2010 10:35 AM CST
Name: Claud
Water Valley, Ms (Zone 7b)
Charter ATP Member
ha ha ha ha ha ha ha
Image
Mar 26, 2010 10:49 AM CST
Name: Linda
SE Houston, Tx. (Hobby) (Zone 9a)
"Godspeed, & Good Harvest!"
Region: Texas Vegetable Grower Seed Starter Garden Ideas: Master Level Canning and food preservation Gardens in Buckets
Tip Photographer Charter ATP Member I was one of the first 300 contributors to the plant database! Ferns
Claud,
How'd you do the cutout with a bandsaw? All I've got available is a hacksaw/jigsaw/razor blade Hilarious!
Image
Mar 26, 2010 1:57 PM CST
Name: Claud
Water Valley, Ms (Zone 7b)
Charter ATP Member
Linda,

Aha, now you know what friends are for!

When you meet a man, don't ask him if he's married, ask him if he has a bandsaw.

(but you can buy a coping saw which will do the job for $7 or $8 dollars at any hardware store.)

http://www.homedepot.com/webap...
Image
Mar 26, 2010 2:30 PM CST
Name: Linda
SE Houston, Tx. (Hobby) (Zone 9a)
"Godspeed, & Good Harvest!"
Region: Texas Vegetable Grower Seed Starter Garden Ideas: Master Level Canning and food preservation Gardens in Buckets
Tip Photographer Charter ATP Member I was one of the first 300 contributors to the plant database! Ferns
Claud,
You made a good point about having that airspace between the soilbed and the reservoir. I'm refreshing my eBuckets for plantout, and I've got two that had a plugged up straw and the potting mix got a bit rank. I dumped it to dry out.

I was wondering if I really have enough airspace in my eBuckets, and whether I should try incorporating your horizontal fill tube design. I'm wondering if the weight of the soil on some of the weaker structured colanders is mashing it down such that it's putting the soilbed into the reservoir. If this is the case, we have a design flaw to be addressed. I haven't seen a collapsed colander, though.

Still, my airspace is much smaller than yours....hmmmmmm...coping saw, huh?

Although, my alternative could be a huge Pixie Stix...trust me, it's just an oversized straw that kid's candy comes in... Glare
Image
Mar 26, 2010 3:31 PM CST
Name: Mary K
Safety Harbor, FL (Zone 10a)
Container Gardener Region: Florida Tomato Heads Vegetable Grower Avid Green Pages Reviewer Garden Ideas: Level 1
Gymgirl said: and I've got two that had a plugged up straw and the potting mix got a bit rank.


I have started working on some ebuckets and have been concerned about using a straw just for this reason ... I bought some clear plastic (vinyl actually) tubing at Lowe's ... it's only $.25/foot for 1/2" ID. I think a length of about 6" or so should be sufficient to go thru the bucket thru the colander and into the water. This seems to be heavy enough that I don't think it will collapse from weight. It's big enought that a piece of wire can easily be worked into it to clear any clogs. Maybe we do need to leave a larger airspace at the top? that is a lot of soil that is immersed in the water with the colanders. I'm going to be starting one next week with some broccoli. I'm thinking two plants to a 5-gal bucket .. what do you think? EB recommends 6 to an EB so that's why I think 2 should work in the bucket.
Mary K.
Image
Mar 29, 2010 12:07 PM CST
Name: Linda
SE Houston, Tx. (Hobby) (Zone 9a)
"Godspeed, & Good Harvest!"
Region: Texas Vegetable Grower Seed Starter Garden Ideas: Master Level Canning and food preservation Gardens in Buckets
Tip Photographer Charter ATP Member I was one of the first 300 contributors to the plant database! Ferns
Mary,
Only the soil packed around the edges and up to the top of the colander is immersed and in constant contact with the water...it's not that much compared to the remainder of the mix in the bucket...

I refreshed 6 eBuckets for bell pepper plantout this weekend, and decided to stick with straws for now, since out of about 35 eBuckets, I've only had issues with 2 buckets of anaerobic potting mix. And, I think it was more a case of me running into the straw and bending it than any soil actually collapsing them closed. I haven't encountered a mashed or collapsed straw yet.

When I construct, I take care to pack the potting mix under the straw tightly as I can get my finger in there. Then, I pack it on top of the straw tightly ensuring good support for the straw.

My next insurance is to use the big MALT straws from McD's. Finally, in cases of extreme rare doubt, I have taken to double-walling the straws. They're not gonna collapse, ever...

So, the real consideration is "exactly how much of an airspace do we need between the soilbed and the reservoir? I might just pick up a length of that tubing to outfit one more bell pepper eBucket as a comparison, to see if there's any observable difference in growth. The only varying factor would be the airspace in the eBuckets.

Linda
Image
Mar 29, 2010 5:59 PM CST
Name: Mary K
Safety Harbor, FL (Zone 10a)
Container Gardener Region: Florida Tomato Heads Vegetable Grower Avid Green Pages Reviewer Garden Ideas: Level 1
Thanks, Linda, for the additional info. 35 ebuckets??? holy cow, girl. Please don't tell me this is one of those things that once you start you can't quit! lol. I'm sure my neighbors already wonder what in the world is she growing now.

That's some pretty fine cabbage you've grown too. I saw your other pics on DG ... you should be very proud.

Mary K.
Mary K.
Image
Mar 31, 2010 8:52 AM CST
Name: Linda
SE Houston, Tx. (Hobby) (Zone 9a)
"Godspeed, & Good Harvest!"
Region: Texas Vegetable Grower Seed Starter Garden Ideas: Master Level Canning and food preservation Gardens in Buckets
Tip Photographer Charter ATP Member I was one of the first 300 contributors to the plant database! Ferns
Thanks, Mary! Lovey dubby
Image
Aug 10, 2011 6:39 PM CST
Name: Rick Corey
Everett WA 98204 (Zone 8a)
Sunset Zone 5. Koppen Csb. Eco 2f
Frugal Gardener Garden Procrastinator I helped beta test the first seed swap Plant and/or Seed Trader Seed Starter Region: Pacific Northwest
Photo Contest Winner: 2014 Avid Green Pages Reviewer Garden Ideas: Master Level Garden Sages I was one of the first 300 contributors to the plant database! I helped plan and beta test the plant database.
>> The rootspread grew laterally anywhere from 11-15" but only grew vertically to a depth of about 8-11".
>> the potting mix in my eBuckets was saturated at the bottom

I've really appreciated this discussion, because I always wondered about flooding and capillary action in fine mixes excluding almost all the air from the whole bottom half of eBuckets. (Roots NEED air!)

I would expect many commercial peat-based mixes to wick up so much water that they would have little or no air, even 2-4 inches above water level. Capillary action is potent in fine mixes.

One way around that is to make the mix much coarser with pink bark chips larger than 1/8", up to 1/2". Or very coarse perlite or grit. But it doesn't take much peat (or anything fine, like sand) to "clog up" a soil mix so that little air gets in.


>> some funky smelling potting mix. I'm sure due to the fact that the overflow straws got plugged up, the mix went anaerobic 'cause of no air circulation.

Anaerobic or hypoxic mix that smells bad has had fermentation going on: alcohols, organic acids, even ketones and aldehydes can accumulate. Root hairs don't like that stuff!

My suggestion would be to flush it a few times before you let the toxins "dry into" the mix. Then fluff it up as much as you can and let it air for a few days. Sun wouldn't hurt, since the microbes that have taken over are what you LEAST want for healthy soil, and most b eneficial things have suffocated.

If you put compost into your eBuckets, nothing else would be as good for poisoned mix as a month or two in a compost heap!

("Hypoxic" is the same as "anaerobic", but "anaerobic" means "no oxygen - zero - none" and that's hard to get unless you bury something feet deep in pure clay. Hypoxia means "not enough oxygen", and that's the more common problem. I also like the fact that "hypoxic" sounds like "toxic" and that is what it is.)

Worrying about fertilizer when the soil is hypoxic is like worrying about your diet while you're drowning!

Corey
Image
Aug 10, 2011 6:43 PM CST
Name: Rick Corey
Everett WA 98204 (Zone 8a)
Sunset Zone 5. Koppen Csb. Eco 2f
Frugal Gardener Garden Procrastinator I helped beta test the first seed swap Plant and/or Seed Trader Seed Starter Region: Pacific Northwest
Photo Contest Winner: 2014 Avid Green Pages Reviewer Garden Ideas: Master Level Garden Sages I was one of the first 300 contributors to the plant database! I helped plan and beta test the plant database.
I always wondered why people use soil mix as the wick in eBuckets.

Why not cotton flannel or rayon batting or some toweling? Leave more room for water in the bottom, more AERATED soil near the bottom.

A good wick could even draw water up several inches ABOVE water level before relying on the soil mix to wick it the rest of the way. (I think you'd get more even watering that way, even if you let the reservoir go completely empty some of the time.)

You could even pull a thick wick out through a hole in the side of the eBucket, run it into a pail or trough alongside or above the hole, and let the whole eBucket suck water into itself. Even uphill a little!

I was amazed at how fast a little 1 inch wide wick of thin rayon batting pulled water UP out of a yogurt tub and then down the side. More then one fat drop per second.

That's almost 1/2 tsp per minute.
1/2 cup per hour
1 1/2 gallons per day from one tiny wick UPhill!

What would some rolled up cotton flannel do, or a piece of terrycloth toweling?

Corey
Image
Aug 11, 2011 8:23 AM CST
Name: Linda
SE Houston, Tx. (Hobby) (Zone 9a)
"Godspeed, & Good Harvest!"
Region: Texas Vegetable Grower Seed Starter Garden Ideas: Master Level Canning and food preservation Gardens in Buckets
Tip Photographer Charter ATP Member I was one of the first 300 contributors to the plant database! Ferns
Rick,
Since the 2010 discussion here, I've moved to Tapla's 5:1:1 mix for my containers. Since the wicking factor is so important, he recommended I start off with a 3:1:1 ration of pine bark fines:peat (I use MG potting mix as my peat component):perlite, and adjust from there.

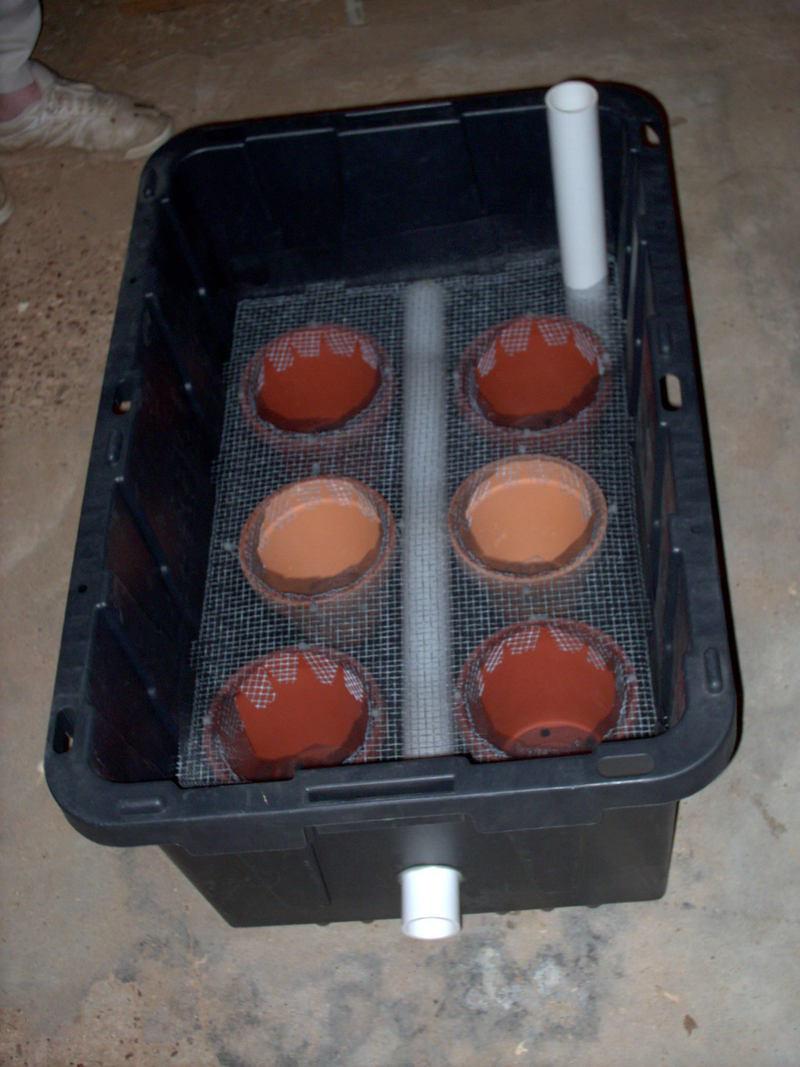
This last season, when I dismantled my eBuckets, I noticed there was a LOT of water saturation of the lower 1/4 level of the mix. This season, I will amend further, and do some eBuckets with a 4:1:1 ratio, decreasing the peat (wicking) action somewhat. I will also do some eBuckets with a 4:1:2 ratio, increasing the perlite component to see if that will increase further aeration, and what effect/difference it will make on the crop.

I LOVE experiments!!! I'll let ya'll know the results.

Hugs, and keep posting here, ok?

Linda Hurray!
Image
Aug 11, 2011 12:48 PM CST
Name: Rick Corey
Everett WA 98204 (Zone 8a)
Sunset Zone 5. Koppen Csb. Eco 2f
Frugal Gardener Garden Procrastinator I helped beta test the first seed swap Plant and/or Seed Trader Seed Starter Region: Pacific Northwest
Photo Contest Winner: 2014 Avid Green Pages Reviewer Garden Ideas: Master Level Garden Sages I was one of the first 300 contributors to the plant database! I helped plan and beta test the plant database.
Hi Linda

I've been advocating wicks for raised-beds-on-legs where the bottom few inches get water-logged and stinky (anaerobic or hypoxic fermenation).

Vegetable Gardening: Table Top Gardens
http://davesgarden.com/communi...

But making the soil mix drain adequately, as you're doing, is a better solution.

I'm still trying to get pine bark coarse enough that it doesn't provide excessive wicking all by itself! Now I start with better quality mulch, and "medium" rather then "fine". I wish I had some 3-per-inch hardware cloth instead of just 1/2" and 1/4"!

I use the 1/4" hardware cloth to try to discard as much of the fine stuff as practical, but it's slow work. Those fines are good for in-ground raised bed soil amnedment, but not so good for pots.
Image
Aug 11, 2011 1:52 PM CST
Name: Linda
SE Houston, Tx. (Hobby) (Zone 9a)
"Godspeed, & Good Harvest!"
Region: Texas Vegetable Grower Seed Starter Garden Ideas: Master Level Canning and food preservation Gardens in Buckets
Tip Photographer Charter ATP Member I was one of the first 300 contributors to the plant database! Ferns
Yeah,
Tapla told me when I got ready to fill the Raised Bed(s), I wouldn't have to screen the PBF anymore! That's a relief, cause it is a total, time-consuming pain to sit there and screen. And, I've learned -- if I HAVE to screen it, do it in the fall/winter!
Image
Aug 11, 2011 4:34 PM CST
Name: Rick Corey
Everett WA 98204 (Zone 8a)
Sunset Zone 5. Koppen Csb. Eco 2f
Frugal Gardener Garden Procrastinator I helped beta test the first seed swap Plant and/or Seed Trader Seed Starter Region: Pacific Northwest
Photo Contest Winner: 2014 Avid Green Pages Reviewer Garden Ideas: Master Level Garden Sages I was one of the first 300 contributors to the plant database! I helped plan and beta test the plant database.
It seems to me that one could make some really high-quality bark chips and fibers by running something like a huge cheese grater lengthwise along logs before they were de-barked. Then there would be very little "powder" and lots of long, thick fibers or chips.

Or you could run logs into a veneer-cutting lath with the bark still on, and slice off a uniform-thickness sheet of bark that ought to crumble into really long fibers and no powder.

But the orchid and nursery industries seem to get along OK just paying for double-screened bark. I suppose the size of the market doesn't justify large investment or "bark research".

Only the members of the Members group may reply to this thread.
Member Login:

( No account? Join now! )

Today's site banner is by IrisLilli and is called "Purple Crocus Mix"

This site is protected by reCAPTCHA and the Google Privacy Policy and Terms of Service apply.