I’ve been lurking on ATP for a good while (and maybe you’ve seen a photo or two of mine in the database or in a thread :lol:). But after learning about this photography section, I figured I’d create a login and chime in here. What follows is a not-so-technical discussion of really basic stuff about cameras and light. I don't think it's quite at a 101 level.
I’ll contribute plant/flower/garden shots going forward. There’s a wealth of magnificent subject matter around me ;) !!
Here goes: --Photography 050: Light – ISO, Aperture, and Shutter Speed--
In the simplest terms, photography is writing with light. In fact, that’s what the word means:
from Greek graphe "writing," and photo-, (comb. form of phos (genitive photos)) "light".
No matter which camera you use (film, DSLR, digital point-and-shoot, or even your iPhone), light goes through the lens and hits a photo-sensitive medium—either film or the digital photosensor. Assuming good focus (which is another discussion completely), the key to lightwriting is exposing the film or photo senor to the right amount of light (to avoid a washed-out or too-dark picture).
There are three variables that determine how much light gets written:
1) How sensitive the medium is to light
2) The quantity of light allowed through the lens
3) How long the medium is exposed to light
In photography terms, these translate to:
1) ISO (film speed)
2) Aperture (f-stop)
3) Shutter Speed
Digital cameras, your phone, and even modern film cameras can (and do) control these variables automatically to ensure proper exposure. But even if you never use your camera’s manual (or semi-manual) settings, it’s helpful to know that these are the variables in play that account for the exposure of a photograph. It’s also key to understand here that if you change (or the camera automatically changes) one of these variables, at least one of the other two will also need to change in order to produce a photograph with proper exposure.
ISO
The ISO value (number) describes how sensitive the film is to light. ISO 100 film is less sensitive to light than ISO 800 film is…and therefore requires more light to produce a properly exposed image. In photographyspeak, ISO 100 is called a “slow film” whereas ISO 800 is a relatively fast film. Slower films produce richer images whereas the faster the film, the grainier or noisier the photos will be.
Digital cameras mimic the ISO settings of film cameras (electronically) and the same quality concerns hold true – the higher the ISO setting on the digital camera, the noisier the photograph will be.
Fast films (and higher digital ISO settings) are commonly used to photograph in low-light situations or for shooting quickly-moving targets (sports, etc.), whereas slower films (lower digital ISO settings) are used for portraiture, landscapes, etc. – stuff that generally holds still.
Aperture (f-stop)
To understand the aperture of a lens, think about the pupil of your eye. When it’s dark, your pupil dilates (gets bigger) to let in more light. When it’s bright out, your pupil it contracts to allow less light to hit the optic nerve (your own photosensor).
The dilation of the camera’s pupil (aperture) is measured in f-stops—the lower the f-stop, the more light hits the photo-sensitive medium.
(Notice here that the higher the f-stop, the less of the lens’ surface area is used to pass light through. That’s a really important concept to understand when thinking about “depth of field” (think focus depth) – but to keep it simple here: the higher the f-stop, the deeper the focus will be.)
Shutter Speed
Shutter Speed is a number, measured in fractions of a second (or even whole seconds), that describes how long the photo-sensitive medium is exposed to light. This variable is pretty intuitive, but it’s important to note that the slower the shutter speed, the longer you have to hold the camera still (and a that’s a very good reason to get a tripod).
So what? How do these variables affect my pictures and picture taking?
Ah, I’m glad you asked. Here are some examples of the same subject taken with absurdly different variables. See if you can get a sense of how each of the three variables affects the final product.
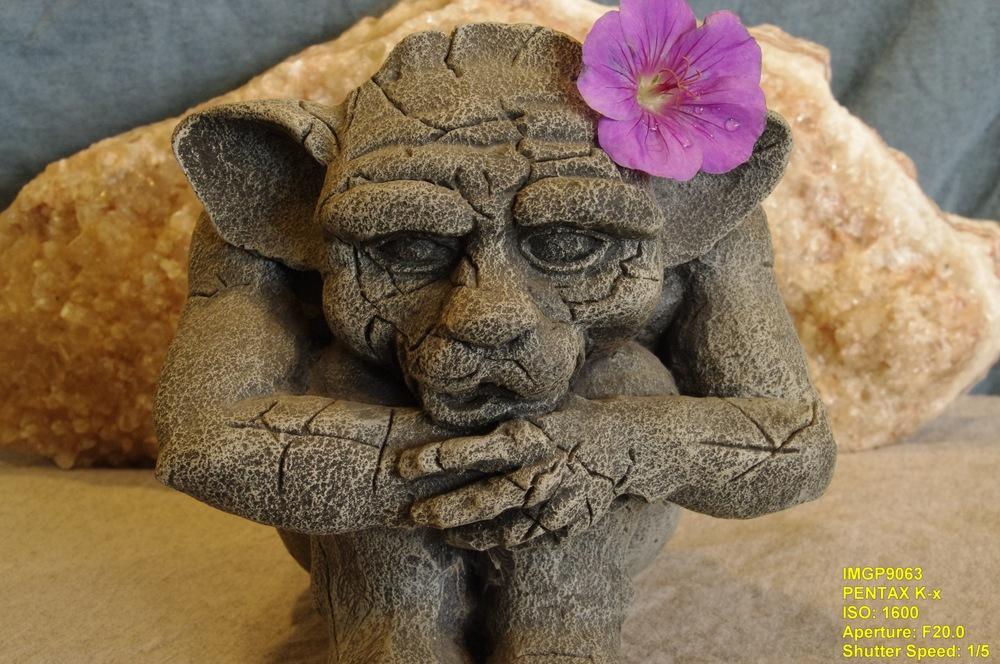
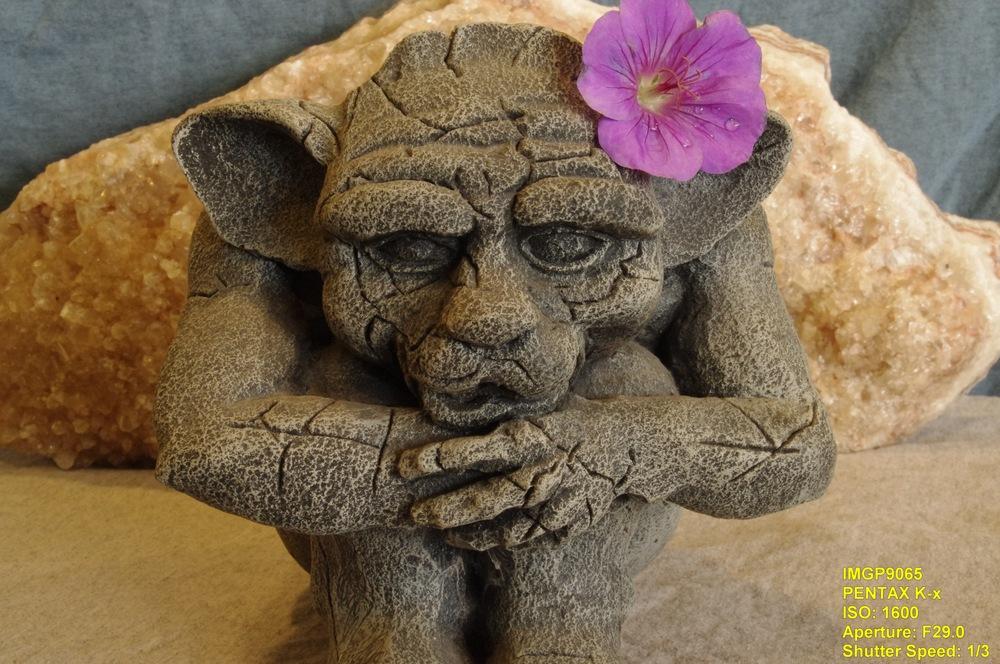
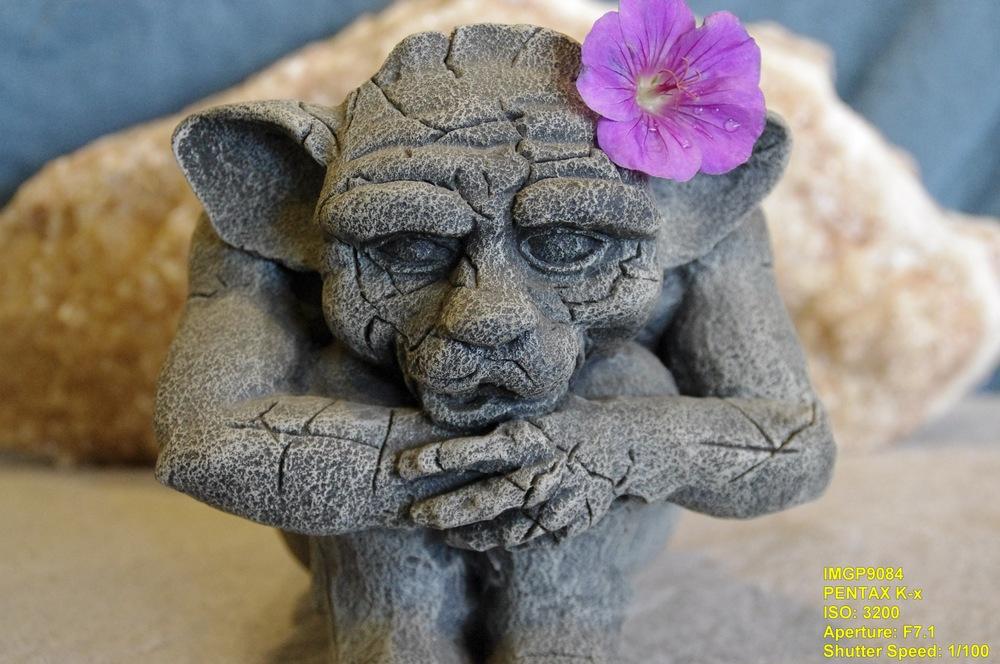
ISO – here are several photographs of a gargoyle shot using increasing ISO values. If you look closely at the flower on his ear, you can see that it gets grainier and nosier (and ultimately becomes unusable). The camera is holding the aperture fairly steady (wide open) but it increases the shutter speed somewhat as the ISO values increase.
Takeaway: for richer shots, shoot using the lowest ISO value that is reasonable (given other constraints/considerations).


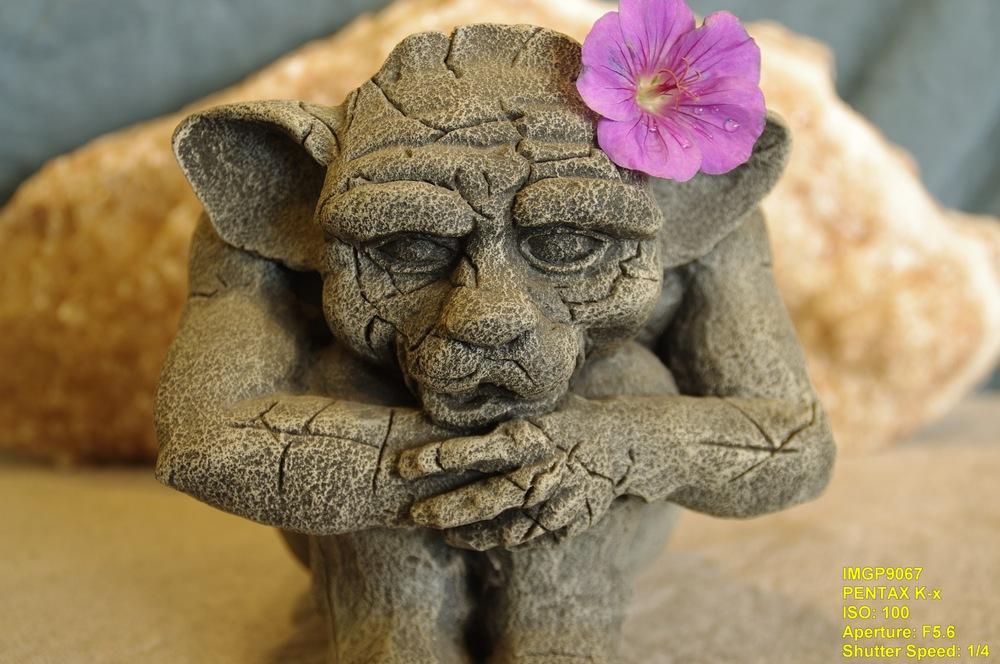
Aperture – here are a few more photographs of the same guy. Because I was shooting in pretty low light (ambient window light and room lighting – no flash), the camera popped the ISO value to the maximum that I had bracketed (ISO 1600) and changed the shutter speed to account for the shrinking aperture through the progression.
Although we’re supposed to be talking mostly about light here, notice how only his nose is in sharp focus in the first shot (wide open for this lens – f-4.5) and even the background is in pretty good focus in the last shot (tiny pupil at f-29). Key stuff in discussions about focus.


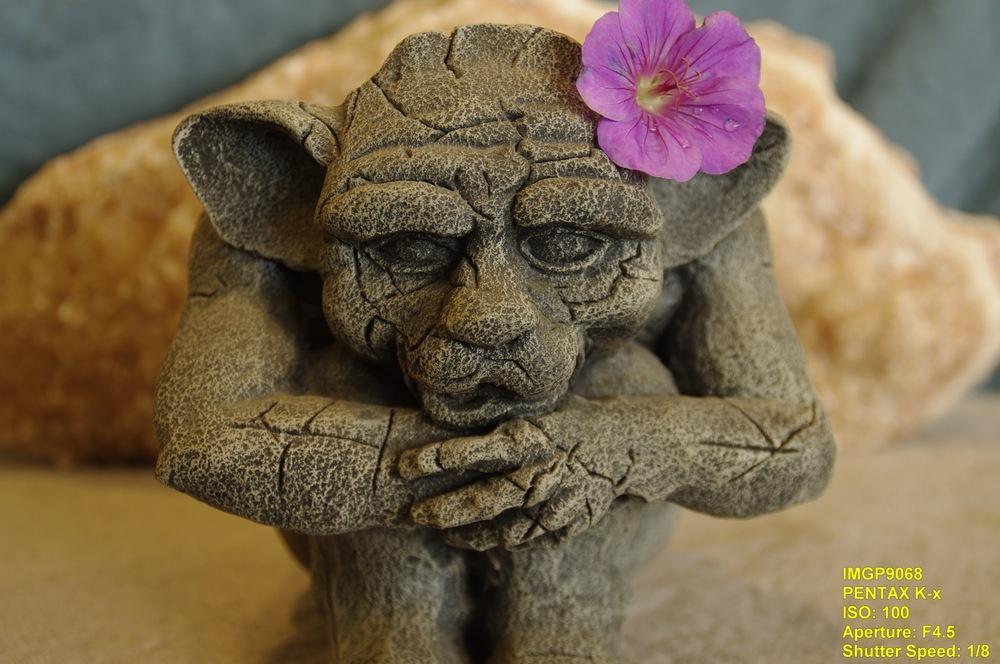
Shutter Speed – in this series, I started with a VERY slow shutter speed of 1/2 second. The camera accounted for that by decreasing the aperture to f-8 and used the slowest ISO value that it could (ISO 100). As I increased the shutter speed, the camera responded by increasing the ISO value and opening the aperture (to f-5.6 in the next and then to f-4.5 in the remaining shots). The camera complained when I tried to shoot the last shot at 1/1000th of a second because even with the fastest ISO value available (ISO 12800) and the aperture wide open (f-4.5), there just wasn’t enough light coming in for that shutter speed.


How your digital camera thinks about this stuff
Your camera probably has a dial that you can use to select from a few icons – automatic, a tulip, a guy running, a mountain, an icon of a person, moon and a dude, etc., (and then maybe some strange letters like SV, AV, M, and other junk), right? This isn’t the right place to go into detail about these settings, but it’s instructive to have an idea about how the camera is deciding to write the light on each. I’ll use my Pentax K-X as the example here, but your camera will have similar (if not more or fewer) settings (check your manual if it’s interesting to you).
What follows are broad, sweeping generalizations, but should give you some idea of the decisions that your camera is making for you about light in each mode (I've left other nuances about the modes alone here). Keep in mind that the camera’s first priority is to get the exposure right – so the emphases described below are only that – emphases. Your camera reserves the right to go entirely rogue in order to get the exposure right. That’s what it cares about most.
Automatic – automatically selects the most appropriate of the modes below:
Portrait (person icon)
Emphasis: shallow depth of field (focused face, blurry foreground/background)
Outcomes: smaller f-stop number (more open aperture), lower ISO value (see note), and slower shutter speed
Note: Some will not allow an ISO value that exceeds a certain threshold in this mode.
Here’s the same gargoyle shot in Portrait Mode:

Landscape (mountain icon)
Emphasis: getting as much in focus as possible
Outcomes: larger f-stop number, higher ISO value, slower shutter speed
Macro (flower icon)
Emphasis: deeper depth of field
Outcomes: larger f-stop number, higher ISO value, slower shutter speed
Note: Some cameras will not allow focus to infinity in macro mode (which makes focusing quicker). Some cameras also allow you to get closer to the object than in other modes – sometimes even closer than the lens should physically (physics) allow (lots of math and maybe some fudging here, depending on the camera/brand).
Other note: This concept is a bit beyond the scope of this discussion…but it’s important to nod at, at least. Although the camera is trying to increase the depth of field in this mode (and actually is), the chunk or slice of what can potentially be in focus decreases the closer the lens is to the subject.
Here’s the same gargoyle shot in Macro Mode. Notice how different it is from the one shot in portrait mode (and how the settings differ, too). (Also, I forgot to bracket down the ISO range...I usually have it set at 100-800...you'll be disappointed shooting portraits at ISO 3200.)

Moving Object/Sport Mode (runner icon)
Emphasis: freezing the in-motion subject (blur reduction/elimination)
Outcomes: fast shutter speed, higher ISO value, smaller f-stop number
Note: in order to achieve a fast shutter speed, the camera will often necessarily bump up the ISO value to the maximum that you allow. Expect your photos to be less rich (grainier or noisier) than those shot in other modes.
Night Scene (guy with moon and stars icon)
Emphasis: the first emphasis is to get enough light on the subject (person) in the foreground and the second is to get enough light on the background
Outcomes: the flash will fire to illuminate the person in the foreground, and then the shutter will stay open for a while afterward in order to expose the background properly – smart stuff!
How can I control these values?
Your camera probably has a few semi-automatic modes that are similar to mine. Look your manual if your settings are not somewhat parallel (or intuitive).
SV (sensitivity priority) – Use this one to set the ISO value manually. The camera will then adjust the aperture (f-stop) and shutter speed for proper exposure.
TV (shutter priority) – Use this one to set shutter speed manually. The camera will then adjust the aperture (f-stop) and ISO value for proper exposure.
AV (aperture priority) – Use this one to set the aperture (f-stop) manually. The camera will then adjust the ISO value and shutter speed for proper exposure.
M (manual) – you’re on your own and in deep water with this one. As you fool around with the other values, though, you’ll get a sense of where to start…and can look results in near-real time on your LCD screen to dial things in. Sometimes, manual is the only way to achieve the results you’re after. Sometimes you just have to outthink the camera.
So that’s that. Stuff that maybe isn’t at the forefront of your mind when you’re point-and-shooting, but your camera is sure thinking about it and trying to make good decisions for you using those three variables as it writes your light.