
Would you like to prevent fungus gnat infestation indoors? It CAN be done. I used a multi-prong approach & except for a lone gnat or two this season, it's been working great this year, solved without the icky yellow, buggy sticky traps.
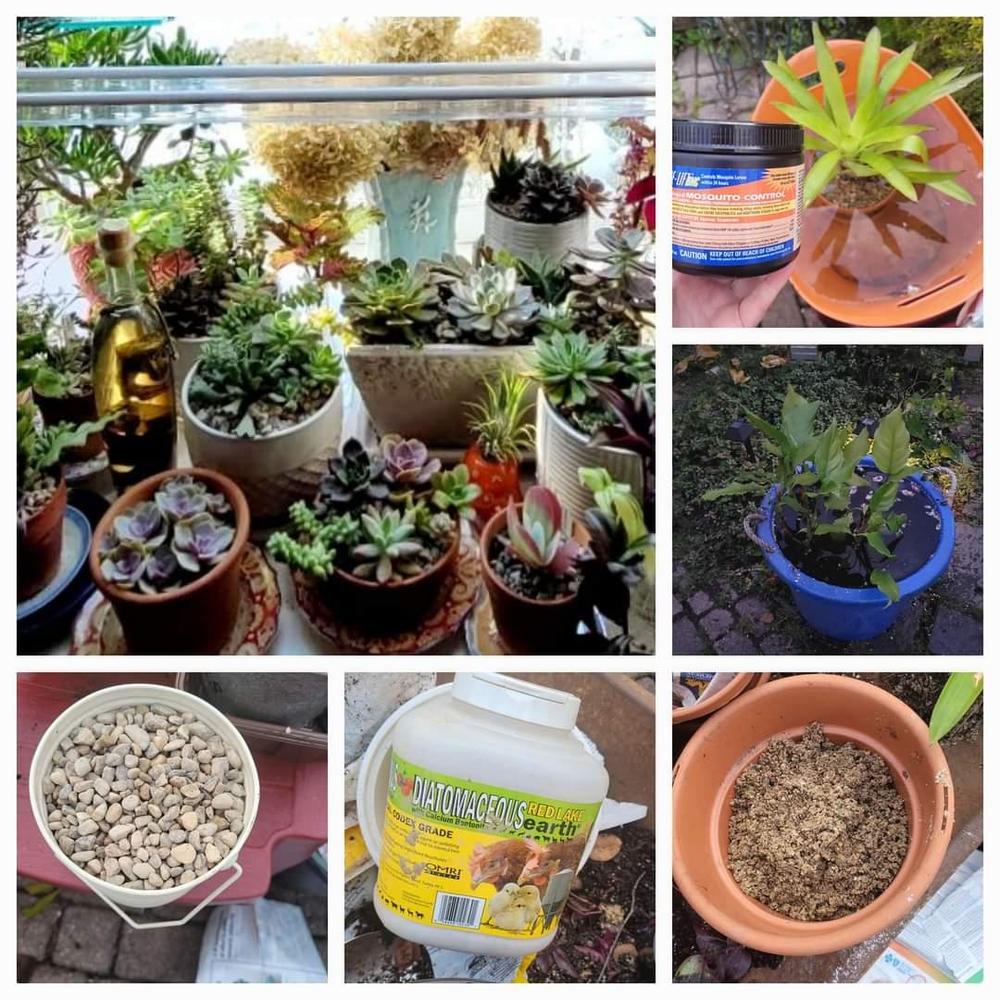
I started with my "move indoors" plant process, honed from 4 years of dealing with the 6 week cycle of fungus gnats. You probably won't see the larvae, that have a black, shiny head with a white to clear body that are 1/8th to 1/4th an inch in length because they prefer to grow under the soil's surface, except those that leave a make a slime trail on the soil surface of heavily infested plants. The eggs are in the soil that you bring in unless you bake your soil & rinse ALL of your plant roots. (New store bought plants may also have eggs or larvae in the soil.)
I did use sticky traps last year, but seeing ooey gooey blaring yellow things covered in dead bugs in my home just wasn't working for me. This does. I have a LOT 🌱of indoor plants. 🌿
1) Repot plants as needed, adding a sand layer. Top the soil in pots with sand & pebbles. Adding pebbles also keeps the soil in the pot for the next step. Some plants may not like the weight of pebbles, so top just with sand, rooting coleus for example.
2) Submerse / soak your plant in a tub of water 15+ min with BT (organic) which is the stuff in Mosquito Bits and other fungus gnat remedies. See step 3 for details on the repotting.
Bacillus thuringiensis, or BT, is a naturally occurring bacteria used as a pesticide for various pests like mosquitoes. BT comes in many forms: granules, sprays, dropper bottles and dunks. However, no matter whether a bacteria introduced is an organic treatment or not, take good care with BT as it can kill beneficial insects too. Please read directions carefully and do not use in the garden where it may destroy the ecological balance of predators & prey.
I set up a processing plant station in October (I'm in zone 6a, SE Michigan) with tubs filled with water with a little soap & BT in it and with drain stations for my soaked pots. You can also use a little bit of NEEM too instead of biodegradable dish soap if you prefer.
2) Spray a light Neem solution on the leaves of tall plants, both sides of the leaves. Aphids followed me in somehow last year on my Mandavilla, not this year.
3) After a good soak of 15-20 minutes, add a thin layer of DE, Diatomaceous Earth, food grade, to the top layer of sand / pebbles as the plant drains.
4) Every 4th week, water with BT added to the water. I use a tiny bottle of the stuff, expensive but 1 drop goes a long way; it lasts.

5) Pour bleach / boiling water down all home drains (they grow in there too).
6) Enjoy a movie & good sleep, bug free.

We started our Red Haven tree as a very small tree in April 2018 in our front yard, in the city (zone 6a, SE Michigan). The first two years we protected it against some early frosts. Yes, we pampered it a bit the first two years.
It is now in its 4th year, 5th summer and we did not pamper it at all this spring. However, there were not early frosts, so that may have helped ensure the bumper crop we have this year.

(Photo above, 2022 peaches.) I hear it's good to plant peach trees and the like near houses as the building heat helps protect it against early frosts.

We netted our tree last year. This year, we have SO many, it's not an issue. We are picking them before they are all ripe. When we did that last year (many less peaches), they ripened beautifully.


Here come the first robust dahlia bouquets of the season, from my new, dedicated to dahlias garden in Michigan, zone 6a.
I've posted a video that gives a luxe view of these dahlias on my Facebook page
https://m.facebook.com/story.p...
and on Instagram https://www.instagram.com/reel....
Here's a preview:


Penhill Autumn Shade, Kelsey Annie Joy and Polka.
This is my 4th year of focusing on Dahlias.
Enjoying!
- Deb
#dahliaseason
A complex, 3-4 day build yet so satisfying! Original post spring 2022. Updated two years later, winter 2023 to spring 2024.
In 2022 we moved out a spa / hot - tub we were no longer using. This left us, intentionally, with a cement pad the right size for a mail-ordered greenhouse by Canopia - Palram. We ordered the Oasis model. The hexagonal 8' x 7' design was also beautiful. So the first photo shows the idea of the greenhouse, and the time of year, March 2022, when we ordered it from Costco. It arrived in a flat box placed in front of our garage door, then built it. In 2024, I've added updates below on how much we are enjoying this little greenhouse in our backyard in town.

Day 1: The instructions and checking all the parts took one day to plan. So the actual first day of the build was putting together the galvanized steel base and upward wall powder-coated aluminum frame or struts, which my husband did on Day 1. He's the detail-oriented one, so necessary to begin well.

Day 2: From then on it was a two person job, which is where I came in, to help organize the parts -- small plastic containers and flan dishes for 70 - 90+ screws and bolts, clips to secure the side walls and many more unique parts. The walls and doors were made of a clear polycarbonate plastic. The roof and louver vents were made of a corrugated plastic material.
I did marvel at the many bolts that we would count out and slide into channels for attaching braces, the roof system and the door assembly and door handle. The ready to assemble pre-drilled metal pieces, pre-cut panels, and extensive hardware was an engineering marvel -- so much in a small package. Quite the feat! There are many steps that required two people such as sliding in the bendy, tall pieces of polycarbonate for each side of the hexagon walls and teamwork in putting in the top cap screws and bolts.
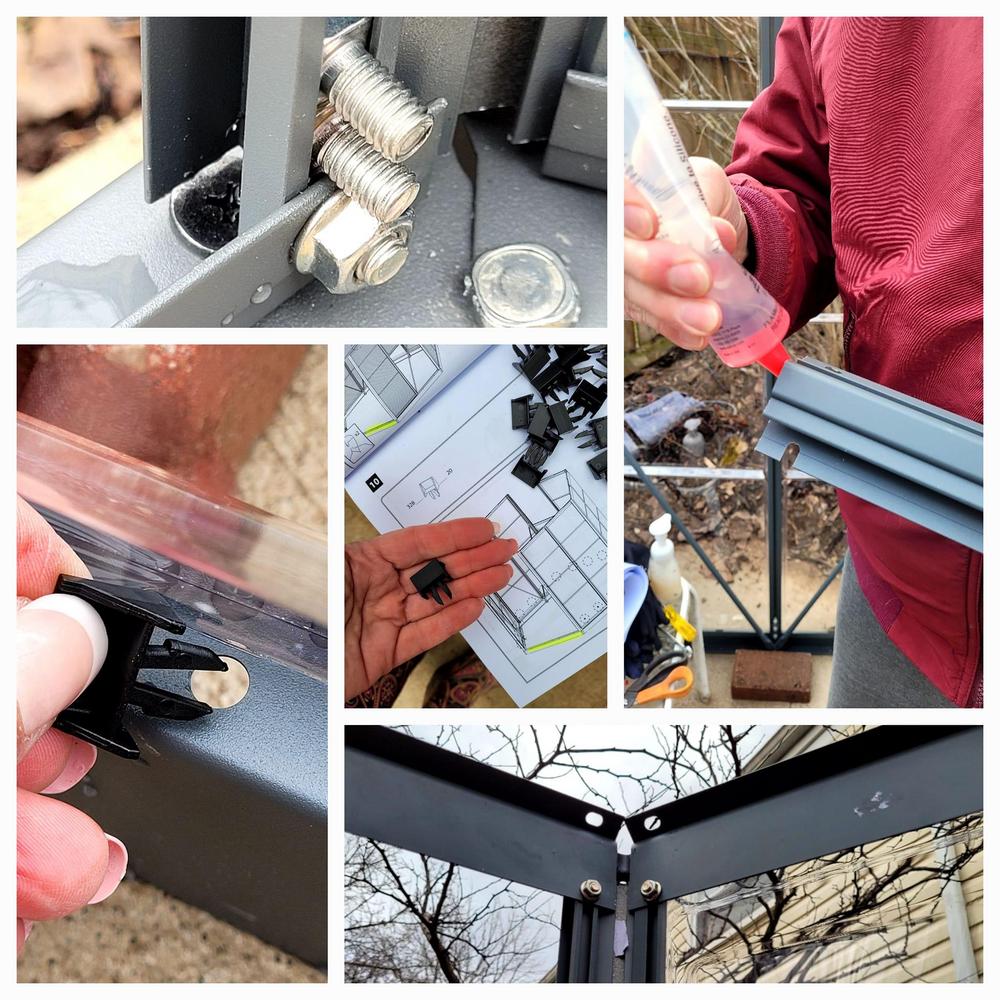
By 10 p.m. in the dark on Day 2, as we wore head lamps to guide sliding roof panels into the aluminum frame channels, in freezing weather, I would not be inclined to agree this is an "easy installation." Panels needed some jostling to get a good fit, and several of the aluminum frame pieces had interlocked in shipping (not the best wrapping) so we had to use a rubber mallet to pound several of the frame struts apart, including those for one of the greenhouse doors. They were locked tight together. One of the framing pieces was bent, fortunately corrected with channel-lock pliers. Building this greenhouse is, however, doable with patience and two people with some mechanical ability. Being nearsighted helps with lining up and installing all those screws and bolts. Using foaming soap helped attach some of the super snug plastic piece to the polycarbonate walls.
Day 3: Adding interior braces, roof end caps and assembling and installing the doors, which thankfully could be put together indoors. The visual instructions mostly avoid the need for translation into multiple languages. The visuals favor those who do well with drawings. With two of us verifying our interpretation of the diagrams, we made only a few "wrong way" moves that were easy to correct.

Photo above shows the boxed greenhouse after it was delivered by UPS. Final photo below, shows the doors added at the end of Day 3. What was left on Day 4 was installing the anchoring screws to the cement inside. My husband soon found that this was a challenging final step, even with cement drill bits and the special blue screws meant for stone. However, he finished drilling in the anchors before evening. Secure anchoring is absolutely necessary for helping any greenhouse survive big winds.

In summary: Definitely a 2 person, complex job best completed with some advanced competencies in reading diagrams. It was also so satisfying to complete, and it looks good, compared to the more utilitarian 6 x 8 style greenhouses. It is already in use, as of Day 4, to help protect sedums and other succulents from too much rain in April and over the summer. I am now moving in artichokes that were overwintered in the garage and pots of newly sprouting potted irises, daffodils and tulips to protect them from marauding squirrels until they get a bit larger. The final touch, solar lights:

Now the 2024 update:
What FUN and how useful this little greenhouse has been. We are looking to get it electrified this year. Two electricians have given us quotes and we now have solar in our house, so that is helpful for keeping it running either year round or for most of the year.
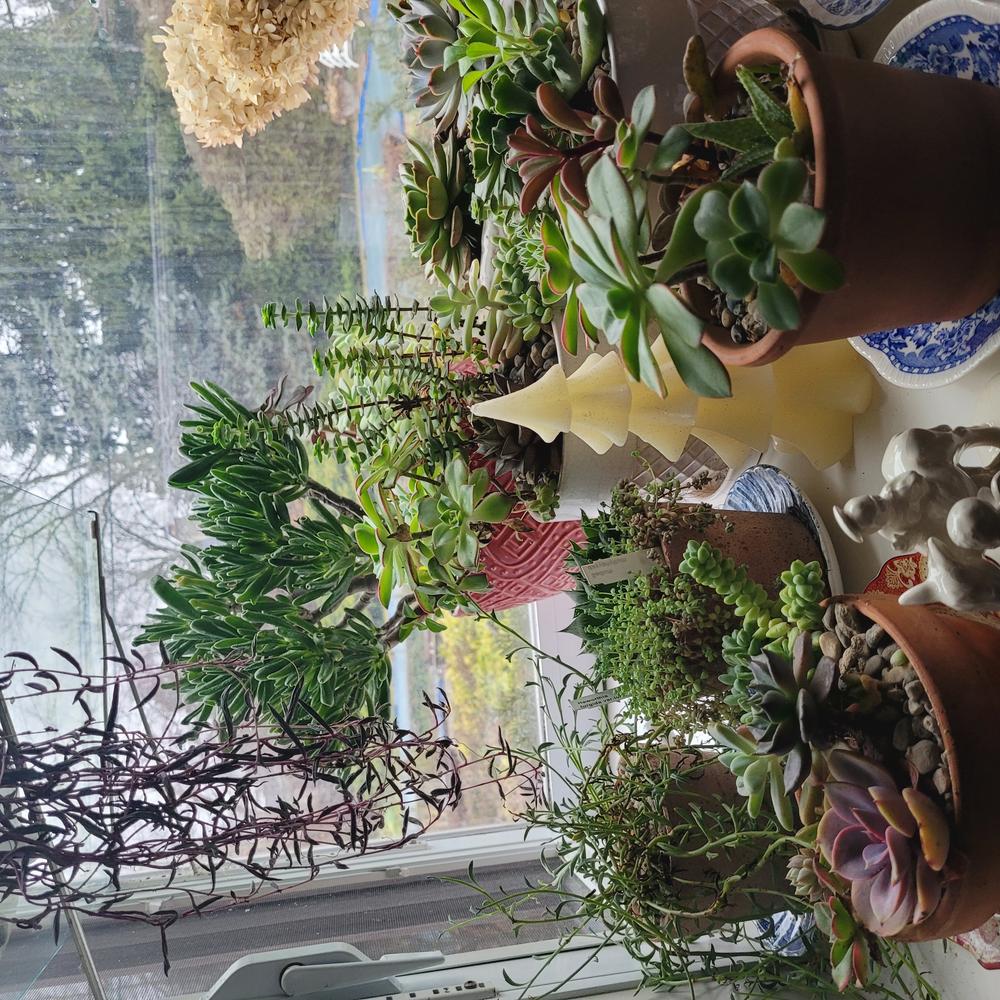
First of all, I'm glad to say in Michigan, this little greenhouse is a great season extender. It allows me to protect my extensive sedum, succulent (cactus) collection from excessive rain, and extends the time I need to slowly prep all my plants, including tender sedums and a Plumeria for overwintering indoors. This deliberate process, and the periodic use of BT (a natural microbial insecticide, Bacillus thuringiensis) has kept the fungus gnats as bay during the winter, without the use of icky, gooey yellow fly traps. I have another blog post listed here about that process. That said, there's always something. In 2024, mealy bugs showed up on my Echeveria, and white flies on my klanchoes.
ANYWAY, back to the good stuff, best shown in a few 2023-2024 photos below:
Fall 2023, season extender:

Use of bubble wrap to help insulate it. Definitely worth it!
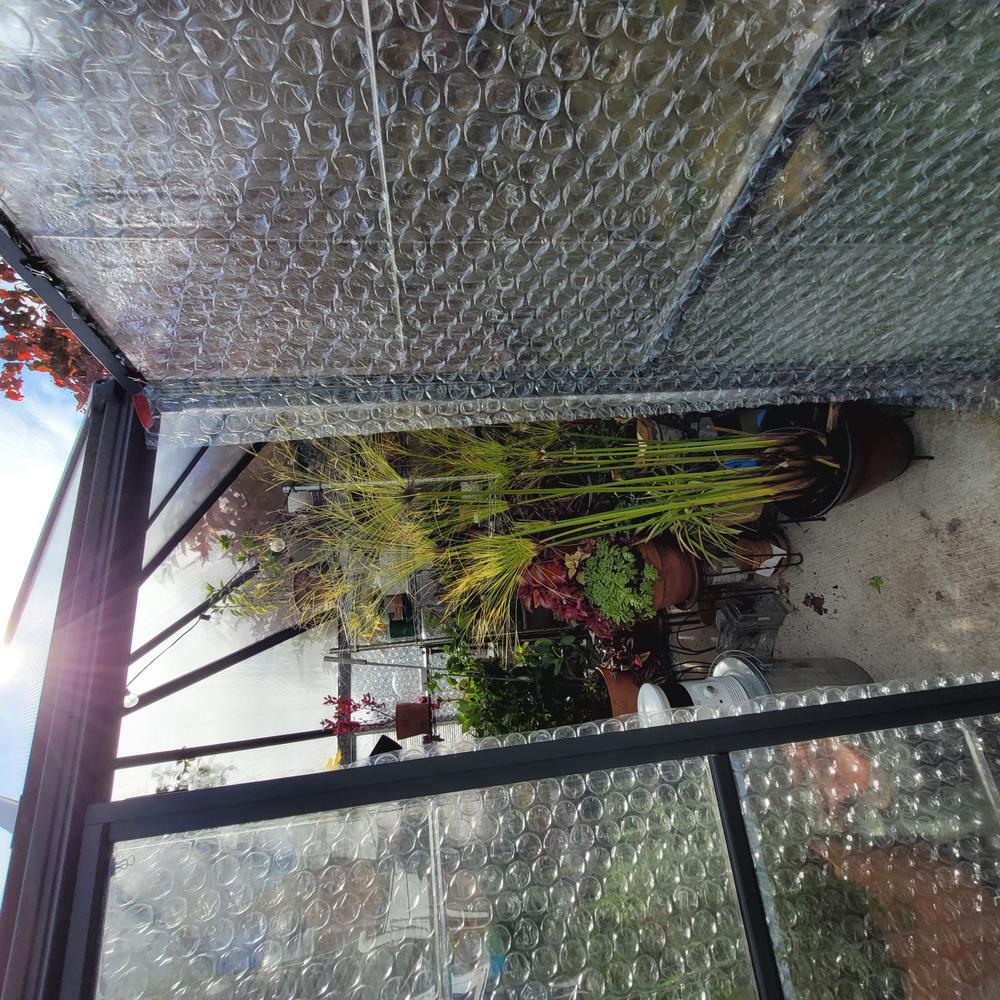
I ordered it through Amazon and the measurements were just the right size of the octagonal shape of this greenhouse. What a find!
I do use an inexpensive heater with a thermostadt during the winter and monitor it closely with a Govee temperature sensor. I find even during February, I need to monitor it closely, as I had one sunshiny day in February when we were both out of down and the greenhouse got to 104 degrees during the day ![]() , as the heater did not turn off soon enough! (Next time, we'll use a timer on it when we leave.) Fortunately the herbs in there toughed it out.
, as the heater did not turn off soon enough! (Next time, we'll use a timer on it when we leave.) Fortunately the herbs in there toughed it out.
Here's the latest for 2024:
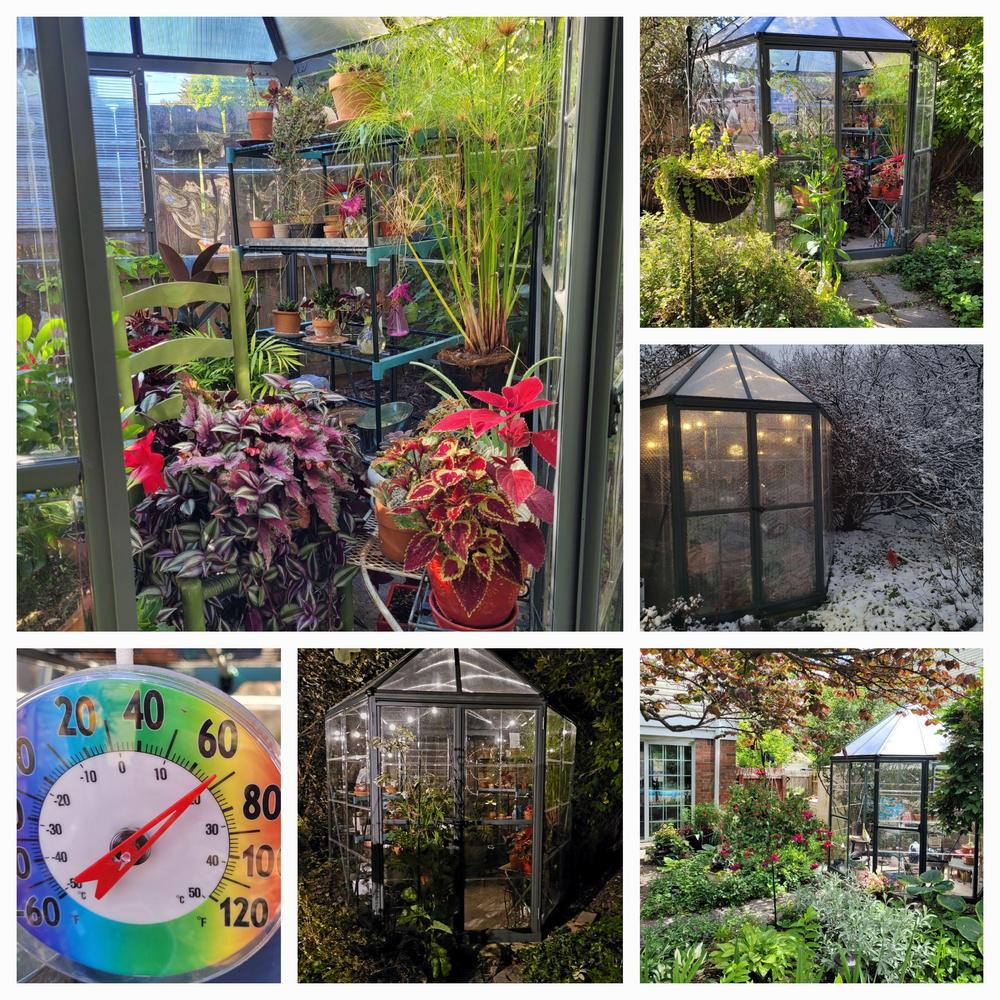
Growing lisianthus in mini-soil blocks. Sprouts!

I hope this has been helpful for those researching greenhouses.
What I'm using the greenhouse for as of this 2024 update:

Let us know what ideas you have for putting a greenhouse like this to good use.
~ Deb
I've planted up 33 Winter Sowing containers this year at the time of this original posting in 2021. In 2024 I'm winter sowing native plants and helping a local native plant enthusiast with native plant growing on a larger scale. In 2024 I've also got a season of selling flowers at a local farmers market under our belts, and having success with dahlias (not winter sown, but sprouted early using the a new, small greeenhouse.) Using the plant events list here made it easy to better track EVERYTHING, including what I'm winter sowing and growing (as long as I log it in.)
In 2021, I had just finished one year of coordinating a community garden and sharing Winter Sowing tips with the local "Project Grow" audience, I thought I'd share it here too, including references to my SlideShare, five seed lists handy for winter sowing, and my top tips. As long as you use Winter Sowing suitable seeds, there's still time to winter sow for most things except some plants / seeds that have a very long stratification period (like grasses.) In 2024 I'm on the board of that community garden organization, Project Grow of Ann Arbor, and have just finished teaching a Winter Sowing Natives class online with Jonathan Parker, of Seeds to Community. He's a great one for promoting the cultivation of native plants in our landscapes. I think I'll just need to do a 2024 Winter Sowing native plants update soon to cover that!
Here's the original detailed Winter Sowing 2021 post with links including extensive seed lists:
There's a great place of respite from the weight of world events and dispiriting local noise, and that place is the garden. Even the soil itself has been recently shown in studies to bring energizing catharsis to one's spirit. To that end, Winter Sowing (WS) is one of the most joyful and hopeful tasks I do after packing away holiday decorations. That gardening and spending time in nature is restorative, especially for chronic stress, is now illustrated in science. So here we are in prime season for Winter Sowing: January – February. This post features ten (10) lessons I've learned about the process. If you are new to Winter Sowing, also check out the basics of why, how, when, what and where to Winter Sow
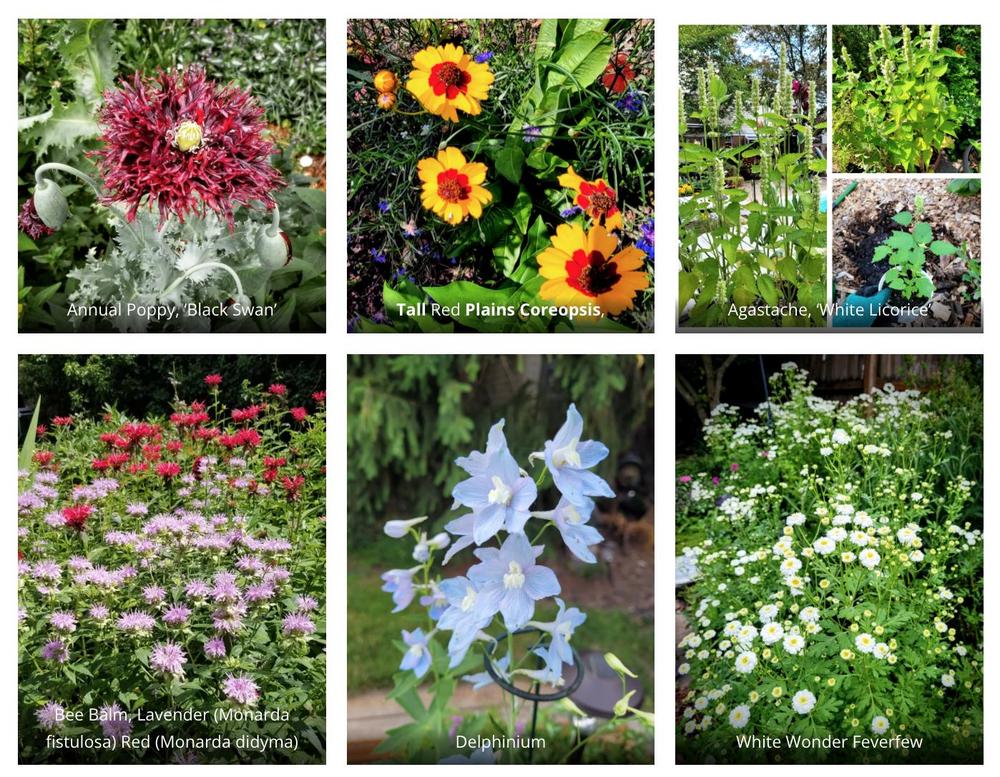
 (Pictured, winter sown Helenium)
The Basics of Winter Sowing
The slide presentation here: https://reveln.com/2022/01/24/...
gives the basics of why to as well as as how to, when to, what to and where to Winter Sow. Later on in this post you will see the seed lists that I've adapted from those developed by Trudi Davidoff who developed the Winter Sowing process.
Two videos of my of my presentation to a local community gardening organization on how to make Winter Sowing containers are now available on the link above.
Here's what I've found most useful after trying many different containers and seeds over the last few years, as well as mining the wisdom shared in Trudi's Winter Sowers Facebook group of almost 70,000 members at the time of this post. These techniques also help with spring seed sowing as well, as the smile from avowed "I can't grow tomatoes" friend shows in this photo with lesson learned #1.

Laura used to say she couldn't grow tomatoes. No longer! I showed her how to make homemade "earth boxes" for tomatoes, and she's a convert.
My top 10 list for Winter Sowing:
1. Fun is a big part of the Process! If it's not fun, why do it? Start by collecting enough of the ubiquitous Winter Sowing containers – the translucent gallon jugs — a WS standard, as a part of the grand WS adventure. I will also cover using the tote method of Winter Sowing in the videos to be posted soon. What is nifty about "free" containers is that they are also great way to connect with friends and neighbors, (Covid safe, outdoors) while you repurpose, reuse, recycle. Plus, some of those same neighbors will be glad to take your Winter Sowing and Spring sowing extras, which most seed nurturers have in abundance. Have a quick outdoor visit with friends and neighbors while you are at it winter or spring / summer.
2. Start with seeds most likely to do well. It's important to create a good first experience if it's your first or second year Winter Sowing. So check out the short list of great plants for Winter Sowing that I've grown myself and recommend for zone 6a, Southeast Michigan. You can also use the internet to research plants, especially those suitable to your zone using your zip code entered into the USDA planting zone map. The photo gallery below also shows some plants on this list. Tip number nine (9) gives links to a wealth of resources on plants by name as well.
If you, like me, love a good challenge, I suggest you wait until your second or third year to plunge into the extensive seed lists below for Winter Sowing. Some plants are biennials and some require fussy cultivation like Lisianthus. Enjoy beautiful blooms before you try biennials, (Hollyhocks, Canterbury Bells), dust-like seeds (Ice-plant, Lisianthus) or the so called "Double Dormancy" types of seeds.
And for a little inspiration, here are photos of some of my WS suitable plants:

3. Plant (WS), wait, then get busy watering! While the frozen tundra reigns in winter, most WS planted containers need little care. As long as they have been well watered before setting them outside, the seeds and soil will go through the various freeze, thaw cycles just as nature intended and will usually stay either frozen, or moist. However, once things start warming up, it's time to get watch the moisture levels. Do not let your WS containers dry out. For the jugs, bottom water, which is mostly needed in late winter and spring when the sun warms the ground and containers. In this way you won't dislodge any small seeds you've taken pains to space out properly to give your young sprouts room to grow.
4. Patience! Winter Sowing results will vary based on time to maturity.
Trudi describes the "hunk-o-seedlings" (HOS) method that I illustrate with the photos in the SlideShare above. Another option is to 'prick out' (a term used in the UK) in April (in Michigan) to the next size pot if the seedlings need more room. If you wish, a cold frame is excellent for growing on to the next size of plants from your WS jugs and containers. I also found last year that using the tote and red solo cups method worked very well for the vigorous, Ammi, as well as finicky or slower to germinate plants. Echinacea (coneflower) started slow, but when things warmed up, it took off growing vigorously. Snowdrop Madonna Anemone was VERY slow to germinate but then grew just fine during July – August. I transplanted it into pots to let it fully mature without competition from other types of plants. Photos are below.

Echinacea, Madonna Snowdrop Anemone, Ammi seedlings, Green Twister
Anemone and the hybrid Green Twister Echinacea are examples of perennials that need two or three years to get to full blooming size. Green Twister is pictured above as as a two year old plant. Ammi (an annual) and the pink Echinacea cultivar shown were robust and flowered well in year one.
Winter Sown seedlings are tough. Those that remain will be champions.
Old brownie tins are just the right size for bottom watering WS jugs. I keep my vintage 9 x 9 brownie tins and a full watering can nearby outside to hydrate winter sowing jugs from March through June. They are useful inside too as the photo illustrates.

Lift the jug and see if it feels light. If so, put the jug in the tin, add water and wait about 15-20 minutes. The jug will draw up the water from below through the drainage holes.
5. The Greenhouse Effect. Covered WS containers do protect tiny plants against late frosts without the tedious "hardening off" process. Yes, you can use blankets, cold frames, mini-greenhouses, light bulbs and tote things to the garage to protect against a cold snap in early May. I do use these remedies for non-winter sown seedlings. Yet the jugs and my WS totes are excellent environments for protecting against a sudden deep freeze in April. You might lose a few tender seedlings in the jug. However most Winter Sown seedlings are tough. Those that remain will be champions.
Snapdragons are a great hardy annual to Winter Sow
Tomatoes: When it comes to SPRING sowing, do not start tomatoes too early indoors in Michigan or they may grow spindly and frail. The photo above shows Laura with some of my tomato extras that got a bit leggy by the time she came by to pick them up, but fortunately those indoor grown plants can be planted deep to the first set of green leaves and will grow roots along the stem and produced good fruits.
As for Winter Sowing tomatoes…. This quote is a good addition to Royer's testimonial in the video above. "I'm in NYC (zone 6b) and have WS-ed tomatoes for a lot of years now. I usually sow them around this time as well [Feb-April], picking tomatoes by early August. The earliest I've gotten fruit were from 'Early Girl', in July. I am a balcony container gardener, and have never had any problem with getting a good harvest. Sometimes too good!! If you're nervous, why not try it both ways? As "flowerwoman" says, the WS-ed ones catch up quickly and have the extra-added bonus of an astounding root system!" Source: Houzz
6. Use the right types of seed. Seed lists help! You will find there are pages and pages of winter sowing suitable seeds. Explore the wide range of seeds to winter sow after the Winter Solstice, December 21st, the start of the Winter Sowing season. These lists are for the Michigan and midwest areas in the middle zones of 5, 6, and 7 where weather is less extreme during winter and summer than the other regions, unless otherwise noted. Many plants will thrive and grow in this temperate climate. Please research your choices to see they are suited to your region. Here are the lists (use the link above or at the end of this post to view them and download if you like):
Common Perennials for Winter Sowing (with zones listed)
Hardy Annuals Suggested for Winter Sowing
Herbs and Vegetables
Middle Climate Native Plants
7. Allow space for learning mistakes. Winter sowing allows for imperfection. Even if you don't follow the various steps exactly right or take perfect care of your young WS seedlings, the plants are surprisingly hardy and often respond well once actively growing. Even forgetting to make drain holes in one of my WS jugs (remedied when discovered) DID produce beautiful plants that bloomed the first year. Check out the Helenium in full bloom pictured at the top of this post.
8. Plan for your time and energy resources and limits. Many gardeners find they have many more seeds than they can plant or care for, so it's ok to save some for next year because it is likely you will probably end up with way more plants than you expect and can use. Having too many young plants that need to be planted out can be stressful and can take away from the joy of spring. Winter Sowing can be hugely successful, so pace yourself so you can fully enjoy your new sprouts and spring plants. Try some new things each year. Also, you can in one of the photos on the page that I didn't get to a few of my plants until June, when they were quite large. Things happen, duty calls, yet in the other photos you'll see the plants still did ok, even when planted out a bit late and produced lovely results.
9. Take notes and photos during the process. Some perennials are short-lived, like Shasta Daisies, so plan on dividing them or either take cuttings or winter sow new ones to replace them. It's good to take photos and make notes about the longer lived and shorter lived perennials so you can make plans for what to winter and spring sow each year. One convenient way to do that is to use the free resources available for keeping track of your seeds and plants online at the National Gardening Association (NGA) website (http://garden.org/users/join/d...), which is loaded with excellent gardening articles and photos.
The website is supported by advertising, so you can join for free. If you use my member referral link http://garden.org/users/join/d... , I can say hello to you when you join and perhaps answer any questions you have after you look around. Check out their gardening forums page or their perennials page. You can build a useful member profile page with garden notes. Note that it is customizable for what you may want to label as your various plant categories. It's where I keep track of the following 337 plant histories as of the time of this posting.
Cottage Garden [63]
Cutting garden [18]
Dahlias [12]
Herbs [17]
Perennials [109]
Pollinators, Wildflowers [55] (mostly winter sown, of course!)
Prairie [9]
Sedums and Succulents [14]
Shade Garden [21]
Veggies, Tomatoes [39]
There's also a handy vegetable planting guide by zip code, a terrific plants database that connects to your personalized plant list (like mine above), seed swaps, and much more. It's a gardener's delight!
10. Experiment! Try different planting methods, based on the habits and vigor of the seedlings. If you have been gardening for awhile and are ready for a challenge, try something new. This year, I have three experiments going on:
a) Lisianthus: My biggest challenge will be seeing if winter sowing the very slow-to-germinate, yet so gorgeous Lisianthus works. It's very much like rose without thorns and is long lasting and lovely to grow in Michigan. I've researched this plant and am curious if I can get viable seedlings, probably using a combination of methods including Winter Sowing in totes, then bringing a few indoors using heat mats. I'll see how this works this spring and post about it on my Lisianthus plant list post and discuss it on the NGA forums.
b) Artichokes: I'm in my second year of using blended methods of growing artichokes after a cold period outside, and then bringing some of the plant indoors in my garage where they go dormant over the winter. Artichokes are perennials in zone 7 and above. I am in zone 6 in Michigan. I have another group of large artichokes grown from seed that I've mulched heavily in their outdoor garden spaces. I'll see how they do this spring.
c) Tomatoes: In the video, part 2 in the link above, there's a bonus section from Project Grow board member Royer Held who has grown his tomatoes outdoors, winter sown in pots. In zone 6a, we have a long enough summer that tomatoes will ripen and produce plenty of fruits by August and September, some even in July. This year I'm going to again Winter Sow several of tomatoes using a tote with holes and the red Solo cups method. It doesn't matter when to sow them outdoors in WS containers, February is ok, as long as it is before April and the cultivar shows an average or shorter length of Days to Maturity (DTM) suitable for your growing zone. The plants will germinate at the right time, be smaller, but catch up fast once planted out, especially as they don't need hardening off, which can be challenging for new gardeners. I've heard from other winter sowers and from community gardeners as well that winter sown tomatoes outperform indoor tomato seedlings when compared side by side in the garden. I will attempt some comparisons this year.

References and More Good Stuff:
Check out my photos on Instagram, @WaitingOnPatience. There I have a reel mini-video example of my Winter Sown asters. I also have things tagged #WaitingOnPatience on Facebook as well.
Check out my Gardening photos on Facebook using the #WaitingOnPatience hashtag.
There are good instruction and references available by Trudi Davidoff, originator of the Winter Sowing method. Update: I highly recommend the Winter Sowing "SOWING" Facebook group. It's a good size, about 22K at the time of this update in 2024. It is well run, and IS actually friendly. welcoming, expansive, has good files in the page's file section on Winter Sowing and does NOT block people except for those who don't follow some quite basic rules. My update is that I can no longer recommend the overly large "Winter Sowers" Facebook group due to excessive "blocking" of new joiners that either ask the most innocent of questions or dare to cross what has become a very wide line about what is considered a purist form of winter sowing. Excessive blocking of gardeners, often the most lovely and curious people, for not very good reasons is odious. So please check out the variety of winter sowing groups that don't have such practices in social media.
Check out my Winter Sowing successes photo gallery below for more of the plants I've grown successfully using the Winter Sowing technique:
Here again is my link to the seed lists and presentations: https://reveln.com/2022/01/24/...
Update 2: At the time of this update, January 2024, I've been using a small greenhouse that I now will use in January to condition my lisianthus that I've sown into soil blocks. I'll expose them to colder temps, then bring back the heater for the greenhouse as I return my large rosemary shrub and other herbs I moved to the garage during sub-zero weather to regain the light. The current temp is 40, the predicted lows are 33 and it's been raining. As long as it's above 20 degrees, the herbs will be fine.
Pictured, overwintering fig tree, flowers on my rosemary shrub, rex begonia, aloe.

Foxgloves that I've winter sown. Once they become established, they self sow. Note they are biennials, so allow for patience as they establish themselves. Be advised, they are also highly toxic, so note if you have children or pets.

I hope these tools help! Happy Winter and Spring sowing!
~ Deb