Post a reply

Avatar for RookiePresent
Dec 24, 2020 12:53 PM CST
Thread OP
Name: Alex
Rockford, Illinois (Zone 5b)
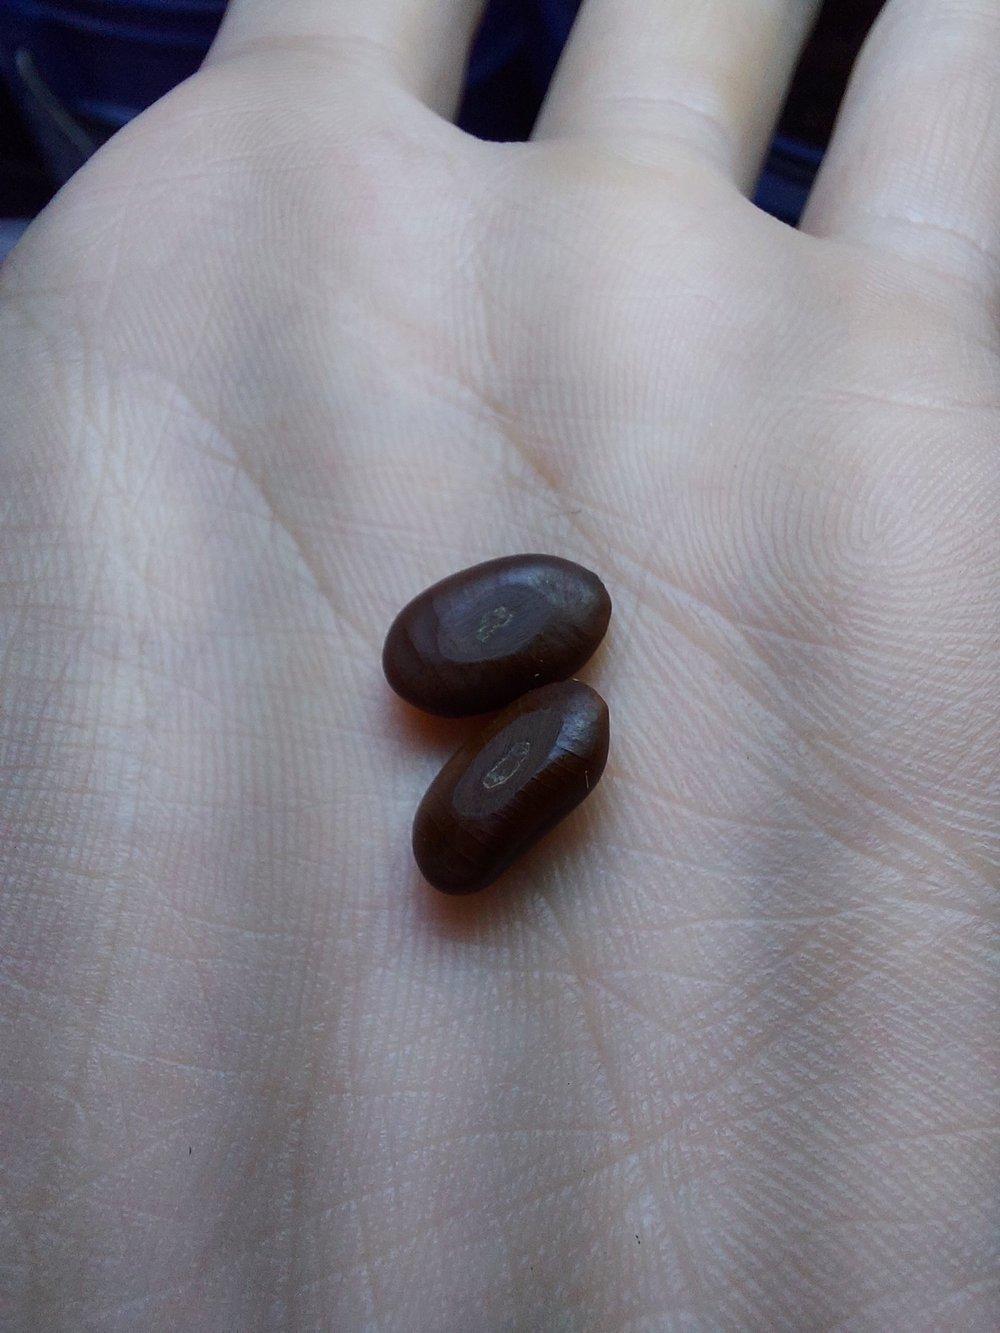
This is what a sufficient scarification by filing looks like on honey locust seeds. I recommend filing deeper than this though, as it makes for slow absorption. I see this depth as a minimum. Filing multiple sides would also speed things up, but isn't necessary.

Thumb of 2020-12-24/RookiePresent/be4ad1

Note that there are only 2 layers to the seed (from this angle): The seed coat itself (dark brown), and then the cotyledon. Once you see a color change, it means you've gone through the seed coat and that is sufficient to allow water in and hydrate everything.

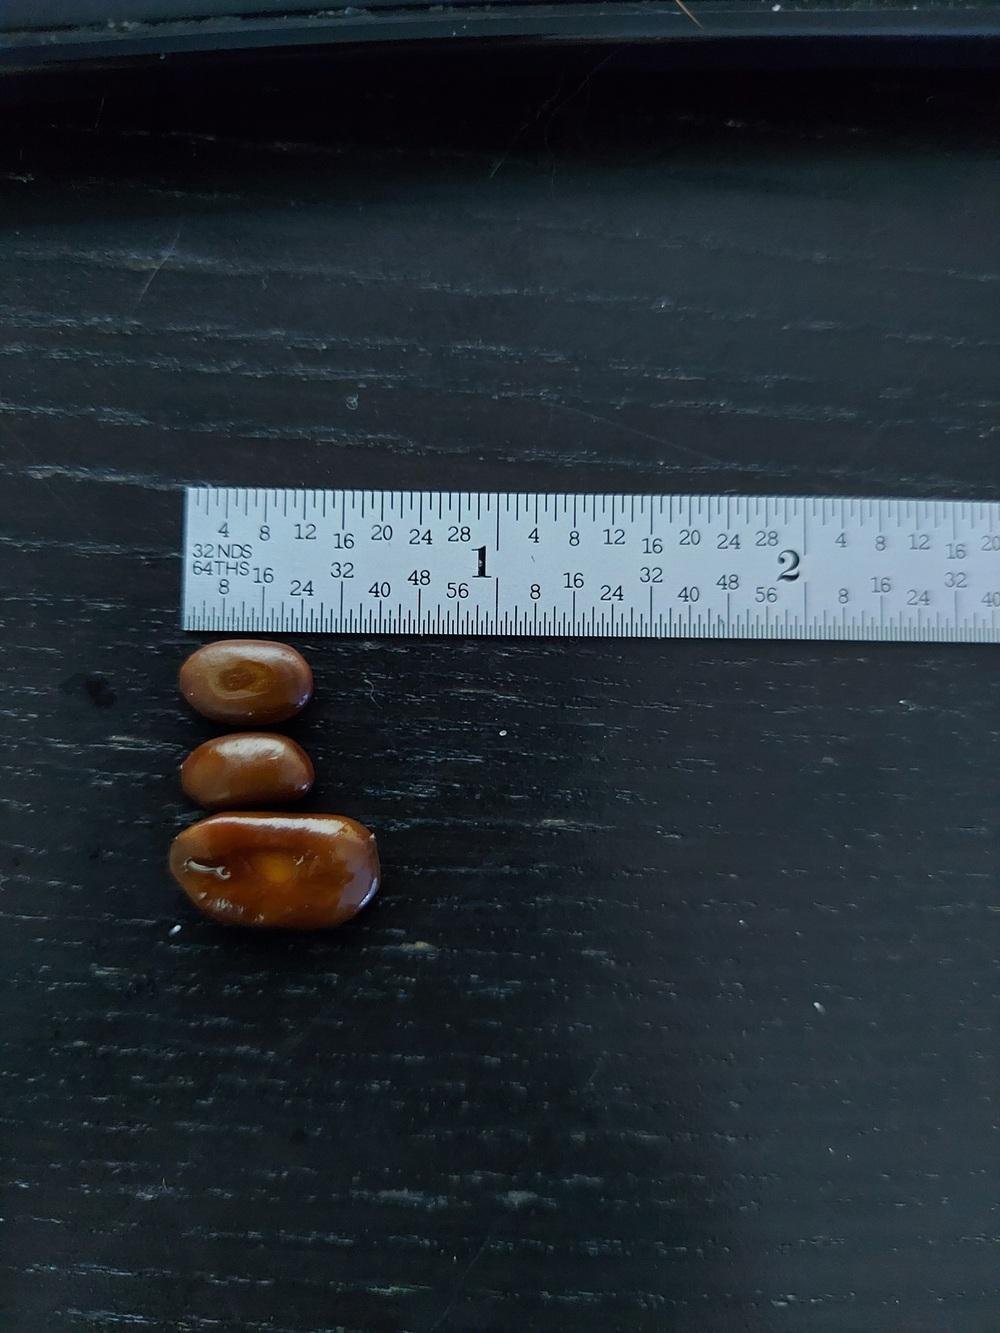
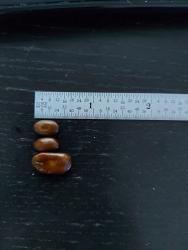
Using this method, this is what a dry and a saturated seed look like side by side:


Thumb of 2020-12-24/RookiePresent/c271e4

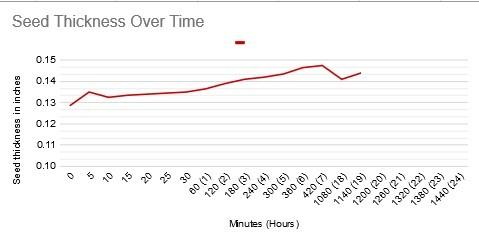
Clearly, the seeds do indeed swell significantly, an indication the scarification was successful and the seed is absorbing water. As the seed was swelling, I took measurements of its thickness and plotted it just for curiosity's sake, and here is what that looked like:


Thumb of 2020-12-24/RookiePresent/b02dcd

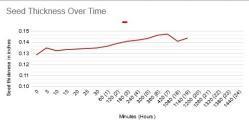
The internet as well as my book said to soak the seeds for 24 hours, which is why the x-axis goes that long. However, by the time the seed had been soaking for ~19 hours, the seed coat was so broken down and soft that my calipers would deform it, and it was no longer possible to get an accurate measurement. However, it's clear that, generally, the scarification worked fine and was allowing the seed to absorb water and break down the seed coat. The blip at the beginning was an error, but I don't know the true value and just had to leave it as is. The large gap in time is just from when I was sleeping.

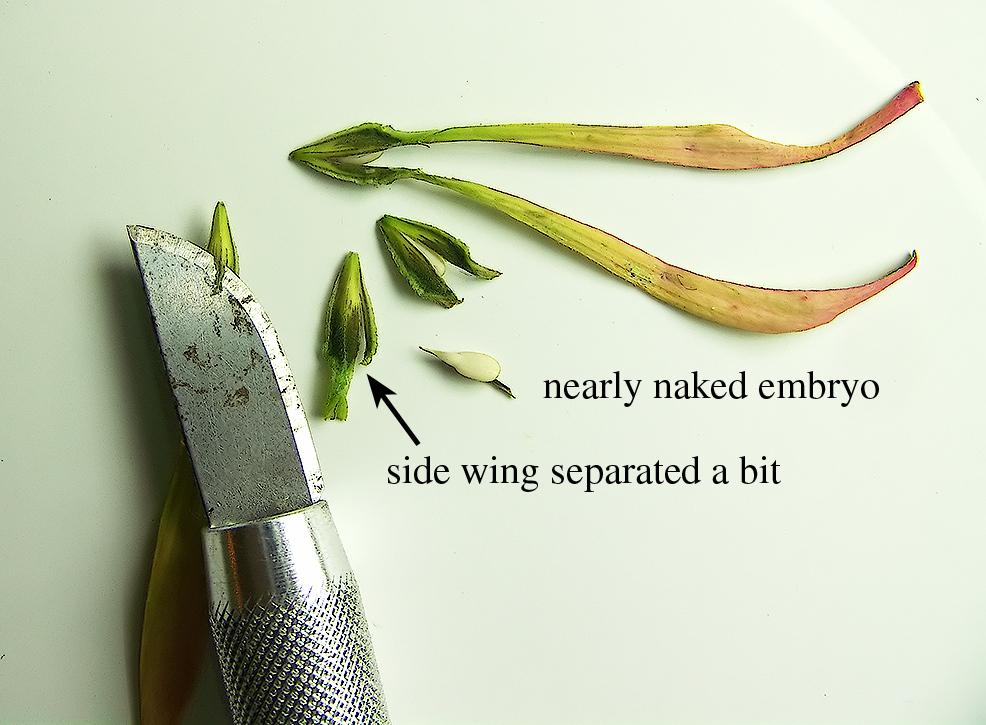
That's it, easy as that. The seed is ready to sow when it's swollen. As mentioned in the paper, they require no stratification so this swollen seed, assuming it's viable, should germinate in under 4 weeks (https://www.treeseedonline.com...).

-

This is more of a guide than anything. I wanted to compile this information, hoping that it would be useful to someone in the future.
I got some seeds from a local tree to use as companion species for my tulip poplars (I read a paper that said poplars grown near black locust trees, because of their nitrogen fixation, grew larger diameter trunks). From what I read, honey and black locust fixate nitrogen the same way, so I feel comfortable substituting one species for another in this scenario.

When researching how to treat my seeds, I also saw several studies that showed that acid scarification was the best method and provided the best results.
The link for one such study is here:
https://www.researchgate.net/p...

From the abstract: "It can be concluded that acid scarification without stratification is optimized in breaking honey-locust seed dormancy."

Which is well and good, except I don't have any acid, and could not find anything online about acid-products at home that could be used. So while that is probably the best way to do it, it's not very approachable for the casual honey locust seed grower. Other options were putting them in hot water, or filing them. Filing, I think, is the easiest way for the casual to scarify these seeds. Without being able to find anything online about how far to scarify and what that would look like, I decided to do it myself and measure a seed to make sure my scrape was adequate and allowed the seed to swell (I also saw several sources say that the seeds swelled to 3 times their size as they hydrated, and I was curious to measure this size difference).

Hopefully this type of post is allowed, I searched around a little bit and I felt this was the best place to put it.
Last edited by RookiePresent Dec 25, 2020 9:38 AM Icon for preview
Image
Dec 25, 2020 10:41 AM CST
Name: Rick R.
Minneapolis,MN, USA z4b,Dfb/a
Garden Photography The WITWIT Badge Seed Starter Wild Plant Hunter Region: Minnesota Hybridizer
Garden Sages I was one of the first 300 contributors to the plant database! Plant Identifier Million Pollinator Garden Challenge
This is very educational and useful, and this is the right forum for the info. Thank you, and Merry Christmas!

You are absolutely right, that the purpose of scarification, in all its methods, is to allow water to penetrate through an otherwise impermeable seed coat. And especially, that one needs not remove to the entire depth of the seed coat to achieve the goal. Only enough to allow adequate water penetration. The part of the seed inside the seed coat is delicate and usually quite susceptible to pathogens, especially if damaged. If you expose the inside part, you are providing an easy way for pathogens to enter. When hot water treatments work, the temperature gradient creates tiny (microsopic) fissures in the seed coat through which water can penetrate.

I have never attempted acid stratification, either. The application time needed has so many variables: species of seed and geographical source of that seed, when the seed was harvested, temperature, concentration of acid, type and form of acid, etc., etc. And useful data sources are very limited, not to mention (as you say) where to obtain said acids.

For me, any seed needing scarification large enough to grab I will do it with a file, or individually sand with sandpaper. Any smaller seed I carefully rub between sandpaper. It is very easy to overdo it, especially with the small seed, so I always recommend prudence.

The graph you composed could be quite useful, but in its present form it is very misleading. The time scale is enormously variable, with eight increments equaling one hour at first, then one increment equaling an hour, then eleven. Could I ask you to redo it with a consistent time scale? The result will be much more dramatic, and true to what is actually happening.

Again, thanks so much for the time spent putting that post together for us. Hard data and unambiguous writing is rare among the chit chat of forums across the internet. Bravo!
When the debate is lost, slander becomes the tool of the losers. - Socrates
Avatar for RookiePresent
Dec 26, 2020 2:11 PM CST
Thread OP
Name: Alex
Rockford, Illinois (Zone 5b)
Leftwood said:This is very educational and useful, and this is the right forum for the info. Thank you, and Merry Christmas!

You are absolutely right, that the purpose of scarification, in all its methods, is to allow water to penetrate through an otherwise impermeable seed coat. And especially, that one needs not remove to the entire depth of the seed coat to achieve the goal. Only enough to allow adequate water penetration. The part of the seed inside the seed coat is delicate and usually quite susceptible to pathogens, especially if damaged. If you expose the inside part, you are providing an easy way for pathogens to enter. When hot water treatments work, the temperature gradient creates tiny (microsopic) fissures in the seed coat through which water can penetrate.

I have never attempted acid stratification, either. The application time needed has so many variables: species of seed and geographical source of that seed, when the seed was harvested, temperature, concentration of acid, type and form of acid, etc., etc. And useful data sources are very limited, not to mention (as you say) where to obtain said acids.

For me, any seed needing scarification large enough to grab I will do it with a file, or individually sand with sandpaper. Any smaller seed I carefully rub between sandpaper. It is very easy to overdo it, especially with the small seed, so I always recommend prudence.

The graph you composed could be quite useful, but in its present form it is very misleading. The time scale is enormously variable, with eight increments equaling one hour at first, then one increment equaling an hour, then eleven. Could I ask you to redo it with a consistent time scale? The result will be much more dramatic, and true to what is actually happening.

Again, thanks so much for the time spent putting that post together for us. Hard data and unambiguous writing is rare among the chit chat of forums across the internet. Bravo!


I completely agree that the graph is pretty bad.
I considered doing equal time measurements, but I wasn't sure how to do that without having to be awake for ~20 hours. I was generally interested in seeing the immediate effects of water absorption and size, hence the finer initial timescale, but taking a measurement every 5 minutes for an entire day was just a lot.
I also only did it with one seed, the other two that I did weren't scarified nearly as deep and thus absorbed water dramatically slower and deformed much differently, so even taking a measurement at a consistent timescale would look completely different depending on how you scarify the seed and where on the seed - it can be surprisingly complicated and variable, and for that reason I think, even with a consistent timescale, it would be very difficult to get consistent results. For this reason, I don't think it would be much more beneficial to do a more consistent timescale, because the results you would see would either be what we generally see already, a consistent upward trend as it absorbs water, or an abnormal and uncharacteristic localized swelling like I saw on one of my other seeds where it absorbed water, but it swelled around the file site like a boil. This would make the thickness measurement very large, while the overall size of the seed didn't change at all just because my file depth was slightly different.
I hope that makes sense. Maybe looking at the size of the file mark versus how large it swells and how fast would reveal more interesting information rather than just how fast it absorbs water? I'm not sure, I'm curious to see what you think of that.
I appreciate the comment, thank you!
Image
Dec 26, 2020 5:56 PM CST
Name: Rick R.
Minneapolis,MN, USA z4b,Dfb/a
Garden Photography The WITWIT Badge Seed Starter Wild Plant Hunter Region: Minnesota Hybridizer
Garden Sages I was one of the first 300 contributors to the plant database! Plant Identifier Million Pollinator Garden Challenge
No worries about the graph. I am 61 and not an engineer, and I wrongly assumed with you being so young, that your background in engineering would require you to be fully adept at digital graphing. I thought it would be a simple task for you.

The "boil" effect is interesting. Never heard of it before. I suspect the anomaly is quite rare and that it might only happen with a certain set of conditions. At any rate, conditions that would not normally be encountered in the natural world.

I don't think we, in non-scientific experimenting, can actually measure the physical depth of a scarification. More importantly, I think the best we can do is estimate how close the scarification is to the seed inside by examining color variations as the surface approaches inner seed contact. Of course, colors may vary depending on the species. If you are soaking the seed in water rather than planting in soil, my prediction would be that scarification size (in diameter, not depth) would be fairly inconsequential.
When the debate is lost, slander becomes the tool of the losers. - Socrates
Avatar for RookiePresent
Dec 27, 2020 11:25 AM CST
Thread OP
Name: Alex
Rockford, Illinois (Zone 5b)
Leftwood said:No worries about the graph. I am 61 and not an engineer, and I wrongly assumed with you being so young, that your background in engineering would require you to be fully adept at digital graphing. I thought it would be a simple task for you.

The "boil" effect is interesting. Never heard of it before. I suspect the anomaly is quite rare and that it might only happen with a certain set of conditions. At any rate, conditions that would not normally be encountered in the natural world.

I don't think we, in non-scientific experimenting, can actually measure the physical depth of a scarification. More importantly, I think the best we can do is estimate how close the scarification is to the seed inside by examining color variations as the surface approaches inner seed contact. Of course, colors may vary depending on the species. If you are soaking the seed in water rather than planting in soil, my prediction would be that scarification size (in diameter, not depth) would be fairly inconsequential.


I'm not 100% sure, but I think the boil effect was a symptom of only the seed coat breaking down and swelling with water without reaching the cotyledons as a result of a file scar that was too shallow (or the ratio of exposed seed coat to exposed cotyledons was heavily skewed to the seed coat side, so all it could do was swell and boil out while the inside was swelling at the same time, just not nearly as fast).

I totally agree, measuring exactly how deep into the seed coat we are isn't possible when my only tool is a caliper. Measuring the mass shaved off would be good alternative, but I can't do that either - I don't have a scale. I don't expect people to want or need to measure their seed mass as they file to get optimal results, it's just not feasible. But I must admit that the more I thought about it the more excited I was to at least try it.

Because all I can measure is how large my file mark is, that's what I'll do. I'll have an untouched control seed, a seed with only the seed coat filed and no internals showing, and then 3-5 other seeds with varying depths of cut that I will measure in terms of exposed area of the cotyledon.
From what I observed for this experiment, I think (and this is just a guess) that when you scarify the seed coat, the innards absorb water first and swell, putting pressure on the seed coat. Normally, the seed coat has time to uniformly absorb water and uniformly break down before the inside of the seed has a chance to absorb much moisture, so when it does it has an easy time expanding and breaking free of the seed coat. I think with this scarification, you skip that part and I believe that there should be a Goldilocks zone where you remove enough seed coat and cotyledon to expose as much seed coat to water as possible, so it breaks down as fast as possible, while also exposing the most non-seed coat to water and breaking that down quickly. The ideal scarification should remove so much material as to speed things up, but also not so much that you harm the seed and it can no longer germinate.
I should be able to see this change in the graphs based on which setting reaches maximum swell the soonest while remaining viable at the same time.

I get this is a lot of fus for something that could just be as simple as knicking a seed and tossing it in some water for a day, but the more I thought about the experiment the more curious I got. I'm between semesters now, so if I will ever have time to do this experiment, it will be now so short of any objections or suggestions, I'll give it a go tomorrow and post here with the results. The graphs it produces should be really neat.
Image
Dec 27, 2020 1:56 PM CST
Name: Rick R.
Minneapolis,MN, USA z4b,Dfb/a
Garden Photography The WITWIT Badge Seed Starter Wild Plant Hunter Region: Minnesota Hybridizer
Garden Sages I was one of the first 300 contributors to the plant database! Plant Identifier Million Pollinator Garden Challenge
Your goldilocks theory is one I am sure many have pondered, and I am inclined to say is correct. That would also support why the correct application of acids works better: the seed coat is weakened all around the seed, rather than just one spot.

The budding horticulturist in you is very encouraging, and your willingness to consider multiple avenues of understanding is a prerequisite. Many great plantsmen have their major careers in other genre; perhaps you will someday be one of them(!)
When the debate is lost, slander becomes the tool of the losers. - Socrates
Avatar for ZenMan
Dec 27, 2020 10:02 PM CST
Name: ZenMan
Kansas (Zone 5b)
Kansas 5b
Annuals Enjoys or suffers cold winters Region: United States of America Seed Starter Keeper of Poultry Hybridizer
Hummingbirder Dragonflies Garden Photography Butterflies Zinnias Garden Ideas: Level 2
Hello all,

It I were trying to germinate Honey Locust seeds, I think I would experiment with various ways of removing the seed coating entirely. I would try simple mechanical methods, using mechanical ways of gripping the seed and cutting or abrading the coating. I have it found it advantageous to save zinnia seeds while the seed coating is still green, and I can extract naked embryos using an X-Acto knife. I can remove naked embryos and get, in effect, zero day germination.
Thumb of 2020-12-28/ZenMan/63daaa
Uploaded by ZenMan

Uploaded by ZenMan
Uploaded by ZenMan

I use some auxiliary equipment to help me extract embryos from green zinnia seeds.
Thumb of 2020-12-28/ZenMan/e6a0e9 Thumb of 2020-12-28/ZenMan/fedae4
I have also used that technique on Milkweed seeds and Devils Claw seeds, with a reasonable amount of success. In the future I plan to experiment with a rotary tool like a Dremel and various grinding attachments. Milkweed seeds remain a challenge for me. I can extract their naked embryos easily enough, but they don't germinate well. I think they must need some cold treatment to stimulate the embryo growth. Crossing Fingers!

ZM
I tip my hat to you.
Last edited by ZenMan Dec 27, 2020 10:20 PM Icon for preview
Avatar for RookiePresent
Dec 27, 2020 10:17 PM CST
Thread OP
Name: Alex
Rockford, Illinois (Zone 5b)
ZenMan said:Hello all,

It I were trying to germinate Honey Locust seeds, I think I would experiment with various ways of removing the seed coating entirely. I would try simple mechanical methods, using mechanical ways of gripping the seed and cutting or abrading the coating. I have it found it advantageous to save zinnia seeds while the seed coating is still green, and I can extract naked embryos using an Exacto knife. I can remove naked embryos and get, in effect, zero day germination.
Thumb of 2020-12-28/ZenMan/63daaa
Uploaded by ZenMan

Uploaded by ZenMan
Uploaded by ZenMan

I use some auxiliary equipment to help me extract embryos from green zinnia seeds.
Thumb of 2020-12-28/ZenMan/e6a0e9 Thumb of 2020-12-28/ZenMan/fedae4
I have also used that technique on Milkweed seeds and Devils Claw seeds, with a reasonable amount of success. In the future I plan to experiment with a rotary tool like a Dremel and various grinding attachments. Milkweed seeds remain a challenge for me. I think they must need some cold treatment to stimulate the embryo growth. Crossing Fingers!

ZM
I tip my hat to you.


Yes! This is a fantastic idea. I considered embryo extraction with some Acer griseum I am trying to grow, and they're a huge pain because they have a very long stratification period and can take up to 2 years to germinate. I have heard that you can stratify them for just 90 days, and then extract the embryo and get some rather good rates. However, these honey locust seeds would be perfect to experiment on and I would be very interested to try this out on this species. Thank you for the suggestion.

Have you tried soaking the seed coat normally and letting it degrade naturally, and then removing the seed coat then extracting the embryo? This is probably more applicable to a larger, hard-coated tree seed? It wouldn't be practical-same-day-germination, but it could be... well, I don't know either. Regular honey locust seeds take 4 weeks to germ minimum, I have no idea how much this process would speed that up.

I have the idea that it would be hard to do this, but I can't even comment on why because I just don't know enough. Does a mature tree seed have some attachment between its embryo/cotyledons and seed coat? Would it even be possible to separate the two, and if so what is the chance of doing that successfully? If I did degrade the seed coat with moisture, surely the inside would get some moisture too and that could fuse them? Or separate them? I really don't know.

Basically, I will give this a try. I'll document everything and do a write-up, I think it will be very interesting. Thank you for the suggestion!
Image
Dec 28, 2020 11:13 AM CST
Name: Karen
Valencia, Pa (Zone 6a)
I was one of the first 300 contributors to the plant database! Cut Flowers Winter Sowing Charter ATP Member Seed Starter Echinacea
Plant and/or Seed Trader Region: Ohio Region: United States of America Butterflies Hummingbirder Celebrating Gardening: 2015
You guys would make great at microsurgery. Smiling

Karen
Image
Dec 28, 2020 2:33 PM CST
Name: Rick R.
Minneapolis,MN, USA z4b,Dfb/a
Garden Photography The WITWIT Badge Seed Starter Wild Plant Hunter Region: Minnesota Hybridizer
Garden Sages I was one of the first 300 contributors to the plant database! Plant Identifier Million Pollinator Garden Challenge
Good luck to you, Alex. Some seeds' seed coats separate easily, some don't. it won't be an easy task with such a hard seed coat. I think I would first sacrifice a seed and cut it in half, then see how easy or difficult it is to remove. Some seeds have a "skin" between the outer seed coat and the embryo that can aid in the separation. (Think of a peanut.) Sunflower seeds have this, too, but it's so thin that it is hardly noticeable.
When the debate is lost, slander becomes the tool of the losers. - Socrates
Avatar for RookiePresent
Dec 28, 2020 5:51 PM CST
Thread OP
Name: Alex
Rockford, Illinois (Zone 5b)
Thank you all for the tips and suggestions I appreciate it.

A quick update: The one seed that swelled the most germinated already, in 4 days! My book and other sources said it would take about 4 weeks, so I am impressed. This picture shows the seed and the scarification site:

Thumb of 2020-12-28/RookiePresent/747e23

Edit: Actually, my book says with filing/hot water scarification, it should germinate in about 3 months. But I found another source that says 10-14 days, but could take up to 21 days. No matter how you cut it, this seed germinated quickly. Here is the source for that: https://forestry.usu.edu/files...
Last edited by RookiePresent Dec 28, 2020 5:55 PM Icon for preview
Image
Dec 28, 2020 8:29 PM CST
Name: Rick R.
Minneapolis,MN, USA z4b,Dfb/a
Garden Photography The WITWIT Badge Seed Starter Wild Plant Hunter Region: Minnesota Hybridizer
Garden Sages I was one of the first 300 contributors to the plant database! Plant Identifier Million Pollinator Garden Challenge
With most species that produce seeds with impervious seed coats, usually, the seeds don't have any further embryo maturation requirements (like cold stratification, for instance). They are ready to go, and all they need is access to water. For example, scarified Astragalus spp. seeds are well know for their one or two day germination.
When the debate is lost, slander becomes the tool of the losers. - Socrates
Only the members of the Members group may reply to this thread.
Member Login:

( No account? Join now! )

Today's site banner is by fiwit and is called "Gazing at More Stars"

This site is protected by reCAPTCHA and the Google Privacy Policy and Terms of Service apply.