How-To Guide for Mounting Epiphytes

By drdawg
January 10, 2015

Lots of people grow epiphytic plants, but most of them are grown in pots, simply because that's the way we are used to growing houseplants. However, that is not the way most of these plants grow in nature. Though they might grow on rocky outcrops or even electrical and/or telephone wires, the vast majority will be found growing in trees. Why not mount some of your epiphytes, so that they grow the way they do in nature?

[View the item]

Avatar for chuck7701
Jan 10, 2015 1:21 PM CST
Thread OP
Name: Chuck Pfeiffer
McKinney, TX (DFW) (Zone 8a)
Ken,
Great article on how to start one, and you mention you had a large one to divide. I'm in the same situation with one that weighs 75 lbs plus, and is about 6 feet in circumference. I use a block tackle pulley to raise and lower for overwintering. I would appreciate any tips or help on dividing Ole Staggie in the picture. It now takes 2 people to move it and a lot of damage to the fronds. I've put off division for as long as I could not knowing how to save it in the process.

It began life as two very small starters in a 12 inch wire basket many years ago, and the fern has totally encased it with new pups every year. Normally hangs out in the warmer months in the tree, but I have to garage it for winter. The original basket wires are rusting out, and I'm worried the stainless clips are about to bust through the old wires. If I lived in the tropics, I'd push an iron rod through and mount a wide base to support it, but I'm not. Sticking tongue out

How would you suggest I divide it up into smaller pieces? Is there a root structure below the basal leaves that I need to work around. I'm stumped.

Thanks
Chuck

Image
Jan 10, 2015 2:05 PM CST
Name: Ken Ramsey
Vero Beach, FL (Zone 10a)
Bromeliad Vegetable Grower Region: United States of America Tropicals Plumerias Orchids
Region: Mississippi Master Gardener: Mississippi Hummingbirder Cat Lover Composter Seller of Garden Stuff
I tip my hat to you.

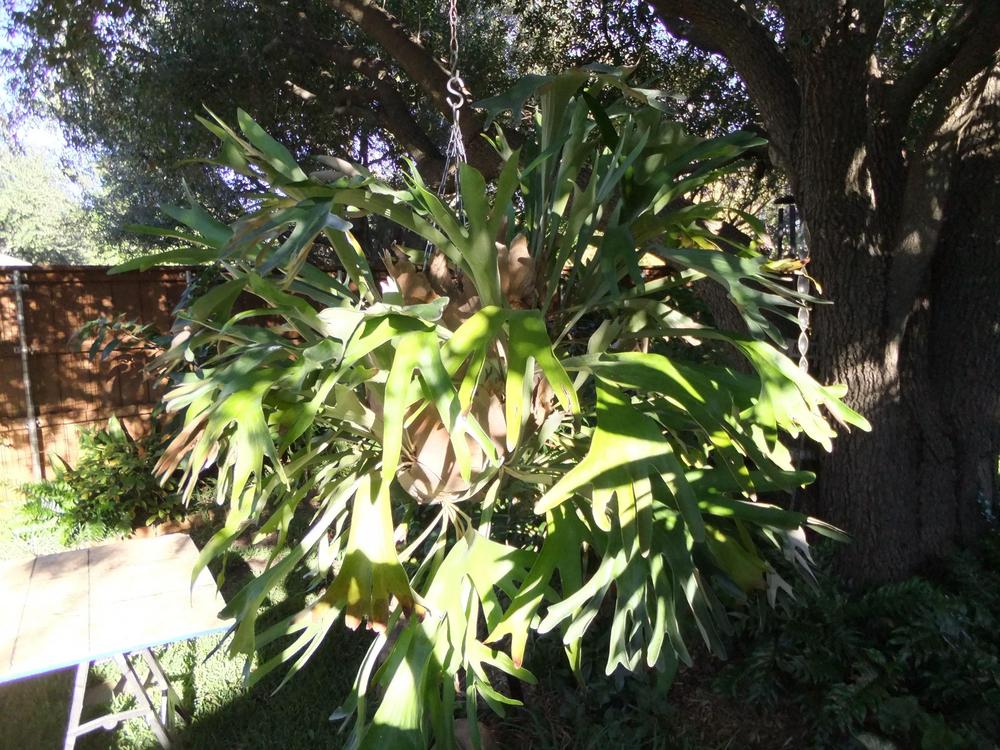
I wish I had pictures of the monster I HAD to divide and how I did it. It was over 100 lbs. and like yours, I had a block-and-tackle system for hoisting in in a tree. I will do my best to describe that division process.

The first thing I did was lower it to the ground, with the mount side down. Mine was growing on a large piece of marine plywood, something used in boat-building and readily available since I lived on the MS Gulf coast. Thus, since I was using a solid piece of wood, all the growth was directed in a 180 degree pattern. IF yours has growth in a wider pattern (growth behind as well as in front), you would want to carefully lean your mount against a firm surface (perhaps a brick wall or similar). That's a little bit trickier.

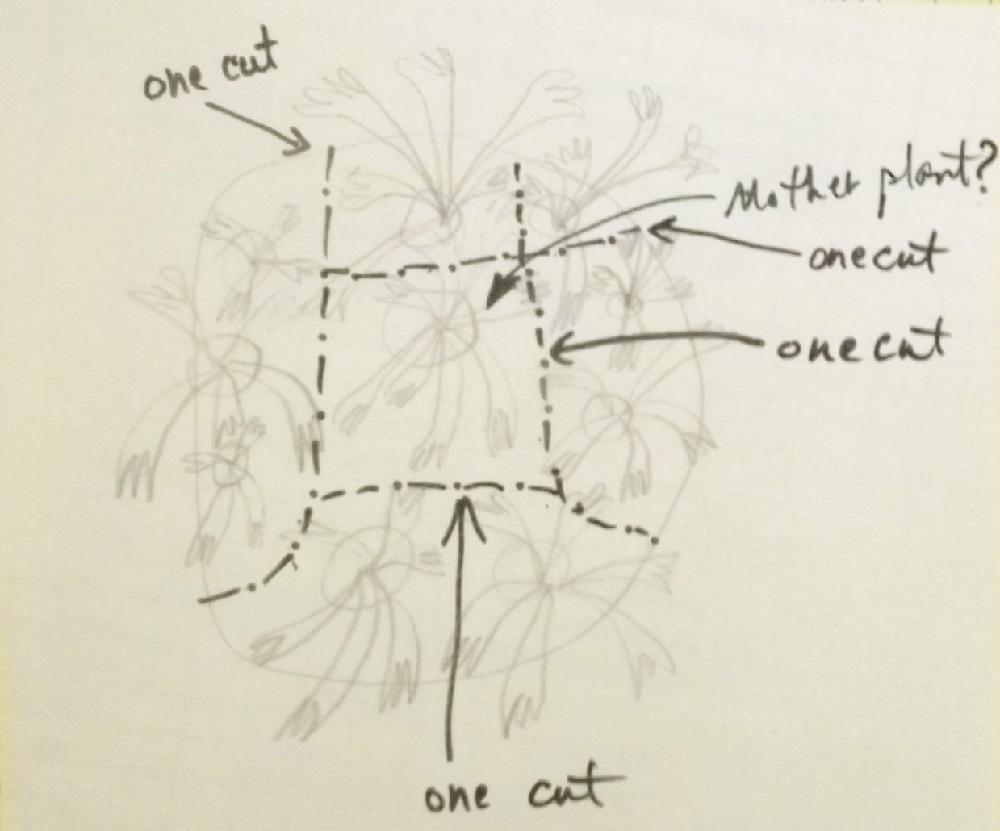
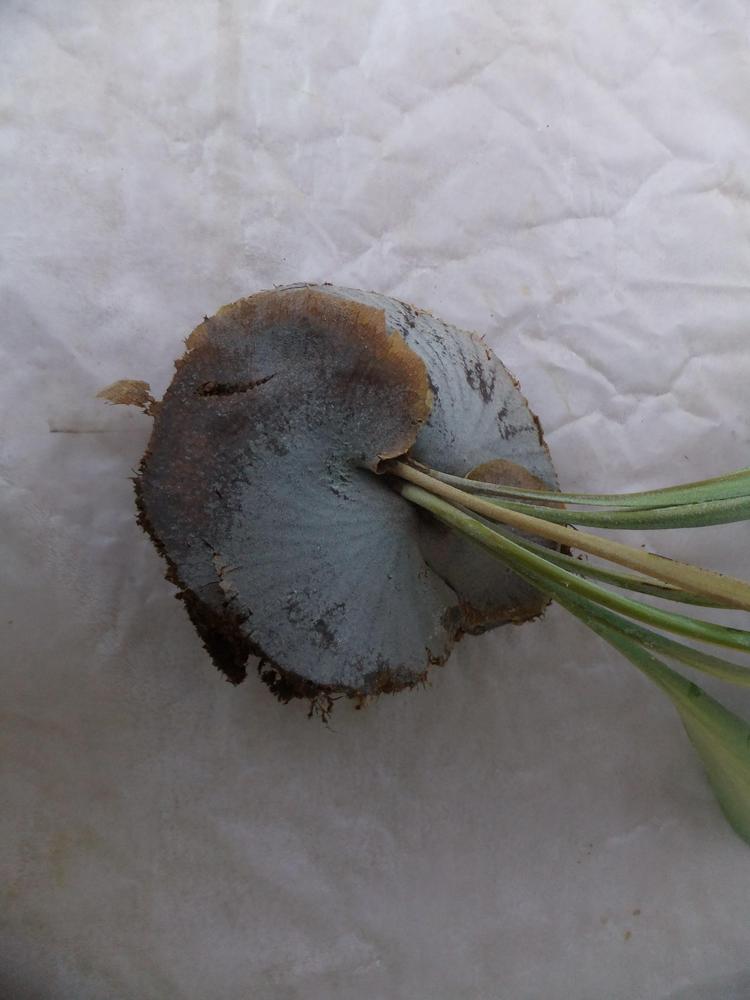
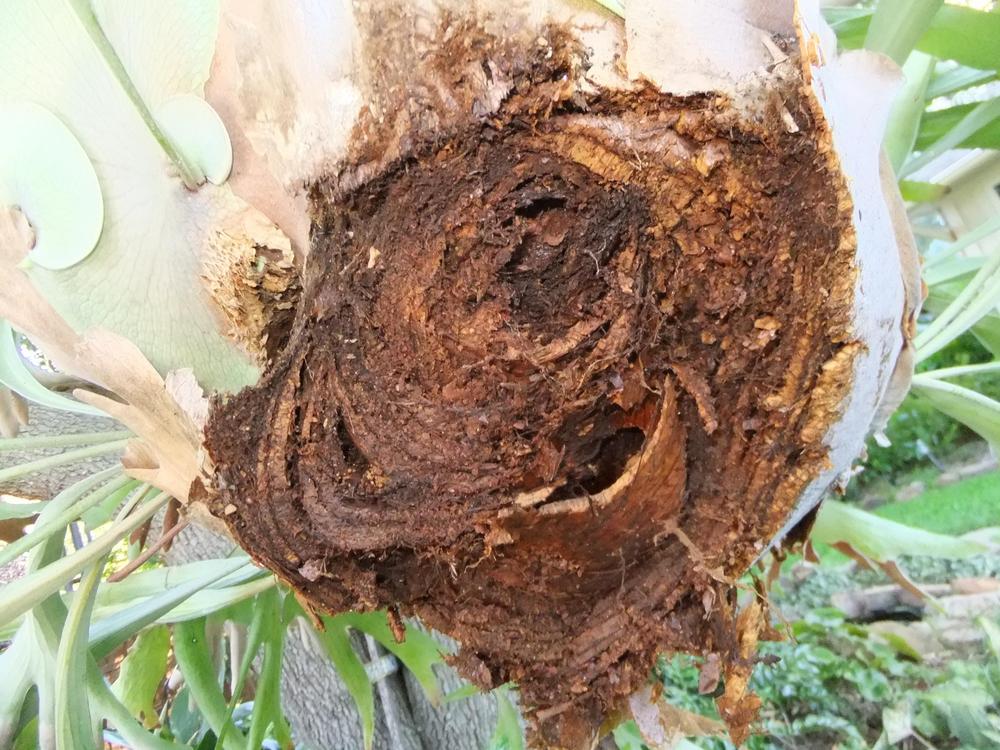
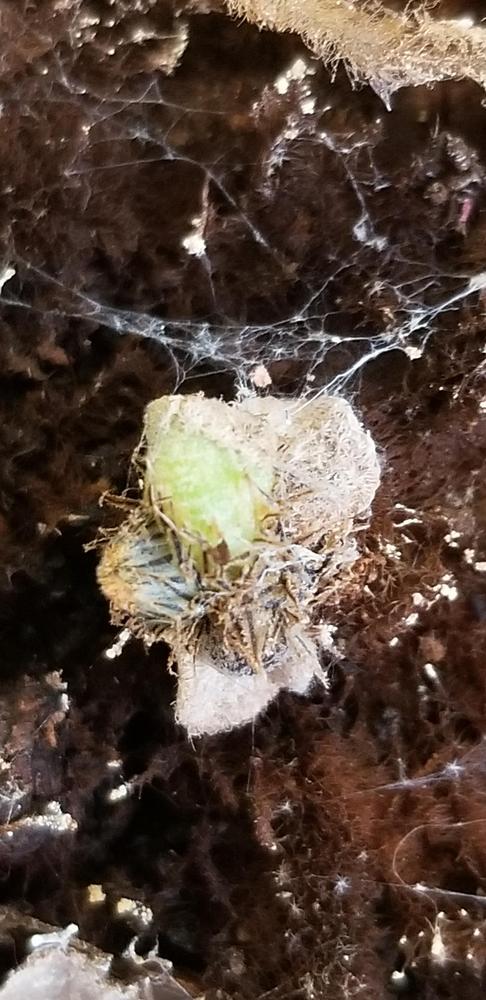
Your plant will be layer upon layer of basal fronds, and other than the top, green, basal fronds, the others will be brown, dry, and fibrous. I picked out the "pups" that were outmost from the "mother" plant to divide first. I used a large, 14-16" heavy-bladed, serrated kitchen knife to do the "surgery". I needed a blade that could "saw through those tough, fibrous fronds. You will have to use your judgment on how large a division you want to take. You just want to be sure that you leave that bright green basal frond intact (if there is a green basal frond). Also, you want to have at least 4 "reproductive" fronds on that division. Let's say you take a 12"x12" division. Most of that will be the brown, non-viable basal fronds. Just use that knife to "saw" the entire depth of fronds down to the mount. Heck, you may end up with a foot deep of brown basal fronds. That's what I had. When you have that 12x12 division cut out, just pry it away from the mount. Now you have a 12"x12"x12" division, and that's way too thick to mount. Using that handy-dandy knife, eliminate 9" of dead-frond thickness. You are thus "shaving" the division down (though cut it away in one chunk) so that it might now be 6" thick (counting the green basal frond, which is sometimes arched). Now you have a mountable-sized staghorn. I continued to do this around the whole periphery, gradually getting closer and closer to the "mother" plant. You can take every singe pup you want (remember the 4-frond minimum though). I think I ended up with 8-10 large divisions when I quit.

Another thing. If you have a whole side of pups (or the whole top or bottom of pups) and you'll be taking them all, just make a longer cut. You might then have several pups that total 12"w but 24" tall. Take the whole side, top, and/or bottom of pups and then cut it down as explained.

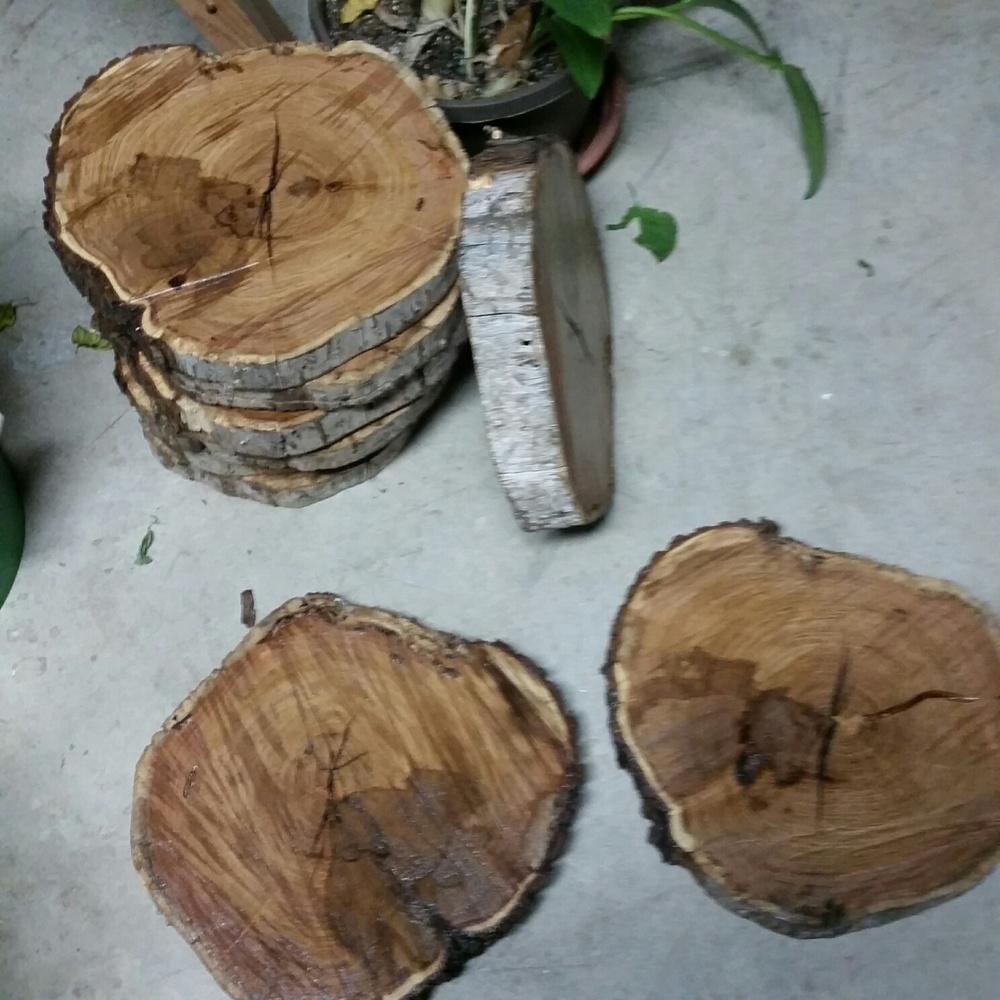
Don't throw away all that basal frond residue. It makes a great material to use to mount all kinds of epiphytic plants. It absorbs water and releases it slowly and basically won't rot. I had a garbage bag full of it and I still have that bag with the brown-frond material 20 years later! I have probably used 75% of what I started with.

Oh, when I had taken all those divisions and the "mother" plant was left, I pried her off the wood and then did the same thing with her stack of basal fronds that I did with the divisions. She was still a large plant but by reducing the brown basal frond layer, I reduced her weight by half. That thick layer of dead, brown basal fronds, particularly when they are soaked with water, is there the majority of the staghorn's weight is.

You asked about damaging roots. Staghorns, at least those mounted, won't have much root system. By removing that thick layer of basal fronds, you really won't do any damage to roots, but even if you did, it is unimportant. Staghorns use the roots for attachment but very little "feeding" activity. The basal and reproductive fronds are used for water/nutrient intake and transpiration.

I hope this makes some sense and helps you figure it all out.
drdawg (Dr. Kenneth Ramsey)

The reason it's so hard to lose weight when you get up in age is because your body and your fat have become good friends.
Avatar for chuck7701
Jan 10, 2015 3:28 PM CST
Thread OP
Name: Chuck Pfeiffer
McKinney, TX (DFW) (Zone 8a)
Thanks DrDawg,

That info helps a lot in deciding how to attack the problem. I wasn't sure if there were roots to the center to worry about, and you're experience helps tremendously in figuring out what and how to cut. I'll probably have to use a saws-all or hacksaw due to the old wires interspersed in the ball. Will remount on cedar or cypress boards for gifts using weedeater cord for mounting.

I was curious about the old brown basal leaves. I'm not sue if I have a "mother" plant anymore since there is new growth and so many layers all the way around the ball. When you say you cut the old leaves, I take it you mean from the bottom (center) of the cut piece towards the outside green basal leaves.

I do know what you mean about the weight when wet. I usually try to let it dry out before moving, but had no choice with an early freeze coming in. Usually hose it down a couple times a week, and often toss cupfuls of diluted fertilizer on the fronds regularly.

Thanks for the help and information. It will be an interesting spring project. I'll take pics and let you know how it works out when I set aside a day for that project.

Thanks again, and happy gardening
Chuck
Image
Jan 10, 2015 3:51 PM CST
Name: Dirt
(Zone 5b)
Region: Utah Bee Lover Garden Photography Photo Contest Winner: 2014 Photo Contest Winner: 2015 Photo Contest Winner: 2016
Photo Contest Winner 2018 Photo Contest Winner 2019 Photo Contest Winner 2020 Photo Contest Winner 2021 Photo Contest Winner 2022 Photo Contest Winner 2023
Wow! Please do take pics of the process for us all--fascinating!
How many years between 2 starters and a massive wired ball that takes a sawsall to divide?

Thanks Ken! Wonderful info
Avatar for chuck7701
Jan 10, 2015 4:18 PM CST
Thread OP
Name: Chuck Pfeiffer
McKinney, TX (DFW) (Zone 8a)
It's been about at least 9-10 years since I started with 2 very small plants. The wire basket dirt and spaghnum moss worked fine in the beginning, then it grew larger and started to tip over from the weight. So I reattached new chains and hung it at 180 degrees from the original. It started pups on the top, bottom and backside completely engulfing the wire basket.

That's why I'll need the metal cutting ability.........and depth. The ball is about 18-24 inches of solid growth (old basal leaves) and the full width is about 6 feet in diameter all the way around. It is a definite conversation piece, and I'll be sad to have to divide it, but it just too huge. Been threatening to divide it for a couple years, but until read Ken's article and he gave me tips on dividing it, I feel confident it will be successful.
Image
Jan 10, 2015 5:06 PM CST
Name: Ken Ramsey
Vero Beach, FL (Zone 10a)
Bromeliad Vegetable Grower Region: United States of America Tropicals Plumerias Orchids
Region: Mississippi Master Gardener: Mississippi Hummingbirder Cat Lover Composter Seller of Garden Stuff
As I said, Chuck, having growth that extends more than 180 degrees is a bit more challenging. You are going to break some of the long, fertile fronds off. Don't despair, its just the cost of doing the chore.

A saw is going to be really difficult to use on those masses of basal fronds. Believe me, I have tried everything. I would still use the long, heavy serrated knife as much as possible, and when you hit metal, get out the saws. If you can force the cut portions aside a bit, exposing the metal wire, use wire cutters. Its easier.

Thumb of 2015-01-10/drdawg/bb4c6f

I don't know if my crude "art-work" helps any, but this shows making an initial four cuts, two long lateral ones and then two shorter upper and lower cuts. You would have multiple plants on each segment and then you would cut those into sections. You would end up with nine divisions, leaving that center-plant as the possible "mother" plant.

Since you apparently don't have a wood mount of any sort, just a wire basket imbedded in the center of the "ball" of plants, you might have to hack away at this sucker while still hanging. You are probably going to need four hands to do it. You'll just have to cut deeply into the "ball" similar to the diagram, then make another cut perpendicular to the first one. That perpendicular cut would end at the other cut. Often you'll end up with more of a wedge of plants/dead basal fronds than of an rectangle or square of material. But still, whittle it down as described previously to get the weight down and to make re-mounting easier.
drdawg (Dr. Kenneth Ramsey)

The reason it's so hard to lose weight when you get up in age is because your body and your fat have become good friends.
Avatar for chuck7701
Jan 10, 2015 7:53 PM CST
Thread OP
Name: Chuck Pfeiffer
McKinney, TX (DFW) (Zone 8a)
Thanks for the diagram, that helps explain the method to cut. Will give it some thought over the coming months in anticipation of the project. Just got a Rockwell F50 orbital cutter/sander for a painting project, and that may be the trick to cutting the wedges out. A serrated knife would be a lot of work as thick and tough as this one is.
Image
Jan 10, 2015 9:09 PM CST
Name: Ken Ramsey
Vero Beach, FL (Zone 10a)
Bromeliad Vegetable Grower Region: United States of America Tropicals Plumerias Orchids
Region: Mississippi Master Gardener: Mississippi Hummingbirder Cat Lover Composter Seller of Garden Stuff
If you find something that is effective in cutting through that dense, fibrous mass, let me know. Good luck. Talk to you later.
drdawg (Dr. Kenneth Ramsey)

The reason it's so hard to lose weight when you get up in age is because your body and your fat have become good friends.
Avatar for chuck7701
Jan 14, 2017 2:48 PM CST
Thread OP
Name: Chuck Pfeiffer
McKinney, TX (DFW) (Zone 8a)
I put off dividing it last year, but it's a must do upcoming project in a month or so. In preparation, I sliced a dozen 12-14w x 1.5-2 inch thick slabs from a large mesquite tree trunk, stained and have sealed them with a polyurethane to for moisture protection. Drill some holes for the tie downs and mount a hook to hang it, and be good to go.

Will take pictures of the process as I "learn" from drdawgs advice and will post the link here to the whole story and pics in a separate article when finished.


Thumb of 2017-01-14/chuck7701/991716
Image
Jan 14, 2017 3:49 PM CST
Name: Ken Ramsey
Vero Beach, FL (Zone 10a)
Bromeliad Vegetable Grower Region: United States of America Tropicals Plumerias Orchids
Region: Mississippi Master Gardener: Mississippi Hummingbirder Cat Lover Composter Seller of Garden Stuff
Go for it, Chuck. It will be a chore but a fun one. I have a feeling mesquite will be rot resistant.
drdawg (Dr. Kenneth Ramsey)

The reason it's so hard to lose weight when you get up in age is because your body and your fat have become good friends.
Avatar for chuck7701
Feb 24, 2023 5:51 PM CST
Thread OP
Name: Chuck Pfeiffer
McKinney, TX (DFW) (Zone 8a)
There's a lot of steps involved in dividing a section, go slow and careful. I will second Dr. Dawg's observation of no less than 4 fronds in dividing. I had many small sprouts that did not survive mounting. Might be best to pot the small ones. There are no roots unless it was potted in dirt, and creative and various ways to mounting are needed. I used 12 or 18 inch black thin tie wraps, connecting two or more to extend 24 inches through base and around board if needed. The tall slab mount used a wall mounting wire basket with coconut fiber and spaghnum moss, then anchored with tie wraps basket frame, and screwed to board.

The mother plant about 16 years old
Thumb of 2023-02-24/chuck7701/8c864a

Cutting sections out
Thumb of 2023-02-24/chuck7701/362463

Cross section view of interior growth
Thumb of 2023-02-24/chuck7701/a6e099

One large section mounted on board
Thumb of 2023-02-24/chuck7701/b01e0d

Fern/frond bud
Thumb of 2023-02-24/chuck7701/924876

Multiple sections in wire planter mounted on cedar board
Thumb of 2023-02-24/chuck7701/782b0d
You must first create a username and login before you can reply to this thread.
  • Started by: chuck7701
  • Replies: 10, views: 6,207
Member Login:

( No account? Join now! )

Today's site banner is by Zoia and is called "Snow White, Deep Green"

This site is protected by reCAPTCHA and the Google Privacy Policy and Terms of Service apply.