Post a reply

Image
Feb 12, 2010 6:00 PM CST
Thread OP
Name: Caroline Scott
Calgary (Zone 4a)
Bulbs Winter Sowing Plant Lover: Loves 'em all! Peonies Lilies Charter ATP Member
Region: Canadian Enjoys or suffers cold winters Million Pollinator Garden Challenge Garden Ideas: Master Level
I am going to try growing four Heirlooms of Canadian origin.

MacPink a pink developed at MacDonald campus of McGill University
Morden yellow developed at the Morden Research station
Kimberley developed in the Kootenay region of British Columbia
Sophies Choice developed near Edmonton Alberta.

I am deciding on others---too many to choose from!
Image
Mar 9, 2010 5:53 AM CST
Name: Arlene Marshall
Twin Lakes, IA & Orange, CA
Zone 4B
I was one of the first 300 contributors to the plant database!
Do there mature sooner or grow better in cooler climates; seems like even my Russian heirlooms do better with a lot of heat.
Yum Yum Divas ~ ~ \"Most recipes are not invention . . . but evolutions\"
Image
Mar 9, 2010 8:52 AM CST
Thread OP
Name: Caroline Scott
Calgary (Zone 4a)
Bulbs Winter Sowing Plant Lover: Loves 'em all! Peonies Lilies Charter ATP Member
Region: Canadian Enjoys or suffers cold winters Million Pollinator Garden Challenge Garden Ideas: Master Level
They have been bred in our northern climate,but I do not think they are that much
more hardy. I am also going to do Early Siberian, Glacier and Polar Baby as they are supposed to be more cold hardy.

Too early to start tomatoes here yet.
Image
Mar 9, 2010 11:08 AM CST
Name: Arlene Marshall
Twin Lakes, IA & Orange, CA
Zone 4B
I was one of the first 300 contributors to the plant database!
I'd like to have just one normal summer so I can make a better comparison of the different ones. Maybe this will be the year. I've only grown heirlooms for about 3 years.
Yum Yum Divas ~ ~ \"Most recipes are not invention . . . but evolutions\"
Image
Mar 10, 2010 9:18 AM CST
Thread OP
Name: Caroline Scott
Calgary (Zone 4a)
Bulbs Winter Sowing Plant Lover: Loves 'em all! Peonies Lilies Charter ATP Member
Region: Canadian Enjoys or suffers cold winters Million Pollinator Garden Challenge Garden Ideas: Master Level
I know what you mean.
All tomatoes do better with sunshine and heat, but not so hot that they do not set fruit.
Image
Mar 10, 2010 11:23 AM CST
Name: Arlene Marshall
Twin Lakes, IA & Orange, CA
Zone 4B
I was one of the first 300 contributors to the plant database!
Smiling
Yum Yum Divas ~ ~ \"Most recipes are not invention . . . but evolutions\"
Image
Mar 19, 2010 11:44 AM CST
Name: Claud
Water Valley, Ms (Zone 7b)
Charter ATP Member
Hi Caroline, wish you luck and a good season. I'm trying Sophie's Choice in the heat and humidity of the deep south. From what I've read about it I don't expect it to do well here. Thought I'd try it in case we have a cool wet spring. Also I'm looking for a compact plant to use inside in my self contained boxes next fall and winter. Soil temperature was up to 61.5 degrees yesterday so I'm planning to set them out next week along with Brandywine OTV and Peron Sprayless. Claud

Image
Mar 19, 2010 8:25 PM CST
Thread OP
Name: Caroline Scott
Calgary (Zone 4a)
Bulbs Winter Sowing Plant Lover: Loves 'em all! Peonies Lilies Charter ATP Member
Region: Canadian Enjoys or suffers cold winters Million Pollinator Garden Challenge Garden Ideas: Master Level
What a neat set up you have. I am going to make some buckets with water reservoirs.
Also they tell me that the Sophies Choice one likes moist soil so I am thinking of planting it in pots which I will stand in an old children's sand box. I'll grow them in a semi hydroponic fashion by running water and fertilizer in the sand box.
I'll post pictures when i get them set up.(June)
Image
Mar 19, 2010 11:28 PM CST
Name: Claud
Water Valley, Ms (Zone 7b)
Charter ATP Member
Thanks, Dollar Tree (everything's a dollar) had the 2 1/2 gallon PP buckets for a buck and the trays which were intended to be for muddy boots and such when you come in the door. I love to repurpose things. I used a small soldering iron to make 3 holes at the bottom of the bucket so I can bottom water in the trays. The plants were a little smaller when they moved into their temporary quarters on Feb 24. As they grew, I removed the lower leaves (this causes their trunk to thicken) and added more potting soil.

Thumb of 2010-03-20/saltmarsh/4ff049
Image
Mar 20, 2010 9:21 PM CST
Thread OP
Name: Caroline Scott
Calgary (Zone 4a)
Bulbs Winter Sowing Plant Lover: Loves 'em all! Peonies Lilies Charter ATP Member
Region: Canadian Enjoys or suffers cold winters Million Pollinator Garden Challenge Garden Ideas: Master Level
Some good ideas there. Thanks for sharing them with us.
Image
Mar 22, 2010 10:25 AM CST
Name: Linda
SE Houston, Tx. (Hobby) (Zone 9a)
"Godspeed, & Good Harvest!"
Region: Texas Vegetable Grower Seed Starter Garden Ideas: Master Level Canning and food preservation Gardens in Buckets
Tip Photographer Charter ATP Member I was one of the first 300 contributors to the plant database! Ferns
Salt, is that 2.5 gallon muck bucket what you're growing them in? Heirlooms? Could you give me the circumference from the center and tell me how deep that muck is? I have a theory I'm working on, and you're muck looks like it might play a BIG role in it.

Thanks!

Linda
Image
Mar 22, 2010 10:38 PM CST
Name: Claud
Water Valley, Ms (Zone 7b)
Charter ATP Member
Hi Linda,

I don't have theories, I have gumball ideas. Sometimes they turn out to be good gumballs, other times they turn out to be sourballs. ha The buckets are 2 1/2 gallon. The question in my mind was about root development. I planted 18 tomatoes in the buckets, and at the same time planted tomatoes in large McDonalds coffee cups (My friends in Memphis have an ongoing "cups for claud" program) and in 8 oz. styrofoam cups. I used Scotts premium potting soil and added one cup of pelletized lime per cubic foot of mix. No additional fertilizer has been added. All have been bottom watered with 1/4 cup hydrogen peroxide added to each gallon of water. All of the tomatoes were planted like the little one you see above and potting mix was added as the plants grew. As you can see in this photo, all the plants have about the same growth, but have different amounts of mix to develop their root system in. When I plant them in the garden, I'll take a picture of their roots for comparison. You would think a more developed root system would mean a stronger healthier more productive plant, wouldn't you? Time will tell. In answer to your question, the bucket has a 9 inch diameter at the bottom, a 10 inch diameter at the top, and is 9 inches high. The circumference at the bottom would be approximately 19 and 3/16 inches, 20 and 1/4 inches in the middle, and 21 and 5/16 at the top. Hope this helps. Claud.

Now tell me about Linda's theory.

Image
Mar 23, 2010 11:01 AM CST
Name: Linda
SE Houston, Tx. (Hobby) (Zone 9a)
"Godspeed, & Good Harvest!"
Region: Texas Vegetable Grower Seed Starter Garden Ideas: Master Level Canning and food preservation Gardens in Buckets
Tip Photographer Charter ATP Member I was one of the first 300 contributors to the plant database! Ferns
Claud,
A skilled tomato grower in Florida and I have been comparing notes on growing our tomatoes in patented Earthboxes, and in our homemade eBuckets (5-gallon buckets with a built-in reservoir and a wick, like the Earthbucket design). We've both come to the conclusion that there is not enough lateral room in an Earthbox to properly grow more than one huge indeterminate heirloom at a time, and there is definitely not enough lateral room in a 5-gallon bucket to allow the root system to develop properly and produce the HUGE fruit we expect.

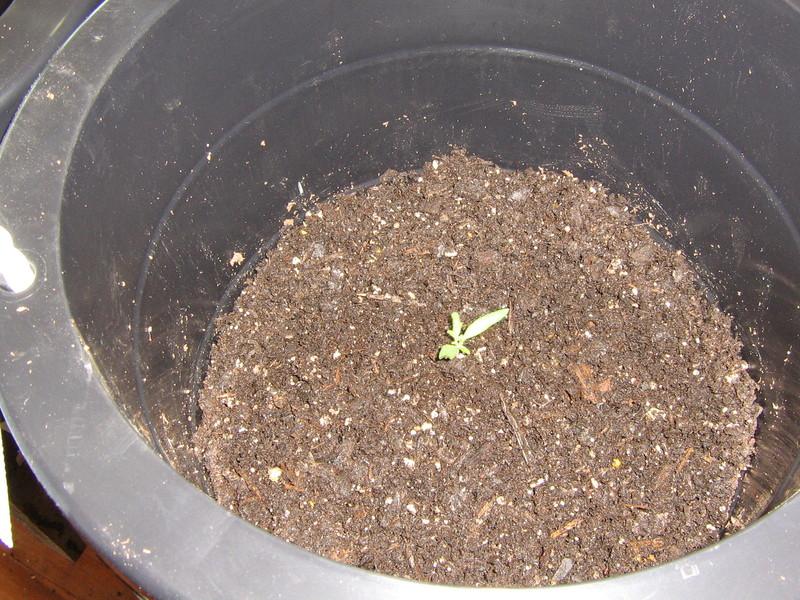
My first two seasons as a veggie gardener, I produce humongous heirloom indeterminates, larger than the palm of my hand (beginner's grace!). When I ripped the plants from the EBs at the end of the season, I took note of the root systems and made an interesting observation. The rootspread grew laterally anywhere from 11-15" but only grew vertically to a depth of about 8-11". My theory is that these tomatoes will do best in a shallower but WIDER container, thereby giving them adequate room to spread out laterally.

I'm looking for a planting vessel that is at least 12-15" circumference from center starting from the middle up, with a depth of at least 18-20". I need a 18-20" depth because whatever I use for the wick will raise the soilbed, and I'll need to add that height to the 11" maximum vertical growing space in the soilbed.

I'll be testing our theory this season when I plant out my new seedlings starting (hopefull) this weekend! LMK what you think of the theory.

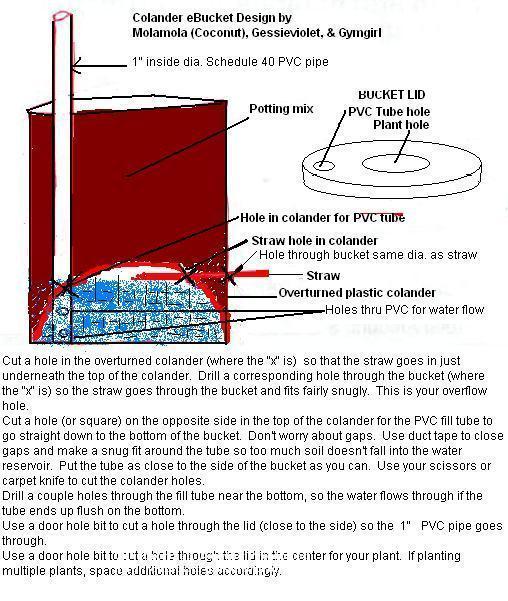
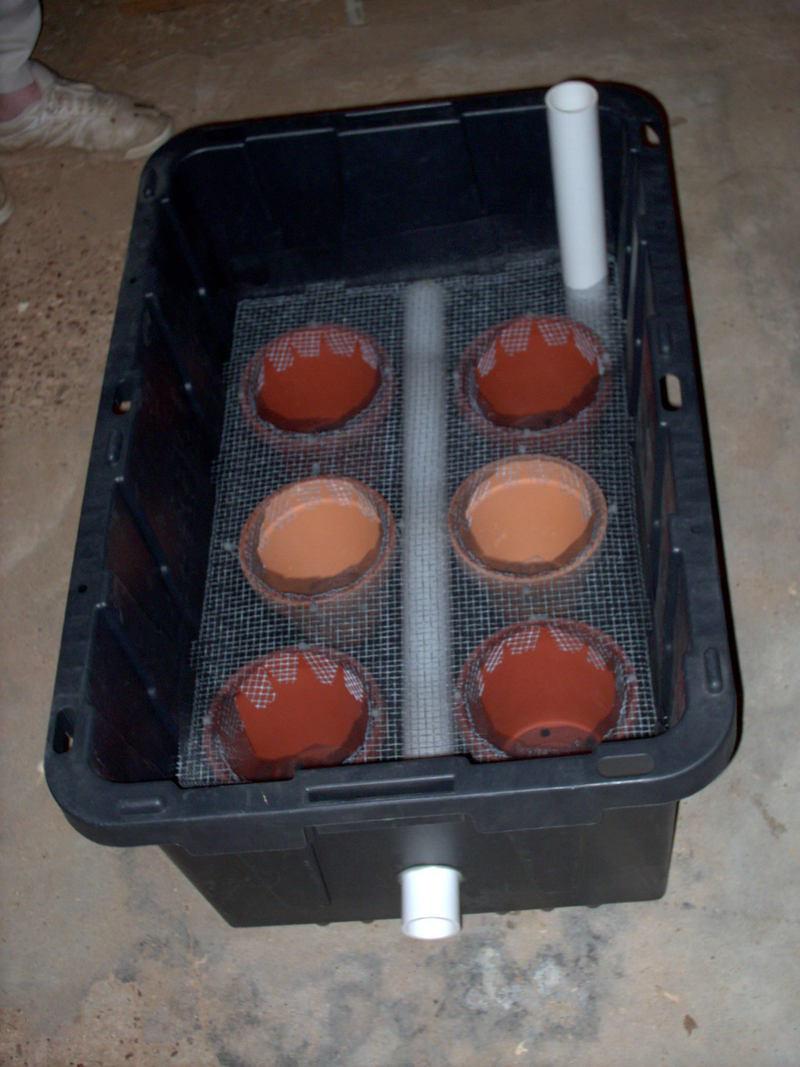
Here's the spec for our eBucket design. The overturned colander is the best wick design to date, and the plants are growing like gangbusters!

Linda

Thumb of 2010-03-23/Gymgirl/38ec7b
Image
Mar 23, 2010 1:03 PM CST
Name: Claud
Water Valley, Ms (Zone 7b)
Charter ATP Member
Caroline,

I hope this discussion is agreeable with you, don't want to hijack your thread.

Linda,

I read the threads on DG last year when ya'll came up with your design and saw the results, very impressive. I had never tried growing in self-contained boxes, but thought tomatoes needed a larger container and bigger water reservoir, so when Home Depot had their 30 gallon storage boxes on sale for $9.95 last spring I made 3 as shown. The water reservoir holds 6 gallons. The 1 1/2 inch pipe has the bottom 1/2 removed to allow for overflow and provides a 2 inch air gap between the water and the potting soil. The top of the pipe is even with the top of the pots. The 6 - 6 inch pots can be clay or plastic as long as they have a hole in the bottom. The 1/4 inch hardware cloth is covered with nylon screen. The potting soil goes from the bottom of the pots to the top of the box and holds 2 cubic feet. When I planted (2 tomatoes at opposite corners) I filled the pots almost full, put the plants in place and finished filling, this gives the plants about 9 inches of soil to grow in. Then I covered with red plastic with slits for the plants to pass through. Finally I made a dip stick 1/2 inch x 1/2 inch x 24 inches by pouring a gallon of water into the reservoir and marking where the water came to and repeating until the water ran out the drain.
All 6 plants grew and produced fruit and were uniform in both growth and production. 11 pounds of tomatoes per plant for a total of 66 pounds. During the heat of the summer, each box was wicking 4 gallons of water per day to its 2 plants. What do you think? Claud


Thumb of 2010-03-23/saltmarsh/f6007e
Last edited by Patti1957 Jul 10, 2011 11:32 PM Icon for preview
Image
Mar 23, 2010 2:14 PM CST
Name: Linda
SE Houston, Tx. (Hobby) (Zone 9a)
"Godspeed, & Good Harvest!"
Region: Texas Vegetable Grower Seed Starter Garden Ideas: Master Level Canning and food preservation Gardens in Buckets
Tip Photographer Charter ATP Member I was one of the first 300 contributors to the plant database! Ferns
Claud,
I think you understand exactly! Great design! I agree

Just a bit confused though about the removal of the bottom half of the overflow pipe. Confused

Is it cut in half down the length of the pipe, and I'm only seeing the top half laying down between the pots?

Also, you said you filled the "pots" halfway, set the plants, then continued filling. Did you mean you filled the "box" halfway?

You deep rooted the tomato plants to a depth of 9" from the top of the box? Did you plant the seedlings strictly vertical or did you curve the stems into an "L" shape for more depth?

Caroline: THANKS FOR YOUR PATIENCE!
Image
Mar 23, 2010 2:26 PM CST
Thread OP
Name: Caroline Scott
Calgary (Zone 4a)
Bulbs Winter Sowing Plant Lover: Loves 'em all! Peonies Lilies Charter ATP Member
Region: Canadian Enjoys or suffers cold winters Million Pollinator Garden Challenge Garden Ideas: Master Level
I am enjoying this discussion of creative tomatoe growing. I will try some of them too.
Still too early for tomatoes here unless one has a greenhouse.
Image
Mar 23, 2010 4:02 PM CST
Name: Mary K
Safety Harbor, FL (Zone 10a)
Container Gardener Region: Florida Tomato Heads Vegetable Grower Avid Green Pages Reviewer Garden Ideas: Level 1
Claud, very impressive.

I have a question as well ... the hardware cloth doesn't collapse from the weight of the soil? It looks like there is no support for it other than the clay pots??

thanks.
Mary K.
Image
Mar 23, 2010 4:24 PM CST
Name: Claud
Water Valley, Ms (Zone 7b)
Charter ATP Member
Linda,
That's right about the pipe. I used a bandsaw to remove about a foot long piece from the bottom of it.
This picture was taken on our farm in 1963. Early tomatoes under Hot Caps (wax paper domes) They worked, but had to be removed and replaced as the weather changed. It allowed them to be planted about 3 weeks early. The variety was rutgers if I remember correctly. The plants were staked and tied, pruned to 2 stems, and topped after the fourth bloom cluster to make the 8 clusters on each plant ripen early. Shortly after the last cluster was picked, you couldn't give tomatoes away much less sell them. Things change.

Thumb of 2010-03-23/saltmarsh/379d86
Image
Mar 23, 2010 5:54 PM CST
Name: Claud
Water Valley, Ms (Zone 7b)
Charter ATP Member
Linda, the plants were grown in McDonalds coffee cups like you see above and were tall enough to have the roots resting on top of the filled pots and planted straight up with the top of the plant sticking out the top of the box. Any leaves that would be below soil level were removed when they were planted. In other words the tomatoes were about 12 inches tall from the bottom of the roots to the top of the plant and about 9 inches of the plant was planted vertically in potting mix with about 3 inches sticking out above the soil. The thing I would be careful of would be planting too deep. The mix is saturated with water for about 2 inches above the water line and your plant will drown (root rot). When watering, I tried to let the reservoir get down to about 1 1/2 gallons and then refilled them. This way the saturated mix was always down in the pots with the roots able to breath above. After the plants finished last year, I took them out of the box. Or I should say I tried to take them out, the potting mix was completely filled with fine threadlike roots and no signs of root rot. Also the roots had filled the entire area available to them. If you look at the picture of the box above, I planted the tomatoes at the 11 o'clock and 5 o'clock positions to allow as much space between them for light and air circulation as well as root growth.

The boxes were filled to the top with mix, firmed down, and covered with red plastic when the tomatoes were planted.

p1mkw
The pots support the hardware cloth fine. It's hard to see in the photo, but the sides of the box taper a little so they can be stacked when empty. Also I cut the hardware cloth one inch oversize and bent a half inch down on the edges. This Stiffens the edges and makes it easy to pull out, but the little barbs dig into the plastic when you push down.
Image
Mar 23, 2010 6:09 PM CST
Name: Mary K
Safety Harbor, FL (Zone 10a)
Container Gardener Region: Florida Tomato Heads Vegetable Grower Avid Green Pages Reviewer Garden Ideas: Level 1
Thanks for the clarification, Claud. Looks like something I may want to try.
Mary K.

Only the members of the Members group may reply to this thread.
Member Login:

( No account? Join now! )

Today's site banner is by RootedInDirt and is called "Botanical Gardens"

This site is protected by reCAPTCHA and the Google Privacy Policy and Terms of Service apply.