It's very easy to grow herbs, lettuce, and other small plants indoors using a continuous flow aquaponics set up that is easy and inexpensive to put together. I am not a DIYer, but I was able to do this with a minimum amount of swearing. Most of the swearing was because I had to figure this out myself, so I've already done that for you. Here's what you'll need:
*Sturdy storage bin to use for grow bed (mine is 15" x 22") - try to buy black if you can. Cement mixing pans from Home Depot will work for this and they are already black. If you don't buy black, you'll need to spray paint the bin black to avoid algae buildup.
*Bulkhead fitting ( $4 at Amazon - search on Lifegard Aquatics 3/4-Inch Double Threaded Bulkhead ) and a threaded standpipe to fit. Or buy it all for about $7 (see picture at
http://www.growwurks.com/botan... - I didn't buy from this supplier, so this isn't a recommendation. Just showing you the picture.) I recommend the second because it will save you heartaches later on.
*Shelf, brackets, and hardware to mount it to wall - size of your shelf will depend on size of your storage bin.
*10 gal fish tank (you can find at thrift stores or buy at Walmart - do not buy the full set up - just the tank)
*Aquarium pump ( $8 at Amazon - for an example, search for Maxesla Submersible Pump 80 GPH (300L/H) Fountain Water Pump For Pond/Aquarium/Fish Tank/ Statuary/Hydroponics with 5.9ft (1.8M) Power Cord )
*Black tubing to fit your pump output
*Bubble stone and air pump (about $10 for both at Walmart)
*Shop light (about $10 at Walmart)
*1 or 2 feeder goldfish (about 45 cents each at PetSmart)
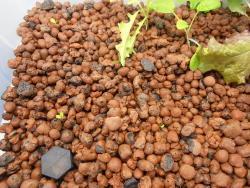
* Hydroponic clay pellets ($17 at Amazon for more than you'll use. You can use pea gravel, but it will make your grow bed MUCH heavier and you'll need to reinforce your shelf. I recommend the pellets.)
Here's what it will look like when you're done, except you'll be smart enough to use black for the bin and tubing.
From the side:
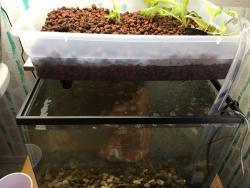
From the top:
Here's how to set up:
Stage 1
1. Spray paint the grow bed if necessary.
2. Cut a hole near a corner of your storage bin to fit your bulkhead fitting. This is the hardest thing about the set up, I promise.
3. Attach bulkhead fitting and test for leaks. Hopefully you won't have leaks, but if you do, seal them with
100% silicone. (Plumbing section at Walmart.) Keep testing until you don't have leaks.
4. (Only if you didn't get the full fitting.) Cut standpipe to a height about the same height as the sides of your bin. If your standpipe doesn't already have holes in it to allow water flow, drill holes in it starting at about 1" above the bottom of the bin.
Stage 2
(Once your grow bed is water tight and fully plumbed)
1. Measure your storage bin from one edge across to the bulkhead fitting. You want your shelf to be a bit shorter than this measurement. Look at the picture above and you can see the bulkhead fitting coming down out of the bed near the left front corner.
2. With your tank in place, determine the height for your shelf and install it. I set mine up so that the brackets are even with the top of the tank. This way the tank is helping the brackets support the weight of the grow bed. Place your grow bed on the shelf.
3. Set up your tank with bubble stone and pump. Attach tubing to pump and run it up to the grow bed. Use a zip tie or duct tape to secure your tubing so that the water will be pumped into the bed at the opposite end from the bulkhead fitting.
4. Rinse the dust off the clay pellets. This will require multiple rinsings. Fill the grow bed with the rinsed clay pellets. If you didn't get the specific fitting I linked to, make sure that the top of the standpipe is above the clay pellets. You don't want pellets getting into the pipe and blocking it.
5. Fill the aquarium with water. Keep at least 1 to 2 gallons nearby. Turn on the pump. Water should pump up through the tubing, flow through the grow bed, and return through the bulk head fitting back into the tank. Watch this for a while to make sure that you have the same amount of water draining out as you have going in, otherwise, it will eventually overflow. Once you have the water continuously cycling, top off the tank so that the water remains at the proper height.
6. No matter how many times you rinsed the pellets, you will probably have a lot of cloudiness in the water from clay dust. This is infuriating, but normal. Just keep the pump flowing and within a day or two, the water will clear.
7. Hang your shop light over the grow bed.
Stage 3
(Once the water is clear)
1. The fastest way to get your new set up ready for fish and plants is to use some water from an aquarium that has already cycled. If you don't have an aquarium, ask a friend who does to give you a gallon from their tank when they clean it. You will have evaporation from your set up, so little by little add a gallon of this. until you've got it running.
OR
If you've got fish fertilizer, you can dilute this in a gallon of water and do the same thing.
OR
You can use a product by API called Quick Start. It's about $15 at PetSmart.
2. After a few days, of this cycling, go get your fish. You can use any fish, but feeder goldfish are cheap and they are dirty. Dirty is good. Their poop and pee is what fertilizes your plants.
3. Plant your bed.
You can directly sow seeds into the clay pellets if you want, but if the seeds are tiny, they may wash into the tank. In the picture from the top above, you can see some direct sown seedlings coming up.
It is also perfectly OK to fill a plastic pot (or solo cup with holes in the bottom and sides) with rinsed clay pellets and then nestle it down into the bed so that the bottom of the cup is close to the bottom of the bed so that water is keeping the lower pellets wet. Direct sow into the pot.
Grocery stores are now selling what they call "hydroponic" herbs. I just put them, pot and all, into my grow bed and they are doing fine.
I also start seeds outside the grow bed in a double solo cup system and once the plants are big enough they can be transplanted into the grow bed.
You can also do this this with small plant starts you bought at a nursery or grew yourself from seed, just rinse as much of the soil off the roots and transplant them into your bed. I've got a couple of cauliflower plants growing in a bed right now.
Fresh herbs and lettuce year-round make this totally worth it.


