Viewing post #101720 by Robynznest

You are viewing a single post made by Robynznest in the thread called Polymer Clay Fairy Door Tutorial.
Image
Jul 18, 2011 12:47 PM CST
Name: Robin
Pittsburg, MO
I sent a postcard to Randy! I was one of the first 300 contributors to the plant database! Charter ATP Member Garden Ideas: Level 1 Garden Art Birds
Orchids Lover of wildlife (Black bear badge) Region: United States of America Hummingbirder Region: Missouri Plumerias
Oops got ahead of my self, if you want a wood grain look to your door make lines going top to bottom and little knot holes. Then add your hinges and such. I take a paper clip and cut it in half to make my hangers, push them into the top. BTW I do all this on parchment paper, that way when I'm ready to bake all I have to do is put the paper on a cookie sheet and bake. No mess and no out of shape pieces.

Now I practice what else I want on the doors. If I'm just going to paint them, this is the time to pop them in the oven. Bake according to package directions. I usually bake 275 for 30 min.

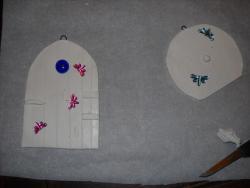
These doors are for an order and they will get decorated with a few extras. A glass bead on one and little plastic dragonflies. I put them on the doors and press them in a little for an indentation. I can leave the glass bead in but take off the flies.
Thumb of 2011-07-18/Robynznest/212d16
Save the planet, it's the only one with chocolate.
Last edited by Boopaints Jul 18, 2011 2:16 PM Icon for preview

« Return to the thread "Polymer Clay Fairy Door Tutorial"
« Return to Garden Art forum
« Return to the Garden.org homepage

Member Login:

( No account? Join now! )

Today's site banner is by RootedInDirt and is called "Botanical Gardens"

This site is protected by reCAPTCHA and the Google Privacy Policy and Terms of Service apply.