Martagons are fairly easy germinators, but not one for immediate gratification. They have delayed hypogeal germination.
Hypogeal because the first leaf it sends up is not a cotyledon, as with most plants, but actually a true leaf. This is because the seed first produces a tiny bulb, and from that bulb comes the leaf. So the first leaf does not come from the seed.
Delayed because the seed first produces a tiny bulb, and then must go through a cold season before it will send up a leaf.
So in nature, the seed does not send up a leaf until its second season after planting:
Season 1: germinates and produces a tiny bulb
--- then winter ---
Season 2: the tiny bulb sends up a leaf.
With martagons, only
one leaf is produced in season 2. Usually only one leaf is sent up in season 3 also, but it is much larger. Thus, a minimum of 5 years is needed for bloom, and it may take longer.
This may help you some:
http://www.the-genus-lilium.co...
The first time I grew martagons from seed, I didn't know any of this. I planted them in a pot, as I would with any other seed, and of course the first summer, nothing happened above ground. I figured the seeds either rotted, or are still sitting there, ungerminated. But I knew that many seeds (not necessarily lilies) will germinate after a summer or winter season in the soil, so I have always made it a practice to keep all seeded pots for at least two years. That second season, my martagons showed. I was very pleased, and later that year I read what had really happened.
Those seeds I had planted in ordinary potting soil, and kept them bagged to keep the moisture constant through the spring and early summer. When "nothing" happened, I removed the bag and just watered them as I did all my other potted materials.
So this is the simplest way to grow martagons from seed.
------------------------------------------------------------
May I recommend this first time, even it just becomes an experiment that later fails, that you use this upcoming method, that in addition to being able to see the tiny bulb formation, can cut the maturation time significantly.
1. Start with ziplock baggies. I usually use 2 x 3 inch or 3 x 5 inch size.
2. Use a growing medium that is soiless. Peat or fine vermiculite seem to work the best for me. I like vermiculite because it is easier to see the brown seeds in it. A soiless medium means less disease problems, as there is very little "food" for disease organisms to grow on.
3. Moisten the medium just enough so it sticks together, but not waterlogged. Vermiculite stores a lot of water within itself. If you use vermiculite, the "sticking together" test doesn't work. Think back when you were a kid, playing in a sandbox. The amount of moisture in the sand that you would need to build with, that's what you are striving for here. If clumps of vermiculite stick to your hands, there is too much water. If individual vermiculite granules stick to you, that is good.
4. Wet the seeds and stick them to the bottom of the ziplock bag that is laying flat. Spoon the medium over the seeds, and fill the bag. The seeds will easily be visible through the plastic, so you will be able to monitor their progress.
Alternatively: first fill the bag loosely with your growing medium, and then put the seeds on top of the mix as the baggy lays flat on the table. A drop of water on the end of a toothpick will grab a dry seed for easy placement.
5. Close the baggie, and place them in a warm 65-70 F area, seed side down. If any seeds mold, they have either been damaged beyond repair, or were not alive to begin with. If possible, try to remove them.
6. Within 2 weeks, seeds should be visibly plumped, and somewhat translucent. If none are plump, then you most likely need to add a bit more water. Just a bit: use an eye dropper or similar. If some are plump and some not, than most likely the unplump ones were never alive.
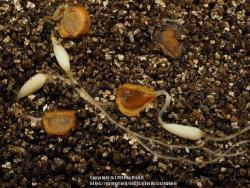
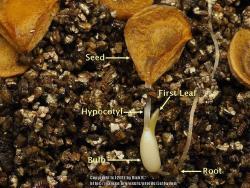
7. At this stage you may see some germination, with a "root" emerging from the seed. This is actually a kind of stem (not a root) called a hypocotyl. At the end of this stem, a bulb will form. (This stem may be as long as a half inch, but is typical an eighth to a quarter inch long. Rarely it is so short that the bulb is formed inside the seed.) From the opposite end of the bulb, a true root will emerge. Depending on different factors, like the age or vigor of the seed, germination should take place in 2-4 weeks.
8. Keep the seeds in the warm stage for at least 3 months total. Four months will produce a bigger little bulb, if you have the time. There is no need for light, and no need for dark during these months.
9. Now is the time for the cold treatment. Put the baggie in the refrigerator for 3 months or longer. If you have to, 2 months is probably sufficient. Six months is fine, but put it in the coldest part of the refrigerator, or the bulbs may sprout prematurely. If you cold store them longer than 3 months, place the baggie seed side up. That way if they begin to sprout, you will be able to see the action. Stored seed side down, any sprouting will be into the medium and blocked from your view.
10. When the cold treatment is over, gently remove the bulbs and plant in a suitable potting soil in a pot 5 inches or more deep. Seedlings will remain in this pot for 2 or more years. They are too tiny and fragile to go directly in the garden. Leaves will emerge from the bulbs, not the old seed coverings. If, for whatever reason, the old seed is removed, lost, rotted or whatever, it is of no consequence.
Rather than opening the baggie by its traditional ziplock, cut one side completely open, and gently turn the contents into a prepared pot. Don't worry that bulbs are (or are not) upright. They will right themselves as they grow. Better to handle the tiny bulbs as little as possible. this is an easy time for damage to occur, and infections to take place. Aim to plant the bulbs one quarter to one half inch deep.
11. Keep moist, and grow in the shade. Only one leaf will emerge per seedling, so try to make the most of it, and keep it alive for as long as possible. Typically, that first leaf may last for only a month or two. The longer it stays green, the larger the bulb it produces.
12. If leaves all die off, you can reduce watering, but don't let the pot go completely dry. For the rest of the summer, the bulb is not sleeping, but is actually growing. However, since it has no leaves, water needs are minimal.
- - - - - - - - -
Using this method, starting in the fall, you can cram 2 years of growth into just one year. The 3 month warm treatment(started in the fall) is equivalent to the first natural 6 month spring/summer, and the ensuing 3 month cold treatment is equivalent to the 6 month fall/winter. That would be your first "year", abbreviated to just 6 months. Your second season of growth for the seed will begin with the ensuing natural spring.
Okay. If your head is spinning, I'm sure you're not alone. But it is what it is. That's why you should think of it as a fun journey, and not be too disappointed if you falter along the way.
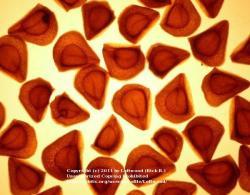
Martagon seed. The photo is back lit so you can see inside the seed. Normally the center part of the seed is opaque and dark brown.
Martagon seed growth.