
http://veganslivingofftheland....
http://www.gardensall.com/your...
http://homestead.org/DianaBark...
4/15/15: I have some older seeds for gourds from last fall's Piggy Swap on Cubits; I'm particularly hoping to get the Lagenaria types going -- which include birdhouse, apple, dipper and snake, as well as luffa. I have the seeds soaking overnight in both plain warm water and warm water plus hydrogen peroxide, and tomorrow will soak some in warm water plus a smidgeon of MG fertilizer. After about 20-24 hours of soaking I'll plant them in pots, and will also try some in damp paper towels in plastic baggies. Hopefully I will get some of the birdhouse and apple gourds, in particular.
12/5/15: I got quite a few bottle gourds and birdhouse gourds from the plantings on the trellis; brought one of each inside before we had any kind of freeze, the rest stayed outside through several pretty hard frosts. The first two that were brought in remain green and heavy at this point, while all of the others quite quickly began releasing moisture and developing mold, and are becoming quite light in weight. So far none of them have developed soft/rotten areas -- beginner's luck? Our weather has still be quite mild (highs in the low to mid 40s, lows in the high 20s to mid 30s), with no snow on the ground yet, and I'm debating whether to put those first two out in the greenhouse to get a little freezing and move things along a bit, especially since all of the others appear to be curing appropriately and it wouldn't be that bad even if I ruin those two (although they are really nice, big gourds!). I'm really pleased about how well they grew, and want to try more of the Lagenaria gourds in 2016 -- not sure yet what type.
1/2/16: Those first 2 gourds that I brought in continue to be green and heavy; our temps have been quite mild yet for this time of year (with a high of 33F today), so I decided to take them out to the greenhouse for a few freeze/thaw cycles to try to get them to start to dry. If it ruins them, I still have a fair number of gourds; this is kind of funny, because when I brought those 2 in I kind of figured the others were going to be ruined by being left out in the cold. All of the others are now in various stages of drying, without any signs of rotting. A couple of them seem to be pretty close to done, with very little mold left on them, so I think they are ready to be cleaned. I've been exploring ideas for painting and otherwise decorating gourds... one thing I definitely want to try is making a "fairy house" from a gourd. Also want to try some decorative carving, and I've seen a lot of examples of beautifully painted gourds. Decoupage seems to be another good option. As far as what type to grow in next year's garden, I will likely just try planting seeds from some of these, as the birdhouse types were the only Lagenaria that I grew in 2015.
I also still have a box full of the dried soft-shell (Cucurbita) gourds from 2014 and would like to decorate some of those as well.
__________________________
Cleaning dried gourds:
http://cubits.org/gourds/artic...
Free gourd craft tutorials:
http://www.sawdustconnection.c...
American Gourd Society
http://www.americangourdsociet...
Green peeling a gourd
by Glenn Burkhalter past president of the Alabama Gourd Society
http://www.lakeview-farms.com/...
Why would you want to green clean?
Well, if done at the right time, a green cleaned gourd will come out without the mottling on the shell caused by fungi growing on the skin as the gourd dries. Some gourds will be a beautiful brown or bronze, and most will be uniform in color. Jim Story was the acknowledged master at gourd manipulation and many of his creations were green cleaned. While Jim did offer some basic instruction, much of what I learned was by trial and error, and that's a very painful and expensive way to do it. Tips and procedures outlined in this article should help avoid some of those heartaches. For those of you who may not be familiar with the term, "green clean", it simply means removing the outer skin from a gourd while it is still green, or at least while it still has some green color remaining.
So, how do you do it?
Most people use a dull pocket or kitchen knife and just start scraping. I do that too, but I also use the side of a fine wire wheel brush mounted on a bench grinder. Be sure to use a face shield if you do this. A wire bristle CAN and WILL fly off the wheel and you certainly don't want one in your eye. I mentioned green cleaning the gourd at the right time; and herein lies the problem. If you do it too early, the gourd will dry too fast, shrivel and crack. Wait too late and there will be a lot of mottling from fungi already growing on the skin. So when is the right time? I surely wish I knew! I did ask Jim about that once, and the only hint I remember from him was; "if it bleeds, stop"! I have now green cleaned several hundred gourds and still have an occasional "failure". But here are some clues that I use to try to determine if a gourd is ready to green clean: (and here I'm assuming that you are selecting a gourd from a gourd farm, not a green gourd "off a shelf'. That's never a good idea whether you green clean or not). The stem should be dead (brown) and not showing any green. A green stem indicates that the gourd is still receiving nourishment from the vine and has not started to dry, or at least not very much. The gourd should be lighter in weight than gourds of a similar size that still have green stems. This is an indication that the gourd has lost some of its interior fluid. Once you've selected the "right" gourd, scrape a small spot and wait a couple of minutes to see if it bleeds. Bleeding is the oozing of moisture from the shell where the skin has been scraped off. If it is bleeding, STOP! Set it aside for a few days and let it dry more. In fact, the gourd may not bleed where you start scraping but start to bleed in another location. Same advice, STOP! White scrape marks on the shell are another indication that the gourd is not ready for green cleaning. This means that the gourd is not dry enough to clean, or the shell is so thin that it probably won't be worth the effort anyway. If the shell is showing a lot of greenish tinge where you've scraped, it might be a good idea to let it dry a couple more days before finishing. That's another indication that the gourd is not quite ready. Some greenish tinge is OK. If I first notice bleeding after I've cleaned a significant portion of the gourd, I will place it loosely in a plastic bag for a few days. This reduces the speed of evaporation and may prevent the cracking.
Once you've completed the green cleaning, place the gourd in a shaded, airy location. There is still moisture in the gourd that will diffuse out through the shell, and fungi will still try to grow on it. Good air circulation will reduce or eliminate that. If you prefer a white shell rather than the brown or bronze color, bleach it with a 50-50 mixture of Clorox and water. You may have to do this more than once to get the desired whiteness. Finally, if at first you don't succeed, try, try again! And gourd luck!
__________________________
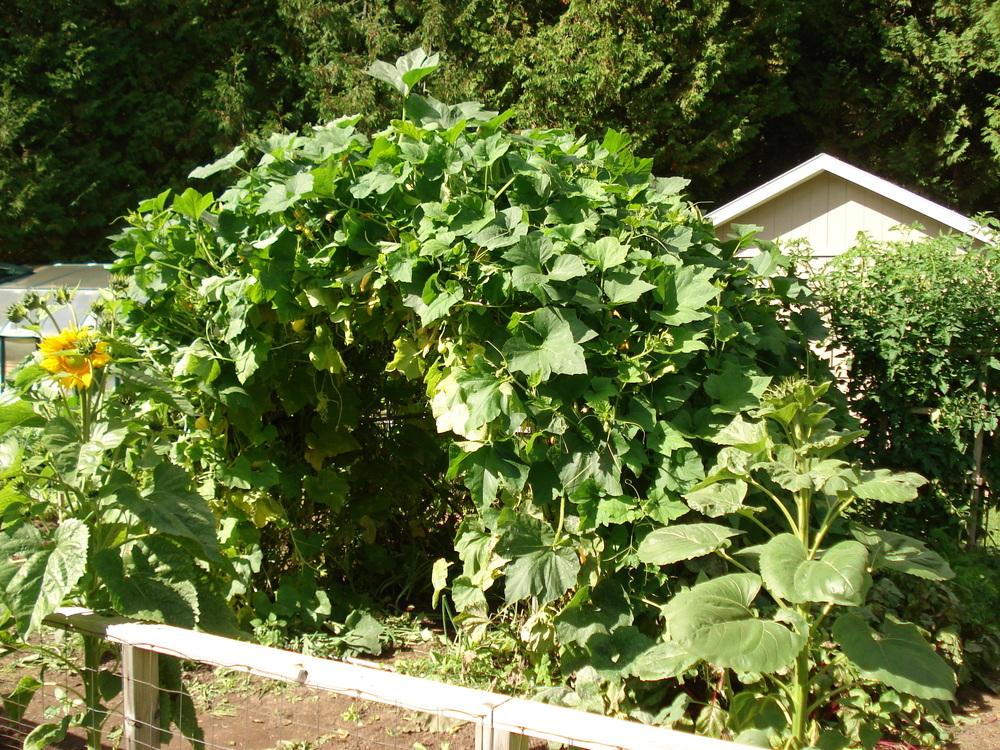
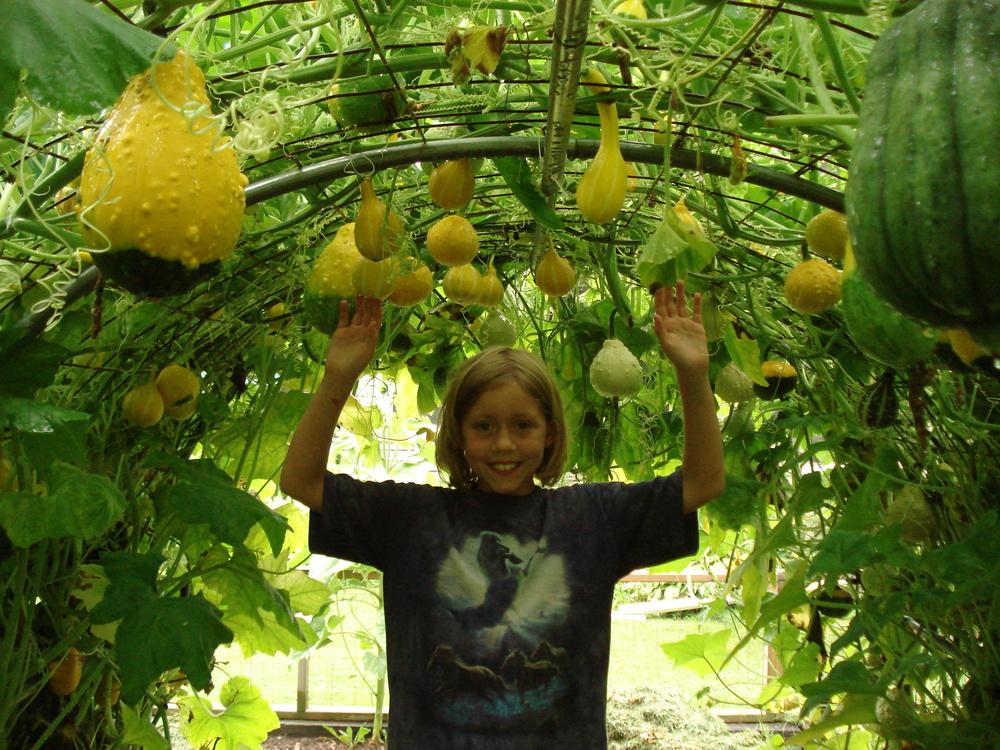
Gourds (soft shelled) growing on my "hoop trellis," 2014

_______________________
Harvesting and curing hard-shelled (Lagenaria) gourds:
From http://ohioline.osu.edu/hyg-fa...
Harvesting and Curing
Gourds are ready for harvest when the stems dry and turn brown. It is best to harvest gourds before frost. Mature gourds that have a hardened shell will survive a light frost, but less developed gourds will be damaged. The lagenaria will tolerate a light frost; but gourd color may be slightly affected. Gourds should be cut from the vine with a few inches of the stem attached. Take care not to bruise the gourds during harvest, as this increases the likelihood of decay during the curing process. Discard any fruit that is rotten, bruised or immature. After harvesting, gourds should be cleaned with soap and water, dried, and rubbing alcohol applied to the surface.
Curing cucurbita gourds is a two-step process which may take 1 to 6 months depending on the type and size of the gourd. Surface drying is the first step in the curing process, and takes approximately one week. During this time, the skin hardens and the exterior color of the gourd is set. Place clean, dry fruit in a dark, well-ventilated area. Arrange gourds in a single layer and make certain that the fruits do not touch each other. A slatted tray will allow air circulation around the gourds. Check gourds daily and discard fruit that show signs of decay or mold and any that develop soft spots.
Internal drying is the second step in curing and takes a minimum of four weeks. Keep the gourds in shallow containers in a dark, warm, well-ventilated area. If any mold appears on the outside skin, gourds can be wiped clean and allowed to continue drying. However, any gourds that become decayed, shriveled or misshapen should be discarded. Periodically turn the fruit to discourage shriveling and promote even curing. Providing warmth during the internal curing process will accelerate drying and discourage decay. Adequate curing is achieved when the gourd becomes light in weight and the seeds can be heard rattling inside. Cured gourds can be painted, waxed, or decorated.
Lagenaria gourds can be surface cured in the same manner as cucurbita gourds. However, the internal drying process takes much longer for the gourds to fully harden. After curing, the surface can be smoothed and polished with very fine steel wool or sandpaper. The hardened shell should be treated with rubbing alcohol, allowed to dry, and then waxed or shellacked for the final finish.
Luffa gourds have specific harvesting and processing techniques to produce high quality sponges. Harvest when the outer shell is dry, the gourd is light in weight and the seeds rattle inside. Remove the stem end of the gourd and shake out the seeds from the center cavity. Soak the luffa gourds in warm water until the outer skin softens to the point where it can be easily removed. Then soak the fibrous sponge in a solution of 1 part bleach to 9 parts water to obtain the desirable creamy-white appearance. Rinse in clear water and allow to dry before using.
--------------
From http://www.amishgourds.com/sto...
Frost does not affect mature Lagenaria gourds. A hard frost simply means that the vines are done growing for the year. Often, the leaves may die, but the vines will still deliver 'hardening off' nutrients to the gourds for some time later. The gourds themselves, will not be affected at all. In fact, professional growers recommend leaving them in the field for curing.
One note:
If your gourds are not done growing and you are surprised by a very early frost, then there is a good chance that those gourds will not make it. The gourds are immature and, just like any other fruit, could be affected by the cold. Regardless, there isn't much that can be done about an extremely early frost because picking the gourds before their time is just as bad as the extreme cold.
-------------
From http://www.clemson.edu/extensi...
Cut gourds from the vines, leaving a couple of inches of stem attached. Gourds without attached stem are more likely to spoil. Be careful when handling the fruit so as not to damage or bruise it as this can also lead to rotting. Discard damage, bruised or immature fruit.
Clean the gourds with soap and water to remove surface dirt, then allow the surface to dry. Immerse the gourds in a 10% bleach solution to kill bacteria and fungi. Very large gourds can be wiped thoroughly with a cloth saturated in the same bleach solution. Then, move the gourds to a warm, dry, well ventilated and shaded location, such as a garage or shed. Make sure that the surface on which they are placed is clean and dry. You can cover the surface with clean newspaper or cardboard. Space gourds so that they do not touch. Alternatively, place the gourds on racks or hang them in nets to allow for best air circulation. If the area is not naturally ventilated, a fan can be used.
Complete drying of gourds may take 1 to 6 months depending on size and type. Check and turn the gourds frequently during this time. Discard any that become soft and begin to spoil. Some surface discoloration or dry mold is normal. Rind drying may only take a few weeks, but gourds are not fully dry internally until seeds can be heard to rattle when the gourd is shaken.
When gourds are completely dry, the outer skin of Lagenaria gourds can be removed to reveal the smooth inner shell. Soak the gourd for 10 minutes in a large bucket of warm water. Then scrub off the outer skin with a scouring pad or wire brush. After the outer skin is gone, dip the gourd into a 10% bleach solution, and allow to air dry.
-----------------------
Consider growing along a sunny wall or greenhouse. Also consider cutting off the growing end of the vine once 3-4 fruits have set, to hasten maturity. (per suggestion from ATP member William, who lives in Sweden and seems to have quite similar growing conditions)
Native American Ethnobotany
Foods, Drugs, Dyes and Fibers of Native American Peoples, derived from plants
http://herb.umd.umich.edu/herb...
______________________
Indigofera tinctoria: http://www.wildcolours.co.uk/h...
Cultivation of Indigo (Growing Indigo)
Indigo plants love warmth and humidity. To grow indigo in a cold country, you need a warm greenhouse, a conservatory or a sunny windowsill. Providing you can keep the plants warm, the earlier you sow indigo seeds the better, as you will have a longer growing season. I try to sow mine in early February, but you can sow indigo seeds as late as April.
Soak the seeds overnight in water and then sow your seeds in pots at least 3 inches in diameter, one seed per pot (pots are better than seed trays because indigo does not like to have its roots disturbed). Keep the pots in a heated propagator until the seeds germinate and then move them to warm windowsill. When the indigo seedlings are large enough, re-pot them once or twice into larger pots with good soil. Eventually use a 10 litre pot per plant. If you have a sheltered position and the weather is warm you might be able to keep the plants outside in the summer.
Indigo plants are hungry feeders and need feeding almost as often as tomatoes. Well cared for plants can grow 2 metres tall and might need pruning.
Spray the plants with water from time to time and if possible keep them on a pebble tray to increase humidity. Keep checking greenhouse plants for red spider mite, which may be a sign that the humidity is not high enough.
Harvesting Indigo dye
The best time to harvest is just before the flowers open. Indigo is a perennial plant and to keep the plant for more than a year you should harvest only half the leaves at one time.
Your indigo plant may need to be more than a year old to come into bloom and it needs plenty of warmth to flower. Try to keep it alive over the winter which should give you an early start the following year. Do not feed the plants from October to March, prune them to a manageable size, reduce watering and keep the plants warm.
Extracting Indigo Pigment (indigo dye)
Use the leaves as soon after harvesting as you can, and follow the instructions for extracting indigo dye from Japanese Indigo. If you have a large enough pot to soak the indigo you can use chopped branches, otherwise pluck and use the leaves.
According to Buchanan, 500 grams of indigo leaves will give you enough pigment for approximately 100 to 200 grams of wool. This varies with weather, soil and age of the indigo plant.
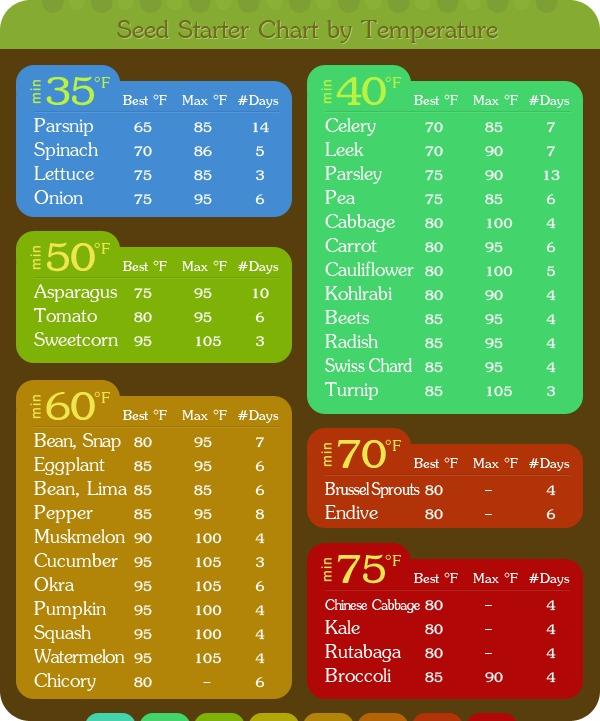
Helpful charts from https://theselfsufficientlivin... :

_______________________________
MY PLANTING CALENDAR:
JANUARY:
Inventory seeds and order seeds
FEBRUARY:
2/1:
Onion seeds
Vinca seeds (light inhibits germination; consider starting in vermiculite)
Pansies (cold stratify for 2 weeks, then move to lights)
2/15:
Celery (indoors)
Artichokes (direct sow indoors, in 4" pots)
MARCH:
3/1:
Perennial flowers (winter sow)
Perennial herbs (winter sow)
Tomatoes (for growing in GH)
3/15:
Peppers
Petunias
Perennial flowers (indoors)
Perennial herbs (indoors)
Celosia
APRIL:
4/1:
Cabbage, kale, etc.: direct sow in HH
Broccoli, cauliflower, kohlrabi, cabbage, etc (indoors)
Eggplant (indoors)
Impatiens (indoors)
4 O'clocks (indoors)
4/15: start moving seedlings to GH (weather permitting)
4/15:
Tomatoes (indoors) (for outdoor plants)
Marigolds (indoors)
Lettuce (in planter in GH)
Zinnias (indoors)
Lagenaria gourds (indoors)
Snow peas (pre-sprout and start in 6-packs, transplant when 3-4" tall)
Radishes (with succession sowings every couple of weeks)
Corn salad/mache: DS outdoors as early as possible, or DS in early fall in unheated GH
MAY:
5/1:
Zinnias (indoors)
Transplant tomatoes to GH
Onion plants or sets -- plant out in garden
Nasturtiums -- direct sow, or start in pots in GH for transplanting
Carrots (direct sow in garden)
Beets (direct sow in garden)
Spinach (direct sow in garden)
5/7:
Cucumbers, squash, pumpkins (in pots in GH, for transplanting)
5/15:
Potatoes (direct sow in garden)
Corn (start in GH in packs, for transplanting)
Peppers (transplant to HH or GH)
5/22:
Basil (indoors; make succession plantings every couple of weeks)
5/26:
Beans (in packs in GH, for transplanting)
JUNE:
6/1:
Marigolds (direct sow outdoors)
Transplant peppers to garden
Corn (direct sow in garden)
6/15:
Chard (DS in ground or planter; make succession plantings)
OCTOBER:
10/10:
Garlic
10/15:
Consider planting potatoes to overwinter in ground and grow in the spring
_______________________________
Growing guides from Cornell University
http://www.gardening.cornell.e...
Seed longevity:
http://www.clearcreekseeds.com...
http://www.highmowingseeds.com...
Growing shrubs and trees from seed:
Books to look for:
Growing Trees from Seed: A Practical Guide to Growing Native Trees, Vines and Shrubs by Henry Kock
William Cullina's Native trees, shrubs and vines
Witch Hazel: http://homeguides.sfgate.com/l...
Chokecherry: http://homeguides.sfgate.com/g...
Eastern Hemlock: https://sites.google.com/site/...
Winterberry: http://www.wildlifegardeners.o...
______________________________________
Starting Brassicas from seed: I've had a problem with the plants being floppy because the seedling root kind of pushes up out of the soil and then doesn't support the plant properly. This is a suggestion from ATP member William: "for direct sowing brassicas outdoors I make a deeper seed drill than needed. After I have sown the seeds I only cover them to correct depth, I don't fill the drill completely. Later on when they have emerged I can just use a hoe to fill the drills up fully at the same time as I remove weeds. With very little effort the plants are now at correct depth and stabilized so they won't flop over. As a plus less watering is needed during germination as the soil is more moist in the bottom of the deeper drill. Of course if one anticipates extreme amounts of rain before the seeds have germinated one could run into trouble on heavier soils, but it has never happened to me on my light sandy soil."
______________________________________
Using a soil block maker:
http://www.johnnyseeds.com/ass...
http://newlifeonahomestead.com...
(recommends using MG Seed Starting Mix)
________________________
Seed starting: breaking dormancy (by Joannabanana)
The thread "Hydrogen Peroxide for Gardening recommendations" in Seed Starting: Breaking Dormancy
Mixing charts for gardening with hydrogen peroxide
http://www.using-hydrogen-pero...
_______________________
SSE -- hand pollination of squash (also saved on my computer in "documents"): http://www.seedsavers.org/site...
SSE Planting and Seed Saving Guide -- Vegetables, flowers, herbs and sunflowers
http://www.seedsavers.org/Educ...
Saving seeds from tomatoes and peppers: http://cubits.org/salsagarden/...
How to keep tomatoes from cross pollinating: http://faq.gardenweb.com/faq/l...
Pepper seed saving guide: http://www.thechileman.org/gui...
Saving seed from Dicentra spectabilis (bleeding hearts): http://homeguides.sfgate.com/b...
____________________
Suggestion for sending seeds through the mail from Starlight1153 (Ella), on her Ella's Garden Cubit:
1. Put your seed in your baggy. The ones from walmart that are like 100 for a buck are the best. Think they like 2" x 3". Put your label inside.
2. Get you a 3 x 5 card if you use normal, standard size envelopes. Get two cards if you use them big long envelopes and tape them together to fit the length of the big envie.
3. Take your baggy seeds and lay them one on top of the other, with the closed parts just laying right below each other down the length of the card IN THE CENTER of it. Generally I can get 6 or 7 seed packets to all line down the card.
4. Next take you a piece of tape and run it all down the center of the packet of the seeds and over a bit on both ends of the card on the back side of the card. When you pick up your card, all your seed packets stay in place.
5. Take a piece of paper towel and cut it in half. Take your card, lay it at bottom of paper towel and wrap it around card and seeds and put a piece of tape to hold paper towel.
6. You now have a bunch of seeds ready to go into your envelop. The po runs envies through so that they get stamp and scan marks on top and bottom and loose seed packets will naturally fall to bottom of envie and get crushed. This method keeps that from happening.
They can run the seeds through and the machine doesn't touch the seeds in the middle. You might want to check, but doing this, unless you got a real fat envie, you will only need one stamp to mail.
Your seeds arrive nice and neat and all in one piece. Saves having to use bubblers all the time which gets to be expensive. I actually figured this method out after seeing how BlueSpiral had sent all her seeds all taped together. I then just modified it to work on smaller seed trades.
_____________________