Post a reply

Image
Jul 6, 2016 2:42 PM CST
Name: Chantell
Middle of Virginia (Zone 7a)
You're worth it!
Charter ATP Member Million Pollinator Garden Challenge Organic Gardener Garden Photography Bee Lover Lover of wildlife (Black bear badge)
Hummingbirder Butterflies Tropicals Herbs Dog Lover Moon Gardener
Haven't tried this yet...but it looked GOOD

Wooww Crab Bombs

1 lb. Crabmeat
1 Egg, beaten
1 cup Ritz Crackers, crushed
1 tsp. Yellow Mustard
2 tbsp. Fresh Lemon Juice
2 tbsp. Fresh Parsley, chopped
1 tsp. Old Bay Seasoning
1 tbsp. Worcestershire Sauce
CRAB PUPPIES

How to make it :

Place crabmeat in a mixing bowl, picking any stray shell fragments out. Add crushed crackers, Old Bay Seasoning & parsley to the crab. In a separate bowl, combine egg, mustard, lemon juice and Worcestershire sauce. Whip with a whisk until smooth. Pour egg mixture over the crabmeat and crackers and gently mix careful not to break up large lumps of crabmeat. Mold into golfball sized balls and place on a cookie sheet. Bake @ 350 degrees for 30 minutes. Drizzle w/ melted butter and allow to cool.
“Little girl, why are you doing this? You can’t save all these starfish. You can’t begin to make a difference!” After a few moments thought, she bent down, picked up another starfish & hurled it as far as she could into the ocean. Then she looked up at the man and replied, “Well, I made a difference to that one!” Be the change you wish to see in the world. http://www.stillsthatspeak.com...
Image
Jul 7, 2016 1:13 PM CST
Name: Chantell
Middle of Virginia (Zone 7a)
You're worth it!
Charter ATP Member Million Pollinator Garden Challenge Organic Gardener Garden Photography Bee Lover Lover of wildlife (Black bear badge)
Hummingbirder Butterflies Tropicals Herbs Dog Lover Moon Gardener
Those from PA should recognize this recipe...reminds me of grandma's house!

Hamballs

Combine the following and shape
• 1.5 lbs ground ham
• 1 Cup bread crumbs
• 1 egg – well beaten
• ½ Cup Milk

Ingredients for Basting Sauce – mix thoroughly – and pour over Hamballs
• 1 Cup Brown Sugar
• 1 teaspoon Dry Mustard
• 1 Cup Water
• ½ Cup Vinegar

1 Can of Pineapple Chunks

Bake at 350 for a total of 60 minutes. Pour Pineapple Chunks over top after 30 minutes. Baste every 15 minutes
“Little girl, why are you doing this? You can’t save all these starfish. You can’t begin to make a difference!” After a few moments thought, she bent down, picked up another starfish & hurled it as far as she could into the ocean. Then she looked up at the man and replied, “Well, I made a difference to that one!” Be the change you wish to see in the world. http://www.stillsthatspeak.com...
Image
Jul 10, 2016 6:55 PM CST
Name: Gita Veskimets
Baltimore or Nottingham MD-212 (Zone 7a)
Life is "mind over matter". If I d
This recipe for "SNACK MUSTARD" hit DG like a storm in 2009.

Everyone was making it but trying to do it "their way" hence all the
notes at the end as to how THEY did it and how it turned out.
It does look and sound delicious. Maybe YOU will want to give it a try
and see what YOU may want to do differently. "It IS the season.....

***FYI--I NEVER made it myself. Just posted it here. Gita--2016.

******************************************************************
"SNACK MUSTARD"---and so so so much more
( Dave..(DG)...Pine City, NY; August 12, 2009).

TRUST ME... once you make this your friends will be begging for more! I have so many people asking me "when are you making mustard again? I'm out!" lol

I usually make a double batch at a time but your first time I would stick to a single batch. I always
can this a certain way--for years-- and have never had a problem with any going bad.

--Fill your sink with hot water and start warming the canning jars you're going to use.
--Fill a large pot with water and turn the heat on "eventually" it will boil.
When you are done making your mustard" I dump this hot water on top of my warming canning jars in the sink, right before I start canning, to really make em hot for the lid to seal.
--Between the heat of the boiling mustard and the boiling water dumped on the canning jars, they seal every time...air tight. There is enough vinegar in the recipe to prevent any bacteria from growing.
Ok, here it goes, hope you people enjoy and share!

INGREDIENTS:
---2 CUPS finely chopped Red Hot Peppers (leave some chunks if you want, as well as some seeds) Any hot peppers you wish" I usually mix and match a bunch so that my mustard is a fun color.
If you use all green hot peppers, you will have a greenish tint :)
--1Tbl. salt
--2c YELLOW mustard
--1c Flour
--1.5 c Water
--1 QT. Cider Vinegar
--6c Sugar --yeah I know its a lot.. but trust me :)

In a large pot add your peppers ,salt,yellow mustard,vinegar and sugar and bring to a boil. As that is starting to boil in a separate bowl mix together your flour and water and whisk to a nice paste.
Once the mustard is boiling, SLOWLY add the flour/water paste while whisking and watch it thicken up as you stir. Once its the desired thickness you can simmer for about 10 min.
--While its simmering dump the large pot of boiling water on your canning jars. Once they have been subjected to the hot water for a few minutes start canning away!
I have never really made a single batch so I don't know how many quarts it makes.. but I'm assuming about 6.
There is usually a little left over that I stick in the fridge to enjoy later :)

I have used this mustard with pretzels , cheese / crackers and even marinade/BBQ meats! So versatile and so good! on Hot dogs and sandwiches even fried fish! :)
Hope you enjoy and let me know if you make it and like it!

**********Notes from other users—and what they did differently:

**********(High Desert, CA)
As look back on ingredients you use, there are lots of differences from the ones I used before.
The ones i used to use as condiments, consists of yellow mustard, vinegar, lots of habanero peppers, garlic and onions . Unfortunately my friend would not share her recipe which I believe was of Caribbean origin. The sauce is not thick, therefore no flour or water is used... only juice from the ingredients is used.

It was the condiments used on the dining table to stay away from salt or sugar.
We use it in everything, including eggs for breakfast.

***********(Maple Heights, OH)
I made some today, I cut the recipe in half. I also used a half a cup of finely chopped red onion, and Honey mustard instead of plain yellow mustard. For the peppers I used hot yellow wax, and jalapenos. I put it on some chicken wings I grilled, and I had to go buy more wings.
Everyone wanted some.

************(Midland, TX )
OK, Dave, I made your wonderful recipe today (thanx!!) It is quite good. I used red and green jalapenos. I only had 1 1/3 C peppers after prepping, so I cut down all ingredients proportionately (about 1.5x recipe.) It made 4 full pints plus a little extra to put in the fridge for immediate consumption.
***A tip for prepping the peppers: just chop the peppers a little and add them to a blender or food processor. Add some of the vinegar called for in the recipe and pulse until you reach the desired coarseness. I got them fairly fine, and they are beautiful in the mustard--sorta confetti-like.

PROCESSING:
If you are going to keep these jars on hand for a while or give them to others, the jars and lids really need to be sterilized (especially if you add any onion.) The hot bath in the sink is fine for sealing but will not kill bacteria, and the object of sealing is to seal sterile contents inside sterile jars with sterile lids.

************** ( Auburn, AL )
Made this during the afternoon and it's very tasty. Would love to have it a bit more of a mustard and less of a pepper jelly so I'll have to fiddle. I used , Red Bell (for color), Jalapeno, Poblano, Anaheim, Serrano, and habanero, I made four different temps, mild (Bells, Jalapeno, Poblano and Anaheim) medium (all of the above but very light on the Serrano and Habanero) hot and x-hot had full habanero (seeds and all).

*************** (No name)
I just made this after doing many ohhms. I've never canned anything, nor made anything with so many hot peppers. It came out wonderful and 2 people asked me for the recipe already.

It gave me an idea to do homemade gift baskets for Christmas, thank you for sharing the recipe with us, Cpt. Spanky!
Image
Aug 24, 2016 7:39 PM CST
Name: Critter (Jill)
Frederick, MD (Zone 6b)
Charter ATP Member Million Pollinator Garden Challenge Critters Allowed Butterflies Hummingbirder Cat Lover
Bee Lover Region: Mid-Atlantic Cottage Gardener Garden Photography Tropicals Hibiscus
I made my grandma's green bean soup tonight, with my secret ingredient (potato flakes) for quick cooking. It's an easy, delicious summertime meal, and the fresh green bean flavor really shines. If you have green beans that are just a little bit too tough to just steam or saute', they'll be fine in the soup, just cut into smaller (1 inch-ish) pieces and simmer until tender.

Here's a link to the DG article with photos (useful if you've never made this kind of dumpling before).

Grandma's Green Bean & Potato Soup with Dumplings

This is a throw-it-together recipe. You can adjust the amount of broth, add more potato flakes if you want it thicker, put in more snap beans if you have them, or make another egg's worth of dumplings.

3 cups chicken broth
2 cups water
1/2 cup instant mashed potato flakes
1/4 teaspoon ground black pepper, more to taste
1 quart fresh green beans, snapped into bite size pieces

4 eggs, well beaten with a splash of water (1-2 tsp)
6 Tablespoons grated parmesan cheese
1 cup all purpose flour
1/4 teaspoon paprika
1/8 teaspoon cayenne pepper or half-sharp paprika

Put the stock and water in a large pot over medium-high heat. Snap the beans while the broth heats up. Add the potato flakes and pepper. Stir occasionally as the potatoes dissolve. Add the prepared snap beans to the thickened soup base and continue simmering until the beans are crisp-tender.

Get your dumpling dough ready while beans are cooking. Beat the eggs in a separate dish. Mix dry ingredients and make a "well" in the center, then pour in the beaten eggs. Stir with a fork, just until all the flour is moistened. This is a lot like making muffins -- you don't want to over-stir or they won't be tender. The dough should pull away from the sides of the bowl to make a sticky lump, not so stiff that you could roll it out, maybe halfway between muffin batter and biscuit dough. (I used to say "consistency of library paste," but nobody knows what that is now.)

When the beans are nearly done, bring the soup to a low boil and add the dumplings. Two long-handled iced tea spoons work really well to make the dumplings, but any 2 spoons will work. Scoop up a little dough, maybe half a teaspoon, on one spoon and use the other spoon to scrape the dough off so it drops into the soup. Work quickly and/or turn down the heat while dropping dumpings so the first ones don't totally overcook. I scoop up a big spoonful of dough and use my second spoon to scrape off 3 or 4 little blobs. The dumplings get bigger as they cook. The last dumplings need about 2 minutes to cook through, so wait a minute before removing the pot from the heat.

Leftovers (if any) keep fine in the fridge and can be reheated in the microwave, although you may need to thin the broth with a little more water or milk. I've never tried freezing this soup, although I've frozen green beans in chicken broth and made soup from them later.
We're all learners, doers, teachers.
Last edited by critterologist May 5, 2023 9:03 PM Icon for preview
Image
Sep 12, 2016 8:04 AM CST
Moderator
Name: Catmint/Robin
PNW WA half hour south of Olym (Zone 8a)
Region: Pacific Northwest Region: Mid-Atlantic Region: Maryland Butterflies Bee Lover Native Plants and Wildflowers
Echinacea Azaleas Forum moderator Cottage Gardener Garden Ideas: Master Level Celebrating Gardening: 2015
Gita’s Latvian Sauerkraut Soup

Note: This is delicious, full-bodied, cool weather soup. No actual
measurements are given. Only guidelines.
Good soups are not based on a
pre-scribed formula. If it seems right to you….go for it
(this recipe is for a pot of approx. 21 qts. capacity)

In a large stockpot put:
--A big, meaty ham bone (smoked is best),
--a 2 lb (plus or minus) piece of fresh pork of some kind (picnic, country spare ribs, fresh ham, thick pork chops etc.)
--and, for extra flavor, some good, smoked ham hocks. (Smoked turkey legs can be used as well).
These have a lot of fat (which can be removed once Soup is cold) but also add a lot of flavor. Anything with bone-in is good. It adds body to the soup.

--Cover meat with cold water and bring to a boil.
--Turn down fire and simmer, skimming off foam as it surfaces.
--Let simmer for about an hour.
**Do not add any of the seasonings until all the “foaming” has stopped, or you will be skimming off the seasonings as well.

--Next add 1 deli-pack (or 1 lg. Can—32oz) of Sauerkraut,
--1 med. head of green cabbage, cut with a knife in a coarse shred,
--2-3 ribs of celery (sliced),
--2-3 med. onions (coarsely chopped),
--1Tbs. Caraway seed,
--about a tsp. full of whole peppercorns, (or fresh ground black pepper
to taste),
--2-3 Bay leaves,
--fresh chopped parsley (1/2c. or so),
--fresh chopped dill (stems and all-maybe a 1/3 cup),
--and 1-2 coarsely shredded carrots.

Note: This soup can have either barley (a ½ cup or so DRY) or diced potatoes (3 or 4 med.—thick-diced) added for a fuller body.
--If you choose barley, add it now, as barley takes long while to cook until it is tender!
--If you choose potatoes, add them in the last half hour of cooking the soup, or they will turn to “mush”.
--Add enough water--or saved broths—(***see note below) to almost fill the pot. Bring all back to a gentle boil.
--Lower fire way down, and simmer the soup for a good 2 hours,
stirring occasionally. Meat needs to be “falling off the bones” done.

--At this point, using a slotted spoon, fish out ALL meats and bones to a large platter. Keep soup simmering ….(you can now add the potatoes).

--Cut away all edible meat in bite-sized pieces.
Scrape off all underlying fat from the Hock's skins and discard, along with all other unnecessary fat.
--Sliver smoked hocks skins from the hocks in very thin strips or
pieces—if you want to….Or toss it! ***
(Save bones for your favorite dog!).

--Return cut-up meat to the soup and stir well to distribute all.
--Simmer another few minutes, or so.

The soup is now basically done. Let it rest a bit and skim off any accumulating fat layer and discard--then serve it with GOOD buttered bread of your choice—Rye bread and butter really complement this Soup. So does a good, crusty white, Italian bread (like at Aldis).
It gets better and better when reheated…as all soups do!

***Soup can be frozen in serving size bowls or containers,
***This, and all soups, freeze VERY WELL and last for a very long time in the freezer without losing flavor. Years! Literally!!!

***Frugality note:
You can save (and freeze) any liquids or broths from previous “cookings”
of veggies, potatoes, etc. and then add them to the soup.
Why pour it down the drain???

Lots of success with this! You will love this soup! Everyone has-- that has tasted it.
First they go--”YEWWW! Sauerkraut soup????
Then they have a bowl of it—and they are hooked!

In case you run into problems—e-mail me or call me and I will
“hold your hand” to the end.
"One of the pleasures of being a gardener comes from the enjoyment you get looking at other people's yards”
― Thalassa Cruso
Image
Sep 12, 2016 8:06 AM CST
Moderator
Name: Catmint/Robin
PNW WA half hour south of Olym (Zone 8a)
Region: Pacific Northwest Region: Mid-Atlantic Region: Maryland Butterflies Bee Lover Native Plants and Wildflowers
Echinacea Azaleas Forum moderator Cottage Gardener Garden Ideas: Master Level Celebrating Gardening: 2015
SSGardener's Spinach Salad:


Dried cranberries flavored with orange juice (found at Trader Joe's), goat cheese/chevre, toasted almonds, spinach.
The dressing has olive oil, white wine vinegar, regular white vinegar, sugar, sesame seeds, and a bit of salt.
"One of the pleasures of being a gardener comes from the enjoyment you get looking at other people's yards”
― Thalassa Cruso
Image
Oct 2, 2016 7:43 AM CST
Name: Terri
Lucketts, VA (Zone 7a)
Region: Mid-Atlantic Region: Virginia Dog Lover Lover of wildlife (Raccoon badge) Deer Ponds
Foliage Fan Ferns Hellebores Irises Peonies Amaryllis
Strawberry Buttermilk Baked Donuts

Ingredients
2 cups all-purpose flour
½ cup sugar + 2 tablespoons sugar, divided
1½ teaspoon baking powder
½ teaspoon salt
¾ cup buttermilk
2 large eggs
¼ cup honey
2 tablespoons butter
1 tablespoon vanilla extract
1½ cups strawberries, diced and divided
1 cup confectioner's sugar

Instructions
Preheat oven to 425 degrees and lightly coat a donut pan with cooking spray.

To make the glaze, combine ½ cup diced strawberries with 2 tablespoons sugar. Stir and mash with fork, letting sit at room temperature until strawberry juice is produced.

Add 2-3 tablespoons of this strawberry juice mixture to confectioners sugar and mix well. If glaze seems too runny or too thick, add more strawberry juice or confectioners sugar. Set aside.

For the donuts, combine flour, ½ cup sugar, baking powder and salt in a bowl and whisk till combined.

In another bowl, combine buttermilk, eggs, honey, butter and vanilla stirring well with a whisk.

With a rubber spatula, slowly add wet ingredients into dry ingredients stirring until mixture is just combined. Add 1 cup strawberries and slowly mix in until just combined.

Pour or pipe mixture into donut pan, filling ⅔ of the way full.

Bake for 8 minutes or until a toothpick is inserted and comes out clean.

Let cool on a wire rack for 5 minutes, and then dip in glaze and return to wire rack.

Eat immediately!
Thumb of 2016-10-02/aspenhill/0a296b
Image
Oct 9, 2016 3:57 PM CST
Name: Terri
Lucketts, VA (Zone 7a)
Region: Mid-Atlantic Region: Virginia Dog Lover Lover of wildlife (Raccoon badge) Deer Ponds
Foliage Fan Ferns Hellebores Irises Peonies Amaryllis
I've been trying new appetizer recipes to eat during the football games this season. Today's trial was pretty good and will be added to my favorites...

Jalapeño Popper Wonton Cups

Ingredients:
24 wonton wrappers
cooking spray
4 jalapeno peppers, diced (use more or less to personal taste preference)
1 8oz package cream cheese, softened
1/3 cup sour cream
2 tablespoons chopped green onions
1/2 cup shredded cheddar cheese
1/2 cup shredded mozzarella cheese
additional cheese for topping (1/4 cup cheddar or mozzarella)

Instructions
Preheat oven to 350.

Spray each wonton wrapper on both sides with cooking spray and place into a mini muffin tin. Bake 7 minutes.

Mix remaining ingredients in a small bowl, reserving 1/4 cup cheese for topping.

Fill each wonton cup with the cream cheese mixture and top with additional cheese.

Bake an additional 12-14 minutes or until cheese is melted and wonton is browned.

Thumb of 2016-10-09/aspenhill/1dc6ef
Image
Oct 9, 2016 4:12 PM CST
Moderator
Name: Rick Moses
Derwood, MD (Zone 7b)
Azaleas Hostas Tender Perennials Ferns Garden Photography Plant and/or Seed Trader
Forum moderator Region: United States of America Region: Mid-Atlantic Region: Maryland Million Pollinator Garden Challenge
Catmint/Robin's Tuscan Spinach Bean Soup

1 tbs olive oil
1 med onion, chopped
2 tsp minced garlic
2 celery ribs, chopped
3 carrots, peeled and sliced
1 (14.5 oz) can chicken broth
1 (28-oz) can cut-up, peeled tomatoes, undrained
1/2 cup small elbow macaroni
2 tbs chopped parsley
2 tsp basil
1 (15 oz) can cannelini beans, rinsed and drained
12 oz fresh spinach (about 4 cups)
1/2 tsp salt
1/2 tsp pepper
Grated Parmesan, as accompaniment if desired

(1) In a large flameproof casserole or large soup pot, heat oil over medium heat. Add onion, garlic, celery, and carrots. Cook, stirring often, until onion is softened, 5-6 minutes.
(2) Mix in broth, tomatoes with their liquid, macaroni, parsley, basil, beans, spinach, salt, and pepper. Heat to boiling, reduce heat to low, and simmer 15-20 minutes, or until macaroni is tender.
(3) Serve hot, sprinkled with Parmesan, if desired.
LLK: No longer by my side, but forever in my heart.
Pal tiem shree tal ma.
Image
Oct 11, 2016 3:04 PM CST
Name: Chantell
Middle of Virginia (Zone 7a)
You're worth it!
Charter ATP Member Million Pollinator Garden Challenge Organic Gardener Garden Photography Bee Lover Lover of wildlife (Black bear badge)
Hummingbirder Butterflies Tropicals Herbs Dog Lover Moon Gardener
Hmmm wondering how hot pepper jelly would taste on those @aspenhill?
“Little girl, why are you doing this? You can’t save all these starfish. You can’t begin to make a difference!” After a few moments thought, she bent down, picked up another starfish & hurled it as far as she could into the ocean. Then she looked up at the man and replied, “Well, I made a difference to that one!” Be the change you wish to see in the world. http://www.stillsthatspeak.com...
Image
Nov 5, 2016 11:41 AM CST
Moderator
Name: Rick Moses
Derwood, MD (Zone 7b)
Azaleas Hostas Tender Perennials Ferns Garden Photography Plant and/or Seed Trader
Forum moderator Region: United States of America Region: Mid-Atlantic Region: Maryland Million Pollinator Garden Challenge
Rolled, Stuffed Pork Loin Roast

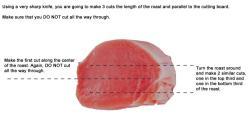
There are two ways to flatten the pork to make a stuffed roast: butterfly and rolled.

To butterfly a roast, make a parallel cut from one end to the other without cutting all the way through the opposite side. When done, you should be able to open the roast like a book or butterfly.

The other method, rolled cut, takes a while to master. This involves slowly cutting the roast to a consistent thickness while 'unrolling' the remainder. Kind of like unrolling a roll of paper towels, except that you are actually cutting the 'sheet'.

I find it much easier to do a triple butterfly instead of the rolled cut.
Thumb of 2016-11-05/RickM/40dfe5
Thumb of 2016-11-05/RickM/5da7fd

Once the three cuts are made, carefully unfold the roast and open it out. Place it on a piece of plastic wrap. Place another piece of plastic over it. Using a meat mallet or empty wine bottle, flatten out the length of the roast.

At this point, I season the meat and roll it up and let it sit in the refrigerator to chill and allow the seasonings to do their thing.

Depending on what you are going to use for a stuffing, prepare it and make sure it is completely cool before stuffing the roast.

About an hour before serving, remove the roll from the refrigerator and unroll on the cutting board. Leave the plastic wrap on the bottom.

Preheat the oven to 350 degrees.

Place the stuffing on the top side of the roast no more than 1/2 inch thick. (If you've ever made a jelly or swiss roll, you'll totally understand why!)

Using the plastic wrap carefully lift the roast and tightly, but not too tightly, roll it up. As you roll the roast, remove the plastic wrap from the bottom.

If you have kitchen string (100% cotton), tie the roll at 1-inch intervals to hold it together. If you don't have kitchen string, you can also roll it up in a sheet of parchment paper, twisting the ends to seal.

Place the roast in a v-rack (too help hold the shape) in a roasting pan. Roast to an internal temperature of 160 degrees.

If you tie the roast, you will need to periodically baste it as you would a regular loin roast.

If you used the parchment, the roast will not have a brown crust on it, but it will have faint marks from the v-rack.

Allow the roast to rest for a 10 minutes to firm up.

Carefully slice with a very sharp knife using a sawing motion.

Enjoy!
LLK: No longer by my side, but forever in my heart.
Pal tiem shree tal ma.
Image
Nov 6, 2016 3:36 PM CST
Name: Critter (Jill)
Frederick, MD (Zone 6b)
Charter ATP Member Million Pollinator Garden Challenge Critters Allowed Butterflies Hummingbirder Cat Lover
Bee Lover Region: Mid-Atlantic Cottage Gardener Garden Photography Tropicals Hibiscus
Yum!! I have a stuffing I especially like with pork... 2 parts peeled, diced apple, 1 part diced onion, 2 parts Pep. Farm or other brand stuffing (the kind that looks like big crumbs, not the cubed kind -- too hard to work with). Add your choice of rosemary, garlic, thyme, or other seasonings that "work" with pork. No need to add hot water or broth, as the juice from the diced apple & onion moistens it nicely.

My brother uses a mixture like that to stuff pork chops. I have an clay pot "chicken baker" that holds a pair of tenderloins nicely... I put rosemary or other herbs between the 2 tenderloins and tie them together, then surround them with the stuffing mix in the clay pot. Oven temp is different for the clay pot, but you could probably make it in a deep baking dish and cover with foil... Either way, I stick a thermometer probe into the center of the biggest piece of pork so I know when it's done.
We're all learners, doers, teachers.
Image
Nov 14, 2016 1:52 PM CST
Name: Frenchy
Falls Church, VA (Zone 7b)
Region: Ukraine Tender Perennials Container Gardener Dog Lover Houseplants Million Pollinator Garden Challenge
Tomato Heads Hostas Tropicals Annuals Foliage Fan Aroids
Artichoke Dip Recipe

1 cup mayonnaise (I use Hellman's reg mayo)
1 cup fresh-grated parmesan cheese
1 can quartered or halved or whole artichoke hearts in water
2 tsp. garlic powder -or to taste
salt/pepper to taste

Preheat oven to 350 degrees F.

Drain and chop artichokes - medium dice
Mix diced artichokes, mayo, parm cheese and spices
Pour into greased baking dish - I use spray oil
Cook for 35 - 45 min on until golden and bubbly

(heats up well in microwave or oven)

ENJOY! - Frenchy21/Froggy21
Image
Nov 17, 2016 8:56 PM CST
Name: Terri
Lucketts, VA (Zone 7a)
Region: Mid-Atlantic Region: Virginia Dog Lover Lover of wildlife (Raccoon badge) Deer Ponds
Foliage Fan Ferns Hellebores Irises Peonies Amaryllis
This is one of the side dishes I make at Thanksgiving - seems to be refreshingly light to counter balance the heavy starches of all the traditional sides.

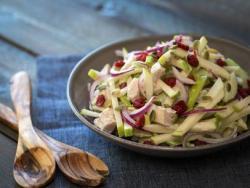
Turkey Apple Cranberry Slaw
Ingredients:
2 medium granny smith apples, cut into match sticks
2 ribs celery, sliced
1/3 cup fennel, julienned
1/3 cup red onion, finely sliced
1 cup turkey, diced
DRESSING:
3/4 cup plain greek yogurt
1/4 cup whole cranberry sauce
2 tablespoons apple cider vinegar
2 tablespoons honey
OPTIONAL TOPPINGS:
dried cranberries

Directions:
In a small bowl, whisk together greek yogurt, cranberry sauce, vinegar, and honey.

In a medium mixing bowl, combine apples, celery, fennel, red onion, and turkey.

Toss with dressing and serve.
Thumb of 2016-11-18/aspenhill/616c48
Avatar for MariposaMaid
Dec 27, 2016 7:18 AM CST
Name: Judy
Mid Atlantic Coastal Plain USA (Zone 7b)
Butterflies
One Christmas card this year had a recipe for Mulled Cider and another this Colonial Williamsburg 18th Century Recipe
Thomas Jefferson’s Favorite Bread Pudding

1 quart scalded milk
½ pound butter, melted
2 ounces brandy
10 eggs
2 pounds of ½ inch cubed stale bread, any kind
2 ½ cups sugar
2 tea cinnamon
1 tea nutmeg
1 T vanilla extract

Cut bread a day ahead to allow drying. Put into 9 x 13” cake pan
Preheat oven to 325. Place milk and butter in pan, heat until just below boiling point, 180 F
Combine eggs, sugar and spices. Slowly add milk to egg and sugar mixture, whisking constantly. Add Brandy. Add to bread mixture, mixing thoroughly to soak bread.
Bake until skewer of knife comes out clean, about 44-50 minutes.
Avatar for tantefrancine
Jan 18, 2017 10:39 PM CST
Falls Church, VA
Birds Roses Garden Procrastinator Plumerias Peonies Region: Mid-Atlantic
Irises Hellebores Garden Art Dragonflies Garden Photography Bookworm
Holy basil chicken

http://shesimmers.com/2012/05/...

The website has photo of the Holy Basil


Pad Ka-Prao (ผัดกะเพรา)
by Leela on May 8, 2012 in She Deglutenizes, She Fries, She Thais


While Pad Thai or Tom Kha Gai, in my opinion, deserve a somewhat extensive tutorial, there really isn’t much to say about Pad Ka-Prao (RTGS: phat ka-phrao). It’s a dish that doesn’t require many ingredients or demand the kind of skill that takes years to develop. And if this dish could talk, the only thing it would beg of you is that you use the ingredient without which it cannot be what it is: holy basil (Bai Ka-Prao ใบกะเพรา).[1]

Holy Basil (Bai Ka-Prao ใบกะเพรา) – Notice the jagged edges and fuzzy leaves and stems.

Unfortunately, holy basil can be hard to find in many areas. Even those who want to grow it have a hard time finding quality seeds. Thai restaurants overseas struggle with this too. They know (at least one would hope so …) that they’re not supposed to use anything other than holy basil. Yet, some routinely use purple/sweet basil instead, because it’s easier to find. As understandable as it is, one cannot pass off such a dish as Pad Ka-Prao — literally “holy basil stir-fry” — without being guilty of untruthfulness. [Added August 11, 2011: If you only have sweet basil, feel free to use it and call it Pad Bai Horapha.]
Other than that, Pad Ka-Prao is very easy to make; to ruin it, you have to try pretty hard.

[It must be pointed out that purists maintain that oyster sauce and soy sauce — two ingredients that are almost always added to Pad Ka-Prao — should not be used. You can certainly go that route in which case omit the dark soy sauce and oyster sauce in the recipe below and add to the stir-fry just fish sauce (and perhaps a tiny bit of palm sugar) to taste. However, chances are the Pad Ka-Prao which you have fallen in love with isn’t made by purists. So, in order to come up with a homemade version similar to what you’ve had at a street food stall or restaurant, you’re going to need soy sauce and oyster sauce. Your call.]


You don’t need to add shallots, if you don’t want to. Many recipes don’t call for them.
I like shallots in my Pad Ka-Prao, though.


4.9 from 10 reviews
Pad Ka-Prao (ผัดกะเพรา)


Print
Prep time
10 mins
Cook time
10 mins
Total time
20 mins

Author: Leela
Recipe type: Main Dish, Entree
Cuisine: Thai, Asian
Serves: 2
Ingredients
1 pound of ground pork, beef, or chicken (You can do what I do here which is chop up 1 pound of skinless chicken breasts with a cleaver. You get better texture that way.)
7 (26g) large cloves of garlic, peeled
7 (16g) bird’s eye chilies (or however many you can tolerate)
1 large shallot (20g), peeled and roughly chopped
2 tablespoons vegetable oil
1 tablespoon fish sauce
2 tablespoons thin/light soy sauce or seasoning sauce (such as Golden Mountain aka "the Green Cap" sauce")
1 tablespoon dark sweet soy sauce (kecap manis)
1 tablespoon oyster sauce
1 cup holy basil leaves, packed
Instructions
If you have a mortar, pound together the garlic, chilies, and shallot until you get a coarse paste. If no mortar, either chop them all up with a cleaver on a chopping block or pulse them into a coarse paste in a mini-chopper.
In a skillet, heat up the vegetable oil over medium-high heat. Add the paste to it and fry until fragrant.
Add the meat to the skillet and break it up with the spatula into small pieces.
Add the remaining ingredients (except the basil leaves), correcting seasoning as needed. [I don't like sugar in my Pad Ka-Prao; besides, the dark sweet soy sauce provides enough sweetness for me. But if you think you'd like it even sweeter, either add about a teaspoon of palm or brown sugar or double the amount of dark sweet soy sauce (which will also make the end product darker in color). Purists, as mentioned in the post, won't even use anything for salinity other than fish sauce.]
Once the meat is cooked through, check the amount of liquid in the skillet. If it’s too dry, add a little bit of water or sodium-free broth.
Before taking the skillet off the heat, add the basil leaves to the mixture and give it a couple of stirs. We only want to wilt the basil with the residual heat that is still in the pan so as not to mute the fragrance of the fresh holy basil leaves.
Serve over rice. A Thai-style crispy fried egg on top and a tiny bowl of nam-pla prik would be nice.
Avatar for tantefrancine
Jan 18, 2017 10:50 PM CST
Falls Church, VA
Birds Roses Garden Procrastinator Plumerias Peonies Region: Mid-Atlantic
Irises Hellebores Garden Art Dragonflies Garden Photography Bookworm
This is another Thai recipe, from the same person (Leela) that I like very much:

Thai Fish Cakes - How to Make Tod Man Pla ทอดมันปลา


Print
Prep time
20 mins
Cook time
10 mins
Total time
30 mins

This is a recipe for classic Thai fish cakes as you will find on the streets of Bangkok as well as family restaurants and rice-curry shops. The post includes tips and tricks on how to make chewy, bouncy fish cakes using ingredients you can find in the US.
Author: Leela
Recipe type: Main Dish, Entree, Meat, Appetizer
Cuisine: Thai
Serves: Makes 30 two-inch fish cakes
Ingredients
1.5-lb package prepared fish paste
2 large egg whites
One 4-oz can red curry paste (I use Maesri.)
1 cup thinly-sliced (crosswise) green beans or Chinese long beans
4 tablespoon chiffonade of fresh or frozen kaffir lime leaves (roll them up like a cigar and slice thinly crosswise)
Vegetable oil for deep-frying
One recipe of easy cucumber relish (see notes)
Instructions
Put the fish paste in a large mixing bowl. Add the egg whites and red curry paste and stir briskly with a wooden spoon until the mixture is homogeneous, thick, and sticky (you can also use a hand-held mixer or a heavy-duty stand mixer with the paddle attachment to mix the fish paste). This should take about 30 minutes by hand or 5-8 minutes on high with a machine.
Once the paste becomes very sticky, fold in the kaffir limes leaves and sliced long beans.
Heat up vegetable oil in a small wok. You want at least 2-3 inches of oil in depth.
Get yourself a bowl of water and place it close to the fish paste bowl. Your hands need to be wet — not just moist, but wet — in order to be able to form decent fish cakes without losing your sanity. The paste is very sticky.
Once the oil is hot, form ¼ inch-thick rounds with roughly 2 inches in diameter and gently slide them into the oil.
With a pair of wooden chopsticks or tongs, move the fish cakes around to allow for even browning. Once one side is golden brown (after 30-40 seconds), flip them. It should take a total of one minute or so to cook both sides. You know your fish cakes are done when you poke them lightly with the tips of the chopsticks and feel the bouncy resistance.
At that point, transfer the fish cakes from the wok to a paper towel-lined plate. Repeat the process until all the paste is gone.
Serve the fish cakes with cucumber relish as an appetizer or a main dish with rice.
Notes


For the cucumber relish: (Mine is a cheater’s version. You don’t even have to make a vinaigrette for this. If you’re a Thai food fan, I assume you have some Thai sweet chilli sauce in the refrigerator. Just use that as the base of your cucumber relish.) Mix together ¾ cup Thai sweet chilli sauce, store-bought or homemade, ½ cup thinly sliced cucumber, 2 tablespoon finely chopped dry-roasted peanuts, 2 tablespoon coarsely-chopped cilantro leaves, and 3 tablespoon thinly sliced shallots or red onion. Keep chilled in a covered bowl.
Image
Jan 20, 2017 10:54 AM CST
Name: Critter (Jill)
Frederick, MD (Zone 6b)
Charter ATP Member Million Pollinator Garden Challenge Critters Allowed Butterflies Hummingbirder Cat Lover
Bee Lover Region: Mid-Atlantic Cottage Gardener Garden Photography Tropicals Hibiscus
ooooh, my mouth is watering. Thanks, Francine! I especially appreciate the "cheater's" recipe for cucumber pickles... We love them, and I have not managed to get them quite "right" at home using sugar and a shot of hot sauce. But I do have a bottle of Thai sweet chili sauce that I've been wondering what to do with!
We're all learners, doers, teachers.
Avatar for tantefrancine
Jan 30, 2017 10:27 AM CST
Falls Church, VA
Birds Roses Garden Procrastinator Plumerias Peonies Region: Mid-Atlantic
Irises Hellebores Garden Art Dragonflies Garden Photography Bookworm
You can do a lot with the Thai sweet chili sauce. Eat with egg rolls. I have to give you the recipe too, the kind that I make, no cabbage, but with bamboo shoots, julienned. You can also eat it with scrambled eggs.
Here is the egg roll recipe: no exact measurement.

Francine's version of Semarang* egg rolls

1. some ground pork (betw. 1/4-1/2 pound)
1a. 1 square of tofu, cut into tiny cubes (about 1/8 x/1/8 inch)--optional
2. 1 large can of whole bamboo shoots, drain, wash each one, cut into matchsticks, soak in clean water again, let sit until ready to be used
3. about 4 cloves of garlic: slice and crushed fine
4. 1 tablespoon of dried shrimp, soaked and crushed fine
5. a big handful of bean sprouts
6. ground black or white pepper (I like a lot--maybe 2 teaspoons?)
7. 2 to 3 little packages of raw sugar to taste
8. Chinese light soy sauce
9. Indonesian sweet soy sauce (kecap manis)
10. salt to taste
11. 2 green onions (scallions) cut into rounds, thin (about 1/8 inch)
12. oil for cooking and also for frying
13. egg rolls wrappers, I prefer the ones made in the Philippines, called lumpia wrappers and frozen with paper between each wrapper--can buy in New Grand Mart--also have the recipe if interested

Instruction:
1. Put the pork into a heated (medium high heat) wok, add about 1 tablespoon of water, keep stirring, until all the pork pieces separate and cooked almost dry. Scope up the pork and place it in a bowl. Add 1 tablespoon of oil to the hot wok, when oil is hot, add the tofu and stir it until the sides hardened. Add to the pork.

2. Add 2 tablespoons of oil into the wok and when warm, add the garlic. Stir the garlic until fragrant, do not let it become golden. Then add the dry shrimp, stir a few times, then add the cooked pork and the tofu, stir a few times. Turn the heat down a little. Scope the soaking bamboo shoots with both hands from the container where they were soaking, then squeeze them dry with both hands, and add the squeezed bamboo shoots into the wok, repeat until all the bamboo shoots are in the wok. Stir to mix with the pork and the garlic. Then gather the food in the center of the wok, leaving the sides empty, turn up the heat to high.
3. When the wok is really hot, then pick up the bottle with the Chinese light soy sauce and pour it quickly around on the empty and sizzling hot side of the wok. Then scope up the mixture from the bottom of the wok to touch the spots where the soy sauce was poured, so the 'burned' soy is incorporated to the mixture. Then add the pepper, sugar (this is my MSG), and the Indonesian sweet sauce, mix everything again. The Indonesian kecap gives the amber color. So it is up to you how much you want to use it. Taste the filling, and adjust until the taste is right. To adjust the taste, the light soy sauce, the Indonesian soy sauce, which is not only salty, but also sweet, or salt can be used, or by adding pepper. When the taste is correct, then add the green onions and the bean sprouts. Turn the heat down to medium low and keep turning the food until it is mixed, the sprouts will be half cooked and it should still be crunchy. Now it is time to push up the food away from the bottom of the wok, making space so all the juices that remained in the food will gather at the bottom of the work before you start wrapping the egg rolls.

I like to eat the egg rolls unfried, called fresh egg rolls. I would put the sweet hot sauce on one edge of the wrapper, put a tablespoonful of filling, wrap it up like an envelope, and eat it.

There are Vietnamese fresh egg rolls, Philippine's fresh egg rolls, and Indonesian fresh egg rolls. They are ALL DIFFERENT! Although the Philippinos also call egg rolls 'lumpia" like in Indonesia, the lumpia is each country is different!

Tip: When wrapping, each time you make a fold, gather the filling tightly against the fold, so the roll is filled tightly--so they do not look 'half full'.

*Semarang is a city in Central Java where these kind of egg rolls are famous.
Image
Jan 31, 2017 7:47 AM CST
Name: Critter (Jill)
Frederick, MD (Zone 6b)
Charter ATP Member Million Pollinator Garden Challenge Critters Allowed Butterflies Hummingbirder Cat Lover
Bee Lover Region: Mid-Atlantic Cottage Gardener Garden Photography Tropicals Hibiscus
You're right, every country/region has their own version when it comes to egg rolls -- I love them all, and yours sounds wonderful! Thanks for the tip on how to get egg rolls to look nice & plump. I'm putting this comment here rather than in chat because I have two things to try with egg roll recipes, both of which will probably make you cringe, but here they are...

A non-oriental friend once shared her "trick" for getting egg rolls to stick together nicely -- a big spoonful of peanut butter, added at the end of cooking! I think she thickened the "leftover" juice in the wok with cornstarch, too, said it was too tasty to leave out.
We're all learners, doers, teachers.

Only the members of the Members group may reply to this thread.
  • Started by: RickM
  • Replies: 68, views: 7,151
Member Login:

( No account? Join now! )

Today's site banner is by RootedInDirt and is called "Botanical Gardens"

This site is protected by reCAPTCHA and the Google Privacy Policy and Terms of Service apply.