Post a reply

Image
Jul 20, 2016 3:24 PM CST
Thread OP
Name: Amber
Missouri (Zone 6a)
Garden Photography Daylilies Region: Missouri
I have been doing searches of past threads on this site in regards to all things re:growing daylilies from seed. I find that much of the information is very pieced apart (e.g., a thread about seed storage, another about seed starting soil mixtures) and I am having a little trouble wrapping my head around all the steps and details. I am wondering if some of you who grow daylilies from seed would mind giving a full description of your process form start to finish.

I know that there are many different methods...each of you has a method that works best for you. I like the idea that daylilies seem so flexible and able to handle and thrive in a variety of situations. I will have a good crop of seeds this year so I am hoping to hear about a variety of methods so that I can try some (or all) of them and discover which method works best for me.

In your descriptions, could you try to cover aspects of seed collection (if you do that), seed drying, seed storage, stratification, germination, seedling growing, etc. on up to the point where you get the seedling in a bed outside or in it's "permanent" pot. I would love to see details about how long each step generally takes, when you usually start, details about amounts/temperatures (e.g., what H2O2 mixture do you use, what temperature you store your seeds in for cold storage), labeling/record keeping strategies...and if you have pictures that would be even better Whistling Also, if you have tried other methods in the past and found they didn't work for you (again, I recognize that what works for one might not work for another and that doesn't make the method ineffective across the board) and want to comment on that (the how, the why you thought it wasn't effective or didn't like it) that would be great as well Thumbs up

My pre-thanks to anyone who responds to this thread! Thank You!
Amber
Daylily Novice
Image
Jul 20, 2016 4:47 PM CST
Name: Daniel Erdy
Catawba SC (Zone 7b)
Pollen collector Fruit Growers Permaculture Hybridizer Plant and/or Seed Trader Organic Gardener
Daylilies Region: South Carolina Garden Ideas: Level 2 Garden Photography Herbs Region: United States of America
Wow that's going to be like writing a high school essay Hilarious! but I'm sure someone will step up to the plate. My understanding of everything was a collaborative effort of many members, YouTube, and tons of reading. But I have to say this the only real way to learn is through trial and error once you tried different methods you'll find what works best for you. Good luck Amber i
🌿A weed is a plant whose virtues have not yet been discovered🌿
Image
Jul 20, 2016 7:11 PM CST
Name: Becky
Sebastian, Florida (Zone 10a)
Celebrating Gardening: 2015 Daylilies Hummingbirder Butterflies Seed Starter Container Gardener
Charter ATP Member I was one of the first 300 contributors to the plant database! Garden Ideas: Master Level Lover of wildlife (Black bear badge) Birds Ponds
I agree, many folks have their own method that works for them. This is my method:

When hybridizing, I use colored paperclips to mark blooms when crossing. I keep a paper list of what is crossed with what according to paperclip color. Pod parent is obvious, but I have to check the paperclip to verify pollen parent. I write the crosses as "pod parent X pollen parent"

As far as seed collecting, I wait until the pods turn brown and then open the pods all the way and remove the seeds, mark a paper envelope to place the seeds in to allow the seeds to dry for a few days to a week, then bag them in small ziploc baggies, labeled with parent's names, and let chill in the refrigerator (crisper drawer) for 4-6 weeks (or longer in many cases).

I have mentioned this in previous threads, this is the method I use to germinate seeds: http://garden.org/ideas/view/b...

After they get big enough to plant outside in the ground (typically a raised bed), then I do so when the weather is cooler (early Spring or Fall). But sometimes I do plant in summer. Not always a good idea, but sometimes you have to do what you have to do considering time constraints.

My seedlings often bloom after a year here in Florida, but some can take 2 years to produce their very first bloom.

That's my method. I know many members have a different method that I hope they will share. This would be a good thread to refer new members to (or gardeners new to daylilies) in the future! Thumbs up

And my method for labeling plants: http://garden.org/ideas/view/b...
What lies behind us and what lies before us are tiny matters, compared to what lies within us.
Garden Rooms and Becky's Budget Garden
Last edited by beckygardener Jul 20, 2016 7:27 PM Icon for preview
Image
Jul 20, 2016 8:01 PM CST
Thread OP
Name: Amber
Missouri (Zone 6a)
Garden Photography Daylilies Region: Missouri
ediblelandscapingsc said:the only real way to learn is through trial and error once you tried different methods you'll find what works best for you


I am getting the sense that that is the way of it. I am hoping that some replies on this thread will give myself (and others) a few clear-cut methods to try out Thumbs up

@beckygardner Thank You! When drying your seeds in the envelopes, where do you keep them (inside/outside, light/dark)? Do you do a pre-soak of H2O2 to allow the little white rootlets to show before putting them in the styrofoam cups or do you take them out of the fridge and put them right in the cups? Do you bottom water or top water when the seedlings are in the styrofoam cups? How big (tall) can the seedlings get inside the cups before you need to transplant them? And do you use any methods for controling pests (primarily gnats) when the seedlings are germinating/growing in they styrofoam cups?

Thanks again for the great reply. Your article is one reason I thought it would be great to see if other people would spell out all the information in one place I tip my hat to you.
Amber
Daylily Novice
Image
Jul 20, 2016 9:01 PM CST
Name: Becky
Sebastian, Florida (Zone 10a)
Celebrating Gardening: 2015 Daylilies Hummingbirder Butterflies Seed Starter Container Gardener
Charter ATP Member I was one of the first 300 contributors to the plant database! Garden Ideas: Master Level Lover of wildlife (Black bear badge) Birds Ponds
I keep my drying seeds inside the envelopes (in A/C) on my desk (so I don't forget about them). Within a week, I move them to the small ziploc baggies (and make sure I write the cross and date in permanent marker on the baggies). The into the refrigerator they go!

I do not pre-soak them in H2O2. I just sow them in the cups. I top water about once maybe twice a week. I try very hard not to over-water them. I do add a little 3% Hydrogen Peroxide (H2O2) to my water when watering them. I truly believe that is why I don't have an issue with damping off (root rot). I put them in a sunny window with a sheer curtain in front of them so they don't get burned by the sun coming through the window. If I didn't have them right up against the window, I probably would not have to do that. I have not had to treat for pests. I had read that the H2O2 kills gnat larvae.

I move them outside to the garden once the weather is nice. And then transplant them once they adjust to full sun.
What lies behind us and what lies before us are tiny matters, compared to what lies within us.
Garden Rooms and Becky's Budget Garden
Last edited by beckygardener Jul 21, 2016 8:49 PM Icon for preview
Image
Jul 21, 2016 6:57 PM CST
Name: Larry
Augusta, GA area (Zone 8a)
Daylilies Region: Georgia Hybridizer Enjoys or suffers hot summers
Hi there! I’m going to take your challenge and describe what I do – beginning until end. However, there are a few things that you need to know. First, I live a few miles west of Augusta, Georgia. We have very hot and very humid summers that often start in late May and continue into early-to-mid October. Our winters are typically mild, although an occasional snow or ice storm are known as are low temperatures into the teens. Spring can start as soon as late February or early March. Second, I am a “backyard” hybridizer. I raise about 300 seedlings per year. Because of this, I have chosen a method that fits that number of seedlings as well as the way I think. I am visually oriented and like to see what is going on as much as possible. Over the last ten years, I have planted all purchased seeds, all seeds from my own garden, and various mixtures of the two. Regardless of the seed mixture, I have averaged about 90% germination and 85% success from seed to first-year seedling. As others have said in almost every “How do you grow daylilies from seed?” post, there are probably as many ways to raise daylilies from seeds as there are people who do it. My method may be the best for me, but might not be for anyone else. With that said, here is what I do:
I start monitoring my pods on a daily basis about 6 weeks after the first flowers were pollinated which would be mid-to-late June. I collect seeds when the pod shows the first sign of splitting between lobes. I take the pods into my home where I remove the seeds from the pods and place them in 1-ounce portion cups and identify each cup by cross. I place the cups on an inside window ledge that gets no sunshine and allow them to sit for two days. The room is air conditioned and typically runs at about 74 degrees during the summer. After 48 hours, I check the seeds and throw out any that are soft or those that collapse when give slight pressure between my fingers. I then place the seeds in a 2X3 inch plastic reclose-able envelope on which the cross, the date, and the number of seeds has been written. I keep a running list of all the envelopes (cross and number of seeds) in a Microsoft Word table. I place the filled envelopes into a larger reclose-able plastic bag which contains a card with the dates of the seeds in that bag. All bags are stored in a ‘crisper’ drawer of a refrigerator. I check the seeds every 4-6 weeks and remove any seeds that show mold or any other problem. If I find a seed that has germinated in the refrigerator, I will check the cross and determine if that is one that I might wish to save. If it is, I will plant it as I will describe later and try to raise the seedling indoors until it is time to plant. If it is not a seed that I hope to grow, I destroy it.
I do not wet-store my seeds, nor do I place water into the storage bag in the weeks leading up to germination. My germination rates are good, but they don’t all germinate in 3-5 days. It can take 4-5 weeks to get everything to germinate. Over the fall and winter I have determined which seeds I will be germinating and assign a number to each cross for identification purposes.
My date to start the germination process is March 1 plus or minus a week or two depending on the weather. I use 9:1 water-to-peroxide and put just enough in a small glass/cup/etc. (6 oz. or smaller) so that seeds can float; place cups in a plastic pans; cover with dark towel; and place pans on a counter top in room set to about 72 degrees, but allowed to cool off at night to 68. No sun touches the pans. After 2 days, I start checking daily for germinated seeds. I generally choose 350+ seeds to start the germination process. With my typical 10% loss, that will result in at least 320 germinated seeds. When I see that a seed has germinated, I carefully remove it from the other seeds in that cup and place it in a cell filled with moist planting mix. The cell is about 1 inch square and 5 inches deep. I cover the seed with about ¼ inch of soil-less mix. I used peat pots for several years with good success, but the space needed for a pot with adequate depth was too great and the cost of the 3+ inch depth pots was high. I found the cells I currently use on a close-out sale 2½ years ago on the Home Shopping Network. I’ve never seen them advertised anywhere either before or after I bought them. They are manufactured in England, the brand name is Haxnicks and the product name is Deep Rootrainers™. I checked and they are available through Amazon.com for as little as $18 for 32 cells (8 rows of 4 cells each, a stand and a plastic cover). I paid $5 for each set of 32 on the close-out. They take some getting used to and can be awkward to get the seedling out of, but the savings in both peat pots and potting mix is worth it to me. Also, I have used several soilless mixes (Fafard, Pro-Mix, Miracle Grow, Stay Green, etc.) as well as mixing my own. All have worked adequately. I like my own mix best as it has the fewest long, thin wooden pieces. I moisten the mix partially before filling the planting cells as the dry mix is almost water repellent once it is packed in the cells and getting the filled cells moist takes too much time.
I fill 11 trays of cells prior to starting the germination of the seeds which gives me 352 cells. I have marked each tray with a number and each set of four cells also with a number. I place them all on a rack of shelves which is located in my yard where it will get sun most of the day. I take one or two trays into the house when seeds start to germinate. I place each germinated seed into a single cell and cover as noted above. I use a plant marker to mark each cell with the cross and the cross number. I enter the identification of each cell by cross, the location of that particular seed and the cross number in a table using Microsoft Word. The location is noted as tray number, row number and cell number (A, B, C or D). The final ID will look like this – 3-5-B, meaning third tray, fifth row, second cell from the right. When all of the cells in a tray are planted, that tray goes outside and a new tray comes inside. This continues until I have 10 or 11 full trays. At this time I am finished with germination for the year. I will sprinkle the trays lightly with water each morning and each evening. If the weather is unusually cold I will bring the seed trays into the house or the garage depending on the space needed. If the temperature gets unusually cold, I will put a small heater in the garage with the trays to be certain the temperature does not fall below freezing.
As the seedlings grow, I continue to keep them moist and I will occasionally rotate the trays to the top tier where there is the maximum amount of sunshine. When the seedlings are about 3 weeks old, I will start adding a very weak dose of liquid fertilizer to the water once or twice each week. By the middle of April, the seedlings are ready to plant. By then I will have taken my list of seedlings (by tray-location and cross) and noted any empty cells where seeds did not grow successfully. I remove them from the list. I typically have several germinated seeds which produce plants which grow very slowly, grow into misshapen seedlings or are albino. At this time these seedlings are also removed from the list. Since the table is in Microsoft Word, I sort the list by the cross number so I will have a table telling me where all of the seedlings are located for each individual cross. Based on the size of the bed or beds I will be using for seedlings, I plan out where the seedlings will be planted and then get started planting.
I live in an area where I could plant in August and have seedlings large enough to make to through our typical winter which would get me blooming seedling sooner than waiting until spring to plant. Unfortunately for me, I simply can’t stand work outside through the heat and humidity of our summer to get a bed empty are ready for new seedlings by September 1.
I have very likely left something out or made something difficult to understand. If that is the case, please post a question about that part and I will try to answer your question.
I hope this helps.
Image
Jul 21, 2016 8:13 PM CST
Name: Gerry Donahue
Pleasant Lake, IN (Zone 5b)
Hostas Garden Ideas: Master Level
Larry, where do your seedlings grow through the winter since you will plant them in the spring?
Image
Jul 21, 2016 8:20 PM CST
Name: Judy
Louisiana (Zone 9b)
Daylilies Region: Louisiana Tropicals Region: Gulf Coast Hybridizer Seller of Garden Stuff
Thanks for your post, Larry! Thumbs up
Image
Jul 21, 2016 8:33 PM CST
Thread OP
Name: Amber
Missouri (Zone 6a)
Garden Photography Daylilies Region: Missouri
@LarryW Thank You! I tip my hat to you.

Just a few questions. To clarify, you start germination around the first of March and plant permanently in mid-April. So you have about a 6-8 week turn around from seed to planted seedling? How big are your seedlings generally when you plant them in the beds? Do you continue to fertilize them once they are in the beds?

When your seeds are germinating in the H2O2, do you wait for a certain length of rootlet or for a green shoot to begin before you take them out for planting in the cells? The Rootrainer system you use, is it all inclusive or do you also have to purchase a soilless mix to go in the cells? The product website says the Rootrainers are reusable...have you found that to be the case? Do you bottom water or top water when the seeds are in the cells?

Also, if you plant them in the cells as they germinate, then seeds of the same cross won't always end up next to each other in the cells but you make sure they are grouped together when you plant them in the beds?

*Edited to add another question
Amber
Daylily Novice
Last edited by amberjewel Jul 21, 2016 8:37 PM Icon for preview
Image
Jul 22, 2016 9:34 PM CST
Name: Larry
Augusta, GA area (Zone 8a)
Daylilies Region: Georgia Hybridizer Enjoys or suffers hot summers
Gerry – The seeds are stored in the ‘crisper drawer’ of a refrigerator from a couple of days after I harvest them until I am ready to germinate. It is only if there is a seed that I want to grow the coming spring that happens to germinate in the refrigerator that I will plant it and do what I can to get it sunlight.

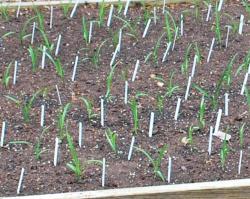
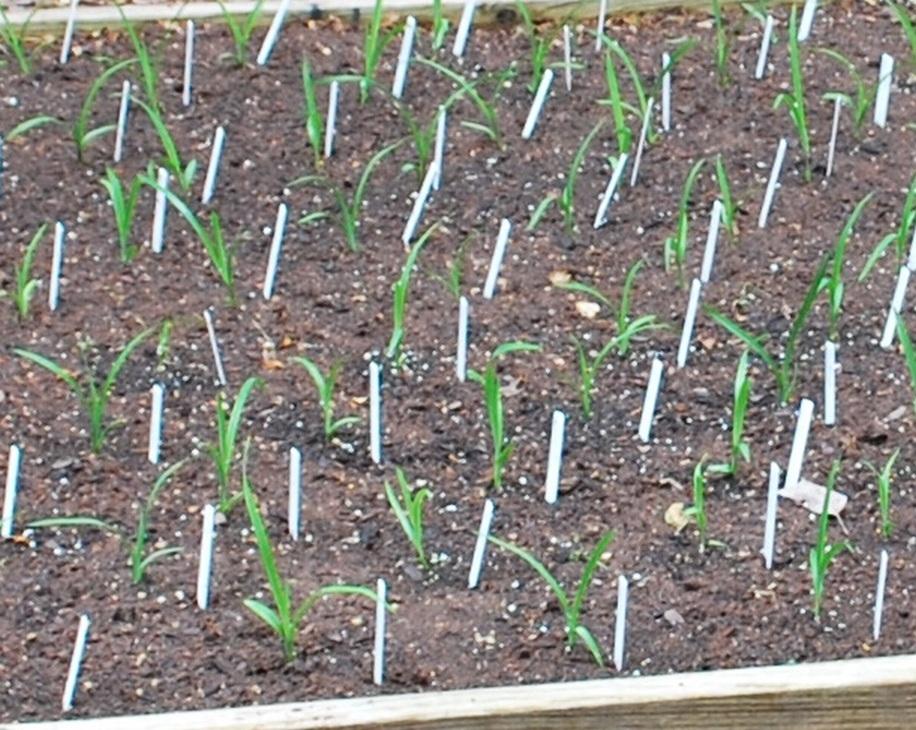
Amber – I think a better estimate of the average time the seedlings are in the cells is closer to 4-6 weeks with a few a little longer and a few a little less. As for size for final planting, here is a picture of the morning after I planted my seedlings this year. (Sorry, the picture is at the bottom of the post)

The garden markers are 6 inch with about 2 inches below ground level, so seedling size is 6-8 inches, but more importantly, the third or more typically the fourth leaf (after the initial spike) is well grown.

Concerning fertilization, I start with a bed into which I have tilled a lot of pine fines along with alfalfa pellets and Milorganite a month or more before planting the seedlings. After planting, I will continue to fertilize with full strength liquid (per label directions) every two weeks. I stop doing this when our daytime temperature reaches a consistent 90+ because I don’t want to encourage too much growth during the time that watering can’t supply all the water the young plants would need if fertilized during our 3-4 month summer. I resume fertilizing when the summer heat breaks and we have several beautiful weeks of weather in October. I stop by the end of October so the plants can return to normal growth rates before the true winter weather hits after the first of the year. In late February/early March I fertilize all of my daylilies with a 1-2 tablespoons (depending on plant size) of something like a 1-2-3 ratio fertilizer that gets the root system up and running again. Then, from late March to bloom season, they all get a weekly foliar spraying of a “bloom booster” type fertilizer. This last step with the liquid is new to me this year and was suggested by grower farther south than me and I can say that it did increase branching and bud count on many of my older seedlings.

I remove and plant the germinated seed as soon as I see the white nub (I think it is called the ‘radicle’) emerge from the seed. I know others wait until the green appears, but I don’t. The Rootrainer system gives you the material which you fold to make the eight sets of cells, a hanger that they will sit on and a clear plastic cover. You furnish the potting soil/soilless mix. Re-useable? The answer is “Yes, but…” I have not broken a cell in the two years I have used them, but I try to be careful with them. If you will only be planting a few seeds. I might suggest peat pots or other fiberous pots where you can just plant the whole pot and let it decompose in the ground. That would be easier and the cost shouldn't be excessive. I stored my Rootrainers folded into the cell shape and I think they retain that shape better that way. The ends do not lock together well even when new, and they get a little worse with age. The real problem for me is getting the seedling out without disturbing the root/soil. Although the soil broke apart leaving the root with only half the soil on several occasions the first year, this year I used a spatula like you might have used in chemistry lab back in high school which helped greatly. My procedure for that is to lay the row of cells on the side and open it, slip the blade of the spatula between the inner wall of the cell and the root/soil ball, lift the seedling and carry it to the hole and tilt it into the hold while it is still on the spatula. Then remove the spatula and fill in with soil to get the plant upright.

I water from the top morning and evening while the seedlings are still in the cell. The bottom of the cell is open so it would probably be easy to water from the bottom using what I have called the cover under the rack of 32 cells. For me, however, with thunderstorms or rainy spring days, I would rather keep the covers as lids so I can keep the very heavy rains from falling directly on the plants while they are still small. Of course, we have strong winds with our thunderstorms, so I have to put a rock or something heavy on top of the covers to keep them in place.

For your final question, you are correct, the seedlings are quite mixed up among the various trays when I am finished germinating. That is why I have entered each seedling in a Microsoft Word table with location (tray #, row # & plant letter) and seed cross number. Any seed that does not produce a green seedling as well as any defective seedling has been removed from the list. I then sort the table using Microsoft by the cross number (see my preceding post). When I sort the tables by cross number (and use the date as a secondary sort) I get a list of each of the seedling for each seedling cross and that list shows locations for each seedling of each cross. Yes, its still takes time and patience, and considerably more of both as the number of crosses increases.

Based on my experience, I would suggest that if you aer interested in the Rootrainer, you only purchase one or two of them and see how you like them before committing the money necessary to buy enough for many more seedlings. They are not perfect by any stretch of the imagination. They do save on potting soil and on space, but there is nothing gained by using them if you fine you do not like them. Also, if you do not know what a chemistry lab spatula look like, I am attaching a picture of the type I use. You would need a blade at least 6" long but no wider that 1".

If there is anything I still have not cleared up, let me know.

Thumb of 2016-07-23/LarryW/f8aa00


Thumb of 2016-07-23/LarryW/b6943d
Image
Jul 23, 2016 8:28 AM CST
Name: Gerry Donahue
Pleasant Lake, IN (Zone 5b)
Hostas Garden Ideas: Master Level
Larry, I am relatively new to hybridizing daylilies, and after waiting two years, more of my seedlings have bloomed this summer. I already do not like the looks of three flowers, and next summer I want to eliminate them. What do you do with plants that you do not like and do not want to keep?
Image
Jul 23, 2016 12:32 PM CST
Name: Larry
Augusta, GA area (Zone 8a)
Daylilies Region: Georgia Hybridizer Enjoys or suffers hot summers
Gerry - If you are hybridizing for your own pleasure, then the answer is fairly simple - - get rid of the ones you don't like. The first option is to put them in your compost pile. If you don't have a compost pile, then put them in the trash can. On the other hand, if you don't like a particular seedling based on your personal likes and dislikes but the flower form, substance, etc., are all good, perhaps you could find someone who would like it in their garden and you could give the plant to that person and possibly infect him/her with "daylily obsession."
A couple of years from now you will run into a problem that is much harder to solve. That comes when you have been saving the seedlings that you really like, but start running out of room for the ones you want to keep from the current year's seedlings in addition to the ones you are already saving or try to find enough space to plant next year's seedlings. Typically, as you hybridize and relate the results back to your crosses, you learn that there are beautiful daylilies that simply don't yield that many good looking seedlings and other daylilies, even some that are relatively plain, that yield a much higher percentage of "keeper" seedlings. When you put what you have learned into practice on future seed selection, you find that the number of "keepers" increases. While you are fortunate that you get to see more seedlings that have the traits you want, you compound the problem by needing to find more places to put them all. I have been facing this dilemma over the last few years and don't have a solution other than culling young seedlings more severely and then re-visiting my older seedlings to see if my tastes have changed or that when I set the standards higher for my newer seedlings, some of the older ones really don't meet my new standards.
Image
Jul 23, 2016 1:54 PM CST
Name: Gale
CentralWa (Zone 6a)
I have not seen anyone share a direct sow method, so I will share mine. I will say that this is only my 4th year planting Daylily seeds. My pod harvest method is same as above, when pods ripen and start to crack, I pick them, and the place on a paper towel in the house for two days, I write the cross with marker on the paper towel. I then check seeds for firmness and place in small plastic bag with a small piece of paper towel, and have cross written on the bag. I then store them in the crisper, checking two or three times through the winter for rot.

In April, when it appears the hard frosts are over, I direct sow into an area that has been cleared of weeds, watered, and the top few inches worked up, then raked level. I plant seeds 6" apart in rows 6" apart, leaving a two foot wide space every five rows, to walk between. Then I use a sprinkler as often as needed to keep moist, and try to keep weeded. Since I don't use a sprouting method, germination for some seeds will take over a month, but most are up within a couple of weeks. As far as germination rates go, I would say approximately 75-80 percent over all, but many crosses will be 100%, and I have had a few with zero. Around the end of June, I will use Preen to help with weeds, and add 16-16-16 slow release BB's. I plan on switching to a higher N product, since I placed last year seeds were they would be watered with the farm field irrigation that has high doses of N ran through it, and had over 50% bloom in one year 😀 rather than the 2-3 years it took before. I also planted a few crosses I purchased off the LA last winter in pots with potting soil and bottom watered them until they were about 6-8" high, and then transplanted them into seedling bed. This was also done outside. I have animals occasionally get out and go into the seedling beds, and just wanted to give these a little extra care in starting.

I'm sure I could get better germination rates with a little more work, and starting in the house, but I only have so much time available, and space in our house is limited, not to mention, lots of young curios children.

Good luck,
Gale
Image
Jul 24, 2016 8:28 AM CST
Thread OP
Name: Amber
Missouri (Zone 6a)
Garden Photography Daylilies Region: Missouri
Thank you Gale and Larry for the great descriptions!
Amber
Daylily Novice
Image
Jul 25, 2016 4:21 PM CST
Thread OP
Name: Amber
Missouri (Zone 6a)
Garden Photography Daylilies Region: Missouri
@LarryW How far apart do you plant your seedlings? I am trying to determine how big of a bed I might need for when all my seeds grow into big healthy seedlings Crossing Fingers!
Amber
Daylily Novice
Image
Jul 26, 2016 8:20 PM CST
Name: Larry
Augusta, GA area (Zone 8a)
Daylilies Region: Georgia Hybridizer Enjoys or suffers hot summers
I typically plant my seedlings 8 inches apart in rows that are 6 inches apart. I stagger the rows to give them a little extra room. Depending on the number of seeds I start and the percent germination, and along with my goal of about 300 seedlings per year, I generally have 11 rows alternating 29/30 seedlings in a bed that is 20 feet by 12 feet. That gives me room for up to 325 seedlings. I do not suggest 6 foot wide beds to anyone however, and I would not make them that wide today if I were starting again. I am 6' 4" with fairly long arms and can barely reach to the middle rows - 5 feet would have been a wiser choice.
My practice is to select "keeper" seedlings with somewhat loose standards after the their first bloom. Perhaps I lose a few that would get much better on their second-year bloom, but I try to cut down to range of 70-90 second year blooms, and these are seedlings that have been transplanted into a similar size bed, but with somewhere between 12 and 15 plants spaced 16 to 20 inches apart and rows that are 12 inches apart. That accommodates between 72 and 89 seedlings, and if well treated they will need that much space to grow without crowding each other much. It takes a lot of work to do this every year, but I choose to do it this way, so I do the work.
Just so you can see a bigger picture of what is required on down the line, here is my plan for next year. . .

I have 6 beds that are 6 X 20 5 that are 6 X 12 1 that is 5 X 22 1 that has an odd shape but is about 12 X 10
One of the 5X12 beds gets too much shade, so I use it only for plants I am holding to give away.
All of the 6X12 beds get enough afternoon shade that I only use the front 6 to 8 feet for planting.
All of the 'offending' trees belong to a neighbor, so I just have to live with them, and they get bigger every year. Anyway...

bed 1 - 6X20 where I will plant the seedlings that I germinate next March
bed 2 - 6X20 Seedlings first bloomed in 2014 (about 40 plants)
bed 3 - 6X20 where I planted this year's seedlings - first bloom in 2017
bed 4 - 6X20 Seedlings first bloomed in 2013 (about 25 plants)
bed 5 - 6X20 Seedlings first bloomed in 2015 (about 70 plants) 2015 was a bad year, so I have kept more seedlings longer
bed 6 - 6X20 Seedlings first bloomed in 2016 (about 80 plants)
bed 7 - 6X12 Seedlings first bloomed in 2011 (12 plants)
bed 8 - 6X12 Seedlings first bloomed in 2012 (12 plants)
beds 9, 10 and 12 - 6X12 and 6X22 Cultivars for hybridizing
bed 11 6X12 - shady bed - overflow - nothing specific planned
bed 12 odd shape All remaining seedlings 2008, 2009, 2010 (12-15 plants)

Next year is the final decision year for all seedlings 2008-2012 - either (1) keep & register; (2) keep because I like them; or (3) give away/throw away

The more you plant, the more you will like the results, but the more work you will need to do. It is a vicious cycle. Downsizing is difficult! I've been thinking about it for a couple of years, but have not taken any action yet. Maybe next year.
Image
Jul 27, 2016 1:12 PM CST
Name: Barbalee
Amarillo, TX (Zone 6b)
This is an amazing thread. I wish I'd found it before I won my first LAuction and had seeds in hand! I had researched via google and You Tube on germinating. I've been putting seeds in a baggie with perlite and enough bottled water with a capful of hydrogen peroxide to just dampen the perlite. The seeds germinate in about a week. I've had 98% success with germination.

My poblem has been keeping the seedlings alive after germination. Thanks to help from Daniel and Becky, it seems I've been overwatering them. I planted the next batch of germinated seeds in Dixie cups yesterday. We shall see if I can get them to the 4 leaf stage!
Avatar is 'Global Crossing' 04-20-2017
Image
Jul 27, 2016 1:22 PM CST
Name: Judy
Louisiana (Zone 9b)
Daylilies Region: Louisiana Tropicals Region: Gulf Coast Hybridizer Seller of Garden Stuff
Barbalee said:My poblem has been keeping the seedlings alive after germination. Thanks to help from Daniel and Becky, it seems I've been overwatering them. I planted the next batch of germinated seeds in Dixie cups yesterday. We shall see if I can get them to the 4 leaf stage!


I wish you much success! Thumbs up
Image
Jul 27, 2016 4:16 PM CST
Thread OP
Name: Amber
Missouri (Zone 6a)
Garden Photography Daylilies Region: Missouri
I agree
Amber
Daylily Novice
Image
Jul 27, 2016 5:56 PM CST
Name: Barbalee
Amarillo, TX (Zone 6b)
Thank You! I need all the wishes and hopes I can get Thumbs up
Avatar is 'Global Crossing' 04-20-2017

You must first create a username and login before you can reply to this thread.
Member Login:

( No account? Join now! )

Today's site banner is by Lucius93 and is called "Pollination"

This site is protected by reCAPTCHA and the Google Privacy Policy and Terms of Service apply.