


Why Grow Edibles in Containers
If you don't have room for a traditional garden, or want the convenience of fresh vegetables and herbs steps from your kitchen door, planting edibles in containers is an excellent solution. Almost any vegetable or herb has varieties bred specifically for container growing, producing excellent yields with just the right amount of care and attention. Container gardens let you grow exactly what you use most, harvest at peak flavor, and enjoy the satisfaction of producing your own food, no matter your space limitations.

Selecting the Right Container
When choosing a container for edibles, remember: bigger is generally better. Larger containers hold more soil, which means more water and nutrient retention, easier maintenance, and typically better harvests.
Half-whiskey barrels, large plastic or wooden containers, or similar-sized pots (18 inches in diameter or larger) will accommodate large vegetables such as tomatoes, eggplant, and squash, with room left over for companion plantings of smaller vegetables like carrots and lettuce. Five-gallon containers are perfect for dwarf tomatoes, peppers, beans, and many leafy greens. Even window boxes, which are typically 8 inches or deeper, can support radishes, arugula, and various salad greens.
Drainage is critical for edible container success. Every container must have one or more drainage holes in the bottom to allow excess water to escape. If your chosen container doesn't have adequate drainage holes, drill additional ones yourself. If the container will be on a deck, balcony, or other surface that needs protection from water runoff, place a saucer or catch basin underneath.

For more details on container materials and types, see Container Gardening Basics.
Potting Soil and Drainage
Using the right soil is essential for container edibles. Fill your containers with bagged, sterilized potting mix specifically formulated for containers. Garden soil from your yard is not suitable: it may contain diseases or weed seeds that harm your plants, and it compacts too easily in containers, preventing proper drainage and leading to root rot.
Make sure your containers sit on a slight elevation off the ground (not sitting flat against a patio or deck) to ensure water can drain freely. A simple pot stand, pot feet, or even a few shims will do.
Location and Sunlight
Sunlight is typically the biggest limiting factor when growing edibles in containers, especially in urban settings. Most vegetables need at least six hours of direct sun per day to produce quality fruits, seeds, and leaves. Leafy greens and herbs can manage with slightly less, but fruiting crops like tomatoes, peppers, and squash really need that full sun commitment.
Southern exposure is ideal, but six hours of direct sun from any direction should suffice. To encourage even growth and prevent leaning, rotate containers weekly.
Wind exposure is another consideration. Strong winds can cause desiccation and damage to tall plants. If your only available space is an exposed balcony or windy terrace, use wire cages or sturdy supports to protect large plants like tomatoes, beans, peas, and squash. Sheltered locations are far preferable.
Watering: The Most Critical Task
Watering is likely the biggest challenge in container gardening for edibles. Because containers have a limited volume of soil compared to in-ground gardens, they dry out much faster, especially in summer heat. During peak summer, you may need to water daily or even twice a day to keep plants thriving.
Check soil moisture regularly (daily, until you establish a pattern for each container). The soil should be evenly moist, but never soggy or waterlogged. A good watering practice: water thoroughly until water drains from the bottom holes, which ensures even soil moisture and helps leach out accumulated salts.
If you'll be away from home, consider installing a drip irrigation system with a timer, which allows you to water automatically. A reliable neighbor is the best backup plan for extended vacations.
Fertilizing
Because roots are confined to the container and cannot search out nutrients from surrounding soil, regular feeding is essential. Vegetables need more nutrients than ornamental container plants, and constant watering leaches nutrients away.
A weekly application of a balanced water-soluble fertilizer such as fish emulsion or seaweed and fish emulsion works well. Alternatively, add controlled-release (slow-release) fertilizer at planting time, then supplement with a water-soluble fertilizer as needed every two weeks. Follow label instructions carefully, and make sure containers are well drained, otherwise salts from fertilizer can accumulate and damage roots.
For large containers, adding mulch (such as straw or bark) on the soil surface helps conserve moisture and moderates temperature, reducing watering frequency.
General Care: Pests, Diseases, and Pruning
Container plants generally receive more attention than in-ground gardens and may be less vulnerable to some pest problems. However, stay vigilant. Check plants regularly, including the undersides of leaves, for insects and signs of disease.
Many common insects can be controlled with an occasional spray of insecticidal soap or simply hosing them off with water every few days. Hand-pick larger pests like caterpillars when possible. Naturally occurring biological controls like ladybugs, parasitic wasps, and predatory midges are very effective. Always read product labels to confirm they are safe for food crops, and follow directions carefully.
Promptly remove any leaves and stems showing signs of disease. For herb containers especially, avoid chemical insecticides and fungicides, since you will be eating the leaves and flowers.
Deadheading flowers and cutting back stems regularly will direct energy toward new growth and productivity, keeping plants vigorous and tidy.
Growing Vegetables in Containers
Which Vegetables Work Best
Although you can grow most vegetables in containers, some are more reliable than others. Great choices include beans, beets, carrots, chard, cucumbers, eggplant, kale, lettuce, onions, peas, peppers, radishes, spinach, squash, and tomatoes. For more detail on growing these vegetables, see Vegetable Gardening.
Container Size by Vegetable
Matching the container size to the plant's root system is important. As a general rule, most vegetables need at least 6 inches of soil depth, but larger plants need much more:
- Tomatoes: 5-gallon containers minimum (compact determinate varieties can be smaller; some cherry tomatoes even work in hanging baskets)
- Peppers and eggplant: 2-gallon containers (about 8 inches in diameter and 10 inches high)
- Beans, peas, cucumbers, squash: 5-gallon containers
- Leafy greens (lettuce, spinach, chard, kale): trays or containers 6 to 8 inches deep; shallow decorative containers work fine
- Root crops (carrots, radishes, beets): 6 to 8 inches of soil depth minimum
- Arugula, radishes: shallow containers and window boxes (8 inches deep or more)
Choosing Compact and Container Varieties
In general, compact varieties are better for containers than sprawling ones. Determinate tomato varieties stay smaller than indeterminate (vining) types and are easier to contain in a standard tomato cage. Bush varieties of beans, peas, and cucumbers make tidy mounds and don't require trellising, though they yield less than vining types.
Recommended compact varieties include:
- Beans: 'Bush Romano', 'Bush Blue Lake', 'Royal Burgundy'
- Carrots: 'Danvers Half Long', 'Tiny Sweet', 'Little Finger', 'Thumbelina'
- Cucumbers: 'Patio Pick', 'Salad Bush Hybrid', 'Early Pik'
- Eggplant: 'Slim Jim', 'Ichiban', 'Black Beauty', 'Morden Midget'
- Peppers: 'Sweet Banana', 'Cayenne', 'Yolo Wonder', 'Jalapeno', 'Thai Hot', 'Keystone Resistant'
- Squash: 'Scallopini', 'Early Yellow Summer', 'Gold Rush'
- Tomatoes: 'Patio VF', 'Sungold', 'Early Girl', 'Sweet 100', 'Saladette', 'Tiny Tim', 'Pixie II', most determinate varieties
Growing Herbs in Containers
Why Herbs Thrive in Containers
Herbs are ideal container plants and often actually perform better in containers than in in-ground gardens. Containers allow you to position them close to your kitchen door for convenient harvesting, and the warm soil temperature in a container promotes growth of heat-loving herbs like basil and rosemary. You can tailor the soil and watering to each herb's preferences, and herbs in containers are less vulnerable to pests and diseases than in-ground plantings.
Selecting Herbs
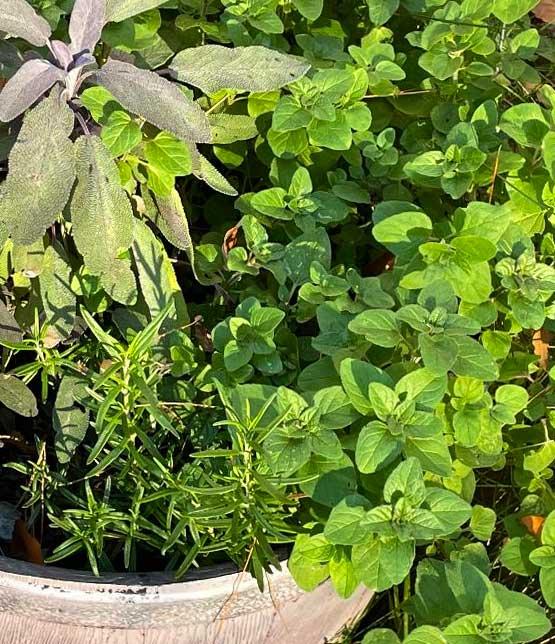
Almost any culinary herb can be grown in a container. Easy-to-grow choices for beginners include basil, chives, parsley, rosemary, sage, tarragon, and thyme. More unusual herbs to try include lemongrass, lovage, French tarragon, lemon balm, feverfew, and various mints. Ornamental herb varieties like purple basil and tricolor sage add visual interest while still being edible.
For tea gardens, consider rosemary, German chamomile, lemon balm, feverfew, and your favorite mint varieties.
Most herbs need lots of sun to thrive, so position your herb containers where they receive at least six hours of direct sunlight daily. Set containers on a deck or patio close to the kitchen so it's convenient to snip fresh sprigs while cooking.
Container Size and Soil for Herbs
An 18-inch diameter container (such as a half-whiskey barrel or large faux terra cotta pot) provides enough space to grow eight to ten herb plants together. Smaller individual pots work fine too: one herb per 4- to 6-inch pot. If using very large containers, fill the bottom with empty soda cans to reduce soil volume and weight.
Use bagged potting soil enriched with compost. Herbs generally tolerate a range of soil conditions but prefer well-draining media. Never use garden soil.
Watering and Fertilizing Herbs
Herb containers need consistent moisture. Check soil regularly and water when the top inch feels dry. The soil should be evenly moist but never soggy. Container-grown herbs will need watering more frequently than in-ground herbs, especially during hot, sunny weather and in small pots.
Fertilize with an organic fertilizer such as fish or seaweed emulsion at half-strength weekly, or full-strength monthly. A light sprinkling of balanced, time-release fertilizer at planting time can supplement water-soluble feeding as needed.
Herbs in containers are less prone to pest and disease problems than those grown in ground. Nevertheless, check plants regularly for insects and disease symptoms. Hand-pick pests or spray off with water. Promptly remove any diseased leaves or stems. Never use chemical insecticides or fungicides on edible herbs.

Planting Arrangements
You can grow multiple herbs in a single large container. Arrange plants so that tall-growing herbs like basil and lemongrass are in the center, and cascading varieties like thyme and oregano are positioned along the edges. Plant them relatively close together: a half-whiskey barrel can accommodate ten herbs or more.
For added visual appeal, mix ornamental herb varieties with culinary ones, or combine herbs with other flowering or foliage plants. Just size your container generously enough to give all plants room to mature without crowding.
Strawberry pots with side pockets are excellent for herbs, allowing you to plant a different herb in each pocket. Window boxes also work well for a mix of compact herbs. A saucer or catch basin is essential if the container is inside or on a surface needing protection from water runoff.
Harvesting and Propagating Herbs
The more you harvest, the bushier and more productive your herb plants become. Once plants show new growth, you can begin cutting. Use scissors or pruning shears to snip whole stems rather than individual leaves; this encourages bushy, dense growth. Never remove more than one third of a single plant at a time.
Pruning and deadheading also keeps plants tidy and prevents them from spreading beyond their space. If herb plants become overgrown, cut them back severely to force new growth and restore shape.
For a continuous supply, propagate new plants from stem cuttings. Mints, rosemary, and lemon balm are especially easy. Cut 4- to 5-inch lengths from the top of healthy plants. Dip the cut ends in rooting hormone powder, then insert them into propagating mix or clean sand in a pot. Place in a warm location and keep the medium consistently moist. In a few weeks, you'll have rooted cuttings ready to pot up as new plants.
In cold climates, move outdoor herb containers indoors before the first frost. Many herbs can be grown on a sunny windowsill or under a grow light for year-round harvests. See Growing Herbs Indoors for more details.
Window Box Salad Gardens
If you have just a small space such as a balcony or patio, you can still grow fresh salad ingredients in a window box. This simple project provides a harvest of crisp, nutritious greens in about a month.
You'll need two window boxes or planters at least 8 inches deep, with drainage holes. Soil-less potting mix enriched with compost, seeds, and a water-soluble fertilizer are the only other supplies needed.
Moisten the potting mix thoroughly. If you wish to use slow-release fertilizer, add it as recommended by the product label. Fill the window boxes and gently firm the soil in place.
Choose seed crops with different harvest times:
- In one box, sow radish and mesclun (mixed salad greens) seeds
- In the other, sow baby carrot and beet seeds
Radishes are ready to harvest about 28 days after germination; baby greens (lettuce, spinach, mesclun) in 30 days; beets in 55 days; baby carrots in 70 days. Having two boxes with staggered crops means continuous harvest.
Water gently so you don't wash seeds out of the soil. Keep the soil evenly moist and watch for germination.
Seedlings will come up thickly and must be thinned. Make the first thinning so that seedlings stand 1 inch apart; you can pluck them out individually or snip at the soil surface with scissors. (Don't waste the thinnings: eat the greens and beet tops as your first harvest!) When plants have doubled in size, thin again so carrots and beets stand 2 to 3 inches apart.
Fertilize every two weeks with a water-soluble formula like fish emulsion, unless you used slow-release fertilizer at planting.
As your harvest of greens and radishes clears space in the box, sow more seed. Work an inch of fresh compost into the empty spots and sow a new round.
Window Box Salad Garden Tips
For color and spicy flavor, sow a few nasturtium seeds in your containers. The flowers are beautiful, fragrant, and edible in salads.
If squirrels are a problem in your area, cover freshly planted boxes with wire mesh or fabric row covers until seedlings are established.
If you have room, add additional containers for other salad favorites like small determinate tomatoes and compact cucumber varieties. (They'll need larger pots than greens, but fit nicely on a balcony or patio.)
Planting: Starting and Transplanting
You can start from transplants (seedlings purchased from a garden center) or direct-sow seeds into containers.
If you're using transplants, harden off the plants first by gradually exposing them to outdoor conditions over 7 to 10 days. It's much easier to move small flats around in a sheltered spot than to move large containers.
Before planting, moisten the soil in the flat and rinse the roots under water to remove compacted soil. Gently tease out any circling roots, and plant at the same depth the seedling was previously growing. (Tomatoes are an exception: they can be planted deeper, with the bare stem several inches below the soil surface; roots will form all along the buried stem.)
If sowing seeds directly into containers, follow the depth and spacing guidelines on the seed packet. Thin seedlings to recommended spacing. Most vegetable seedlings can be eaten as tender greens when thinned, so don't waste them.
If you're in a cold climate and want to extend the season, you can start the planting date a week or two earlier by positioning containers in a sheltered spot when cold snaps are forecast.
Growing Vertically to Save Space
If space is limited, grow some crops vertically. Pole beans, vining cucumbers, and climbing peas can be trained up a sturdy trellis placed behind a container, leaving the front space for smaller companions like lettuce or carrots. Indeterminate tomatoes require staking but will produce heavily. In all cases, use a relatively large, heavy container to accommodate the root system, and consider securing the trellis to a wall or railing to prevent top-heavy containers from tipping.
Harvesting for Continuous Production
Harvest regularly and often. This practice encourages plants to flower and produce more fruit, and it gives you a continuous supply of fresh vegetables and herbs throughout the season.
For most vegetables, pick at the peak of ripeness for best flavor. Young, tender produce is often more flavorful than mature vegetables.

For herbs, snipping stems regularly keeps plants bushy and productive. Never take more than one third of a single herb plant at a time.
With regular attention to watering, feeding, and harvesting, your container garden will keep you supplied with fresh, homegrown vegetables and herbs all season long.
For more on the fundamentals of container culture, see Container Gardening Basics. For specific growing guidance on individual vegetables, see Vegetable Gardening. For indoor and windowsill herb growing year-round, see Growing Herbs Indoors. For combining your edibles with ornamental plants in attractive arrangements, see Container Design & Plant Combinations. If you're interested in growing dwarf fruit trees or berry bushes in containers, see Fruit & Trees in Containers.
