


A garden is more than plants. The structures around them, the beds that hold the soil, the trellises that carry the vines, even the hidden box that swallows the runoff from a downspout, shape how the garden looks, how well it grows, and how much work it takes. The good news is that most garden structures are well within reach of an ordinary homeowner with simple tools and a free weekend. This guide covers the workhorses: raised beds, trellises, the materials to build them from, and a couple of small projects that solve big problems.
Why Raised Beds?
Raised beds have become the default way to grow vegetables, herbs, and flowers, and they earn the popularity. The soil in a raised bed drains sooner and warms faster in spring, so you can plant earlier. Because you fill the bed with fertile soil, you can space plants closer together and harvest more from less ground. You never step on the growing area, so the soil stays loose and uncompacted. Weeds are fewer, watering and weeding are easier on the back, and clearly defined beds and paths are less likely to be trampled by kids and pets.
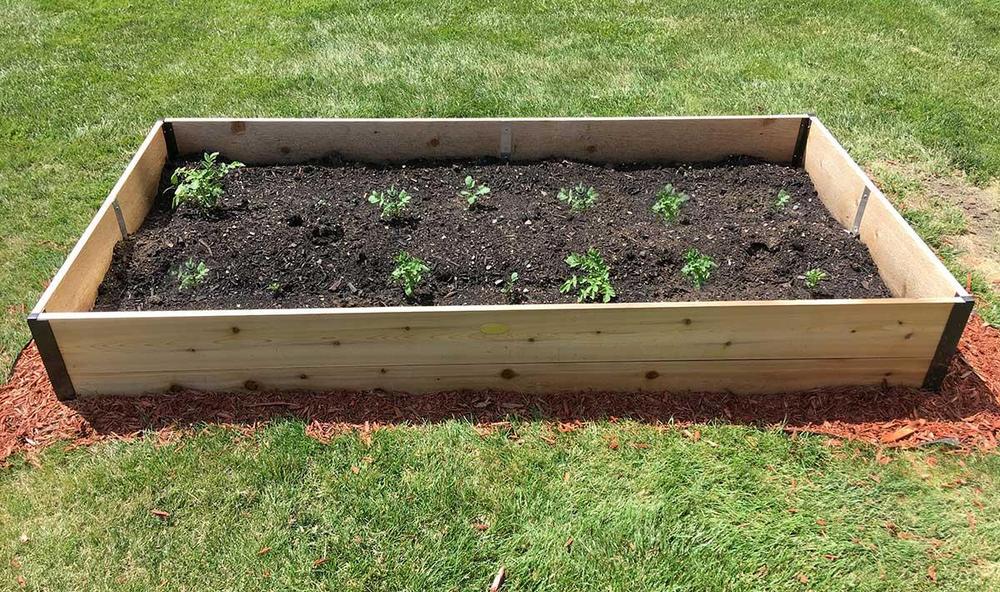
Raised beds come in two basic flavors. Temporary beds are simply mounded soil, shoveled up each spring into any shape you like and raked smooth; they slowly flatten over the season and let you redesign the garden every year. Structured beds hold their shape with a frame of wood, stone, brick, concrete block, metal, or composite lumber, and they are what most people mean by a raised bed today.
Whatever the style, two dimensions matter most. Keep beds no more than 3 to 4 feet wide so you can reach the center from either side without stepping in. And build them at least 10 to 12 inches deep to give roots real room. Length is up to you, though wooden sides longer than 8 feet want a brace at the midpoint to keep them from bowing.
Choosing a Raised Bed Material
Wood is the classic and still the most common choice. Naturally rot-resistant species such as cedar and redwood last far longer than soft woods like pine; see our companion article on naturally rot-resistant woods for a deeper look at the options. Use lumber about 2 inches thick, reinforce the corners with 4-by-4 posts or metal corner brackets, and brace long runs at the midpoint. To stretch the life of the wood, you can treat it with an earth-friendly preservative such as linseed oil or a borax-based product.
A note on treated lumber: the old arsenic-treated (CCA) wood that gave "pressure-treated" its bad reputation was withdrawn from residential sale in 2003. Today's treated lumber uses copper-based preservatives that university extension services consider a much lower risk around food crops. Even so, many gardeners still prefer untreated rot-resistant wood or composite lumber for edible beds, and that is a perfectly sound choice.


Stone, brick, and block make the most permanent beds. Fieldstone or flat stone can be dry-stacked or mortared; brick, pavers, and concrete blocks work the same way. Aim for the same 10- to 12-inch height and 4-foot maximum width. One elegant variation is a 3- to 4-foot-tall masonry wall with a soil-filled planting space in the center: raised high enough to defeat rabbits, quick to warm in spring, and easy to tend standing up. Keep in mind that in a small bed, concrete-based materials can leach lime into the soil and slowly raise the pH.

Metal beds of corrugated steel or aluminum have become popular, especially in urban gardens. The material lasts indefinitely, and the soil inside heats up quickly in spring and stays warmer into fall. The flip side: in summer a small metal bed can get genuinely hot, which stresses cool-soil crops such as spinach, peas, and salad greens. Larger metal beds have enough soil volume to buffer the heat; in smaller ones, favor heat lovers like melons, sweet potatoes, portulaca, and succulents.
Composite and recycled-plastic lumber never rots, never splinters, and never needs staining, which makes it a natural for ground-contact garden projects. More on it below under Materials That Last.
Building and Filling the Bed
Site the bed where it gets full sun, and if it sits on soil, loosen the ground underneath with a shovel or spading fork before you fill it: roots and water will both travel deeper. If mice or voles are a problem in your garden, line the bottom with hardware cloth before adding soil.
Construction of a simple wooden bed is a short afternoon's work: boards about 2 inches thick and 10 to 12 inches wide for the sides, 4-by-4 posts at the corners, and a handful of quality exterior wood screws driven with a power drill. Have the lumberyard cut boards to length if you don't have a circular saw. Square corners and a rectangular shape are all you need.
Fill the bed with a roughly 50:50 mix of compost and topsoil; if the mix still feels heavy, lighten it with some potting soil. For a completely different way to fill a deep bed, using buried wood that feeds the bed as it breaks down, see our article on hugelkultur raised beds.
Elevated beds and garden boxes. Building a bed up on legs, waist high, means no kneeling at all, and it puts the garden out of reach of most critters. A box on legs 2 to 3 feet tall (or a wooden bed stacked that high) is also a good fit for gardeners with limited mobility. In a tall or elevated bed, save soil, weight, and money with a false bottom: set a shelf of exterior-grade plywood about a foot below the rim, drill it generously with drainage holes, and cover the holes with window screen so the soil stays put. A foot of soil is enough for most annual vegetables, herbs, and flowers, and voles cannot tunnel up into the bed. Small boxes work on a balcony or patio, and if your site's sunlight moves around during the day, casters turn a garden box into a sun-seeking machine.

Caring for a raised bed. Raised beds drain well, which also means they dry out faster than ground-level gardens, so water regularly and concentrate water and fertilizer right around the plants. With less soil mass to draw on, plants appreciate regular feeding with an all-purpose fertilizer. Mulch with straw, shredded bark, or another organic material to conserve moisture and suppress weeds. Raised beds are ideal for succession planting: when the early lettuce finishes, pull it and drop in beans. Put tall crops on the north side so they don't shade the rest, grow climbers like pole beans and cucumbers on a trellis at the back of the bed, and let trailers like petunias and lobelia spill over the front edge.
Trellises: Gardening in Three Dimensions
Instead of treating the garden as a flat canvas, think of it as a three-dimensional space. A plant-covered trellis can screen a busy road, create privacy, shade a sitting area, and hide the compost pile, all while taking up almost no ground.

- Clematis 'Elsa Spath'
- Uploaded by mantisOH
The practical benefits are just as real. Vertical growing multiplies what a small space can produce. Vines on a trellis get better air circulation, which discourages fungal disease. Harvests hang clean and visible instead of sprawling in the dirt. A trellis even moderates the wind, slowing gusts that would snap brittle plants like delphiniums, and in cold climates it acts as a snow fence, banking an insulating drift over the flower bed beside it.
Match the plant to the support. Not every vine can climb every structure, so start by figuring out how your vine climbs. Twining plants such as pole beans wrap their stems around a support and do best when the slats are less than 2 inches wide. Tendril climbers such as sweet peas grab with slender threads and need even narrower supports, like netting or wire. Clingers such as many ivies attach with tiny adhesive disks and climb best on natural surfaces like wood or stone rather than shiny vinyl. And "climbing" roses do not truly climb at all; they simply throw long canes that you tie to the trellis, or weave through its openings.
Install the trellis before you plant so you never have to disturb an established root system, and anchor it well: in the soil, against a building, or both. It must carry the weight of the mature plant, wet leaves, wind, and all. Set your new vine a few inches in front of the trellis and tie it loosely to get it started.
A few planting strategies: choose evergreen vines where you want year-round screening, and deciduous ones where you want summer shade but winter sun. Many vegetables come in both bush and vining types, so for vertical growing, make sure you choose the vining or climbing variety.
A Trellis as Garden Architecture
A trellis does more than hold up plants; it reshapes how a garden feels. A latticework screen across the width of a backyard, an idea as old as the gardens of Versailles, divides the space into rooms, and a divided garden reads as larger, not smaller. When a visitor can see only part of the garden and knows it continues beyond the screen, curiosity pulls them through. Different garden styles that would clash side by side can each flourish in their own room: a wild, informal pond garden can live a few steps from a clipped formal lawn when a trellis stands between them.
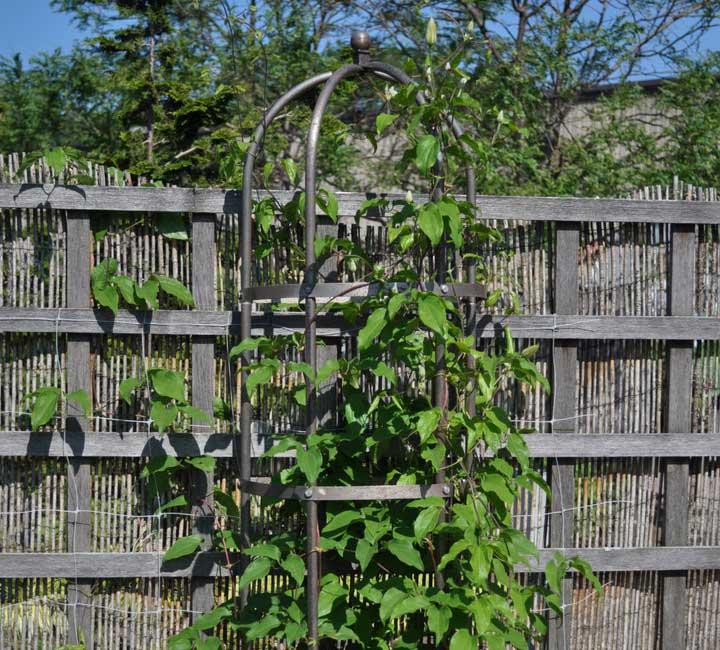
An opening in the trellis aligned with a path creates a focal point and a sense of scale, framing the view like a doorway. The lattice also makes a handsome backdrop that anchors a flower bed to its surroundings, and it offers sturdy support for climbing roses, clematis, Dutchman's pipe, and hardy kiwi. One warning from experience: a long trellis is also a perfect squirrel highway.
Building a latticework trellis. For each 8-foot section you need 12-foot 4-by-4s for posts, 8-foot 2-by-4s for top and bottom stringers, scrap 2-by-4 blocks, and 1-by-2 strapping for the lattice (about 12 horizontal and 12 vertical strips per section). If you plan to paint or stain, do it before assembly. Set the posts about 3 feet deep in concrete, plumb and 8 feet apart. Nail 2-by-4 blocks near the top and bottom of each post to carry the stringers, 8 feet apart vertically, and nail the stringers to them. Center a 1-by-2 flat along each post between the stringers, and nail 1-by-2s along the front edges of the stringers to create a mounting plane. Then build the lattice: nail 12 horizontal 1-by-2s across the front, spaced about 7 1/4 inches on center, and 12 verticals to the back of the horizontals at the same spacing. Repeat for each section. A very long trellis catches a lot of wind; breaking the run by offsetting a section or two a couple of feet from the main line adds both interest and stability.
Materials That Last
Every outdoor structure eventually faces the same enemy: rot. You have three honest choices: naturally rot-resistant wood, treated wood, or no wood at all.
Naturally rot-resistant woods such as cedar and redwood are the traditional favorites, and for good reason. Our companion article on naturally rot-resistant woods covers the choices, including what to know about sustainability, in detail.
Composite and recycled-plastic lumber has matured from a curiosity into a mainstream building material. It comes in three broad types: lumber made from 100 percent recycled plastic (mostly the high-density polyethylene of milk jugs), wood-plastic composites that blend roughly equal parts plastic and wood fiber (the familiar decking boards, such as Trex), and fiberglass-reinforced plastic lumber engineered to carry structural loads. In the garden, these materials shine anywhere wood touches soil: raised bed sides, edging, stakes, retaining walls on a slope, boardwalks, arbors, and outdoor furniture that can sit out in the weather for years.
The advantages are simple: no rot, no splinters, no annual staining or sealing, and a use for plastic that would otherwise sit in a landfill. The trade-offs are worth knowing before you build. Plastic lumber is heavier than wood, two to three times as much for some products, and it expands and contracts noticeably with temperature, so follow the manufacturer's specified gaps between boards. It can soften slightly and get hot in strong sun (lighter colors stay cooler), and unreinforced plastic lumber lacks wood's stiffness, so decking generally needs closer joist spacing or a structural frame of treated wood or reinforced plastic. You can work it with ordinary carpentry tools; use sharp carbide blades (a dull blade can melt the plastic), fasten with stainless steel screws in predrilled holes, and wear a dust mask when cutting.
Landscape Fabrics: The Quiet Weed Barrier
Around trees and shrubs, under decks, patios, and gravel paths, a landscape fabric can eliminate weeding for years without herbicides. These woven or spun-bonded synthetic fabrics form a physical barrier against weeds, but unlike sheet plastic they breathe, letting water and air through to the roots. Research at Virginia Tech found that trees and shrubs surrounded by landscape fabric grow as well as those without it, minus the weed competition.
Fabrics are the wrong tool for annual and perennial flower beds: all the planting holes invite weeds in, and many perennials cannot spread and fill in properly through fabric. Nor are they invincible; tough perennial weeds like Bermuda grass and nutsedge eventually punch through even the best fabric.
To install, clear the area of existing weeds, lay the fabric after planting so you can fit it neatly around each plant, overlap pieces at least 6 inches, and anchor with metal pins. Most fabrics are UV-stabilized and last five years or more even exposed, but a mulch topping looks better. Keep organic mulch over fabric to about an inch deep; any deeper and weed seeds germinate happily in the mulch itself, and pulling their roots tears the fabric apart. The best weed-suppressing topping is decorative stone or rock, though soil under stone runs drier. When comparing fabrics, hold them up to the light: the less light shines through, the smaller the pores, and the better the fabric resists weed and root penetration.
Build a Dry Well for Runoff
When it rains buckets, a dry well (or catch basin) tames the runoff from downspouts, driveways, and patios: it slows the water down, channels it away from the house, prevents erosion, and gives the soil time to absorb it.
A dry well is simply a box buried in the ground under a downspout, with a removable grate on top that lets runoff in while keeping leaves, silt, and curious animals out, and a drainpipe partway up one side to carry overflow away. Commercial heavy-duty plastic catch basins (typically 9 or 12 inches square and a foot deep) are sold at landscape and lumber suppliers and connect to 3- to 4-inch flexible drainpipe.
A homemade dry well is better: bigger, so heavy rains don't overwhelm it, and open-bottomed, so light rains simply percolate into the soil. Build a 2-foot-square box from 2-by-6s or plastic lumber. Cut a 3-inch hole in one side, 6 to 8 inches up from the bottom, fit a 3-inch flexible drainpipe sealed with pipe sealant, and run the pipe in a trench away from the house to a swale or low spot. Line the bottom of the box with 2 to 3 inches of 1-inch stone or gravel, and top it with a grate of wood or rebar slats spaced 1 to 2 inches apart. Each fall, scoop the leaves and silt out of the bottom so the outlet pipe stays clear.
The Finishing Touch
Once the beds are built and the trellis is up, consider how the garden looks after dark: a few well-placed low-voltage fixtures can carry all that structure into the evening. Our companion article Light Up Your Landscape covers landscape lighting design in depth.
Good structures repay the weekend it takes to build them for years: earlier planting, bigger harvests from less space, fewer weeds, and a garden that looks intentional in every season. Pick one project, and build it well.
